Documentation
Tuturn - Online Tutors Marketplace WordPress Theme
Thank you so much for purchasing our item from the Themeforest.
- Version: 3.8
- Author: AmentoTech
- Created: 19 May, 2022
If you have any questions that are beyond the scope of this help file, please feel free to email via Item Support Page.
Things You Must Have
We recommend below PHP configurations to avoid errors like blank screen, demo content import fails or theme installation error. You can do below configuration changes yourself or contact your hosting provider and ask them to set below configurations.
- PHP Version Should be > 8.1
- PHP Zip Extension Installed
- upload_max_filesize 100M
- post_max_size 128M
- max_execution_time 300
- memory_limit 512M
- max_input_vars 3000
- max_input_time 300
Tip: You can check PHP configuration settings by installing WordPress phpinfo() extension in WordPress. You can also contact your hosting provider if you don’t know much more about it.
Download & Installations
Overview
Tuturn is tutors Marketplace WordPress theme. It has been designed after thorough research to cater to the requirements of people interested in building online tutions centers and tutors marketplace. Students can find available online tutors and unlock any tutor profile to get online tuition.
Downloading
Follow the steps below to set up your WP Tuturn Theme:
When downloading the zip package file from Themeforest, you'll have all the files you need inside. The zip package contains the following files:
- tuturn.zip contains the theme
- tuturn-child.zip contains the child theme
- documentation folder (It contains documentation for the theme)
- plugins.zip include required and recommended plugins. Plugins are also prepacked in the theme
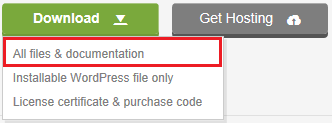
To install this theme you must have a working version of WordPress already installed. For more information regarding installing the WordPress, please visit below mentioned URL Installing Wordpress
Theme Installation
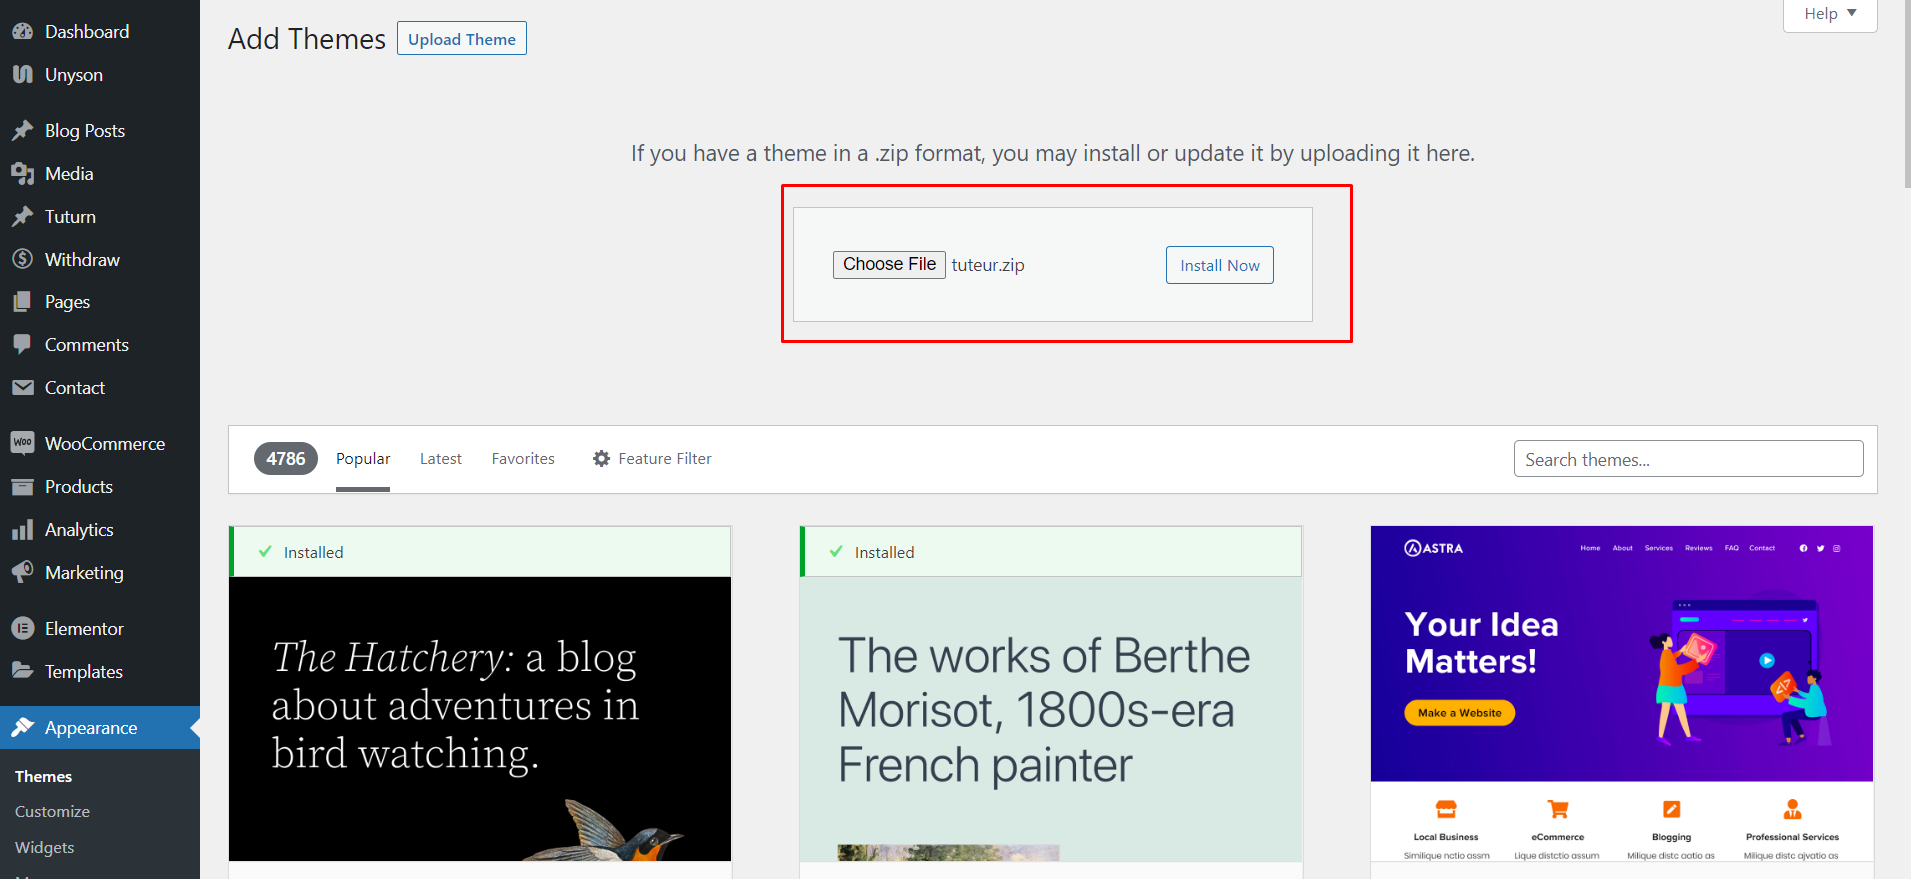
- Navigate to Appearance > Themes
- Click Add New button and finally hit the Upload Theme
- Click on Choose File and find the "tuturn.zip" file on your computer and click Install Now button
- The theme will be uploaded and installed.
- For Activating the theme, Go to Appearance > Themes and activate the installed theme
Plugin Installation
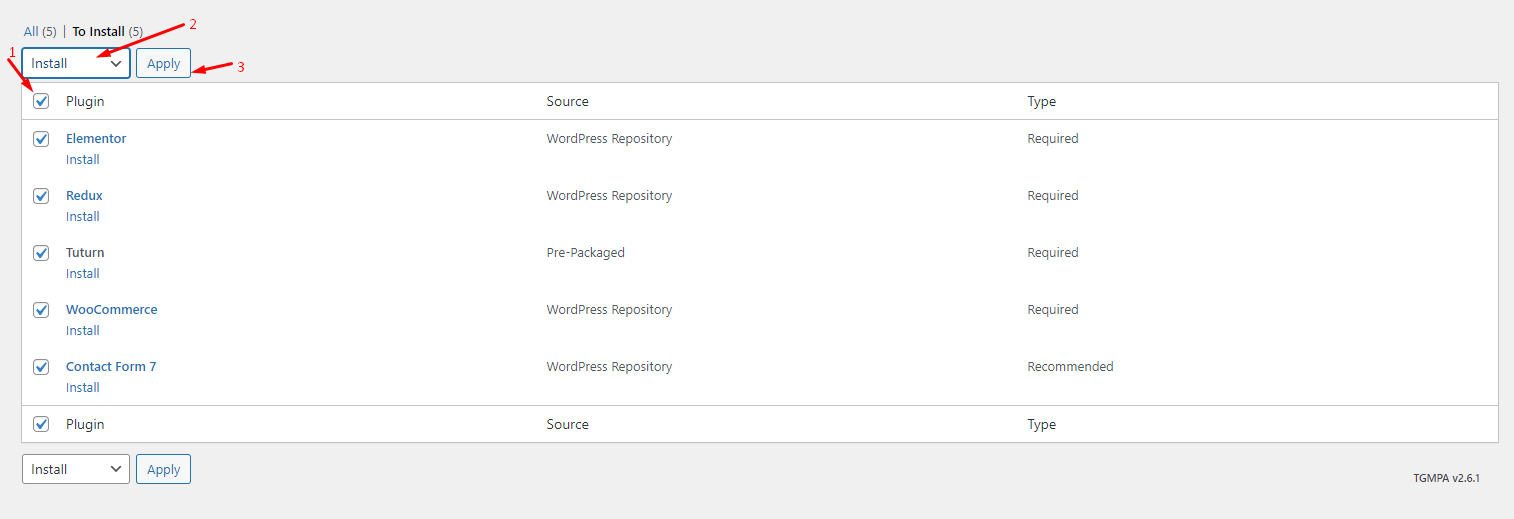
Click on Begin installing plugins

Simply select all plugins and install them.
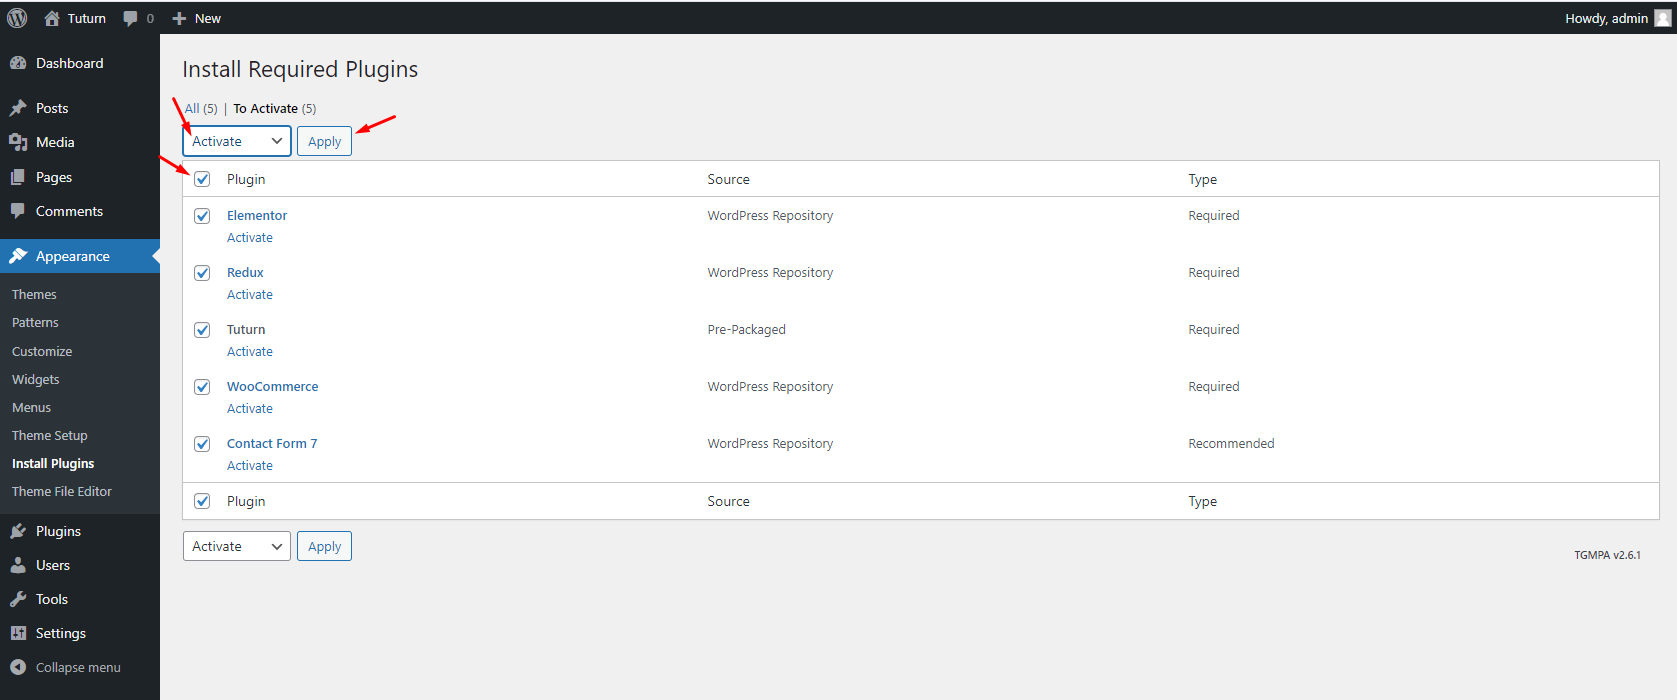
Once you've installed the plugins, choose them all and click Activate.
WooCommerce Setting
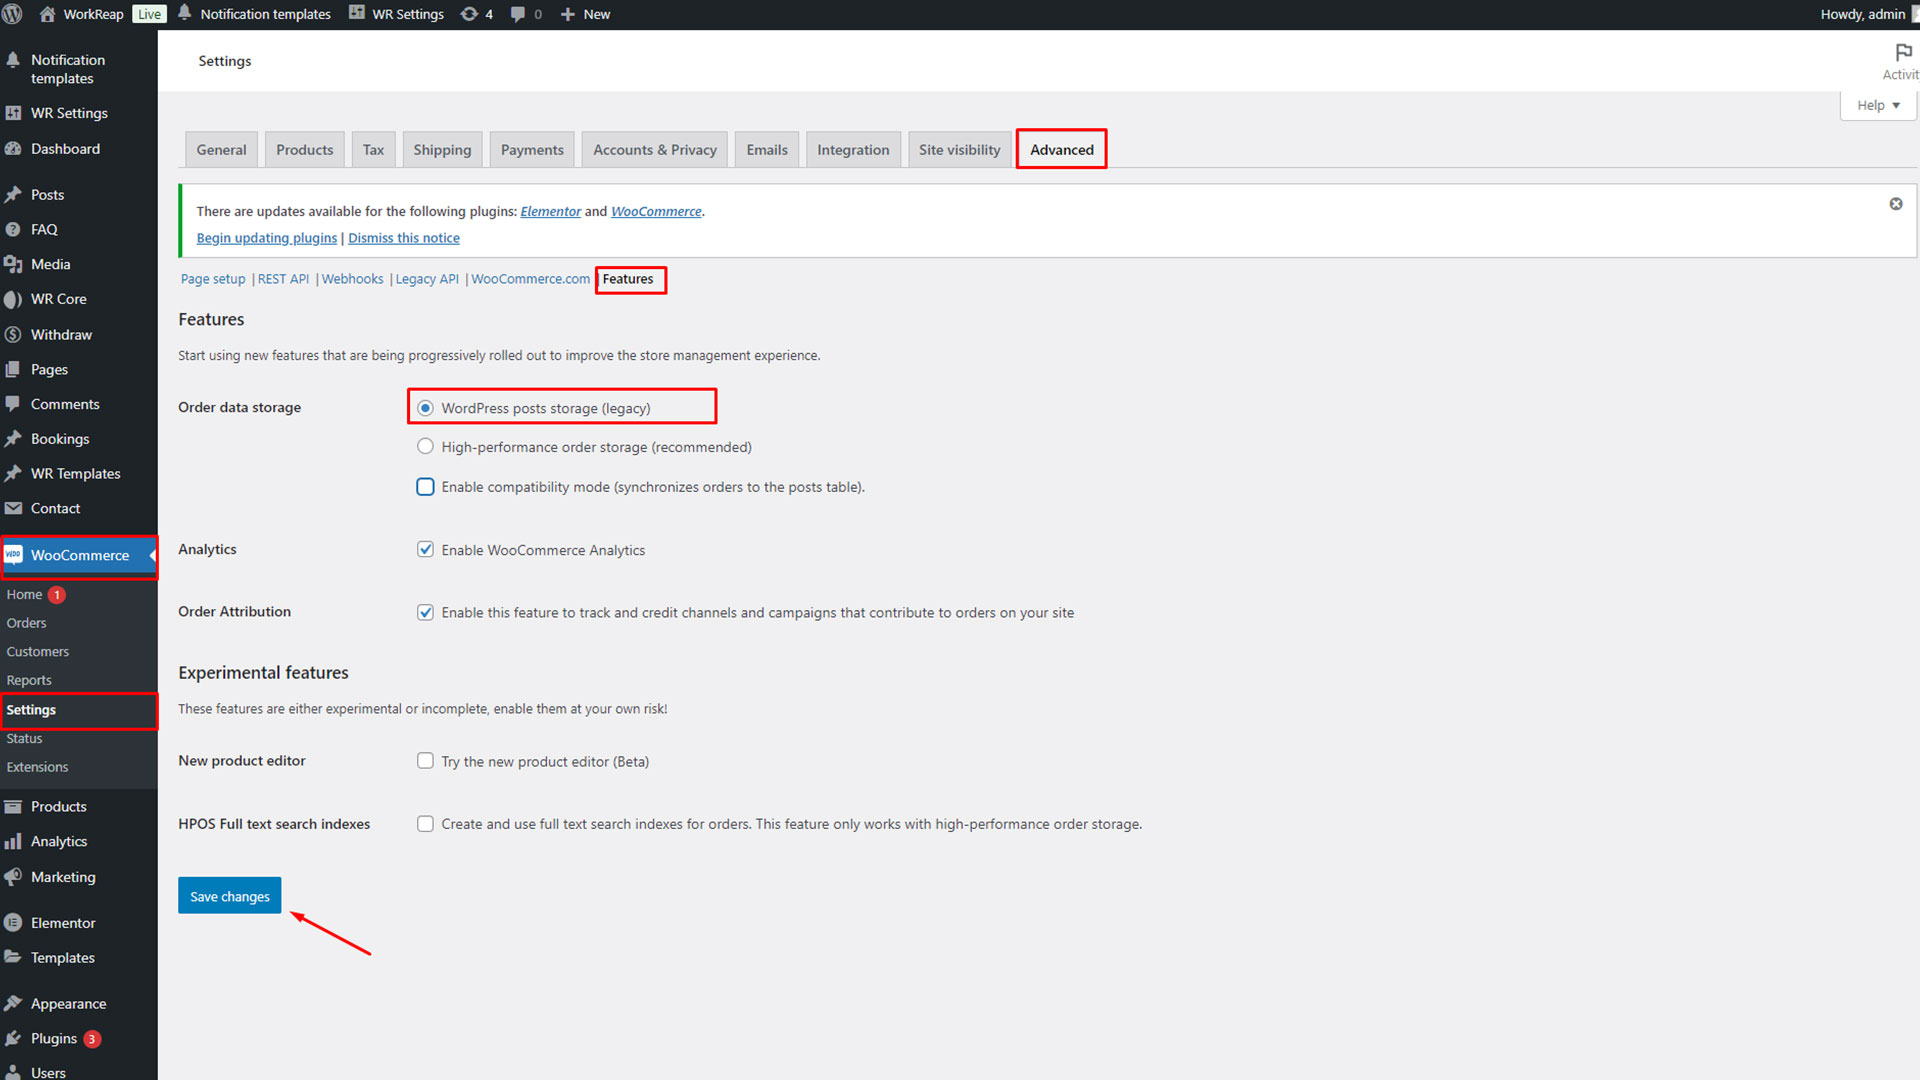
After installing and activating the Tuturn required plugins, go to WP Admin > WooCommerce > Settings > Advanced > Features, and set the order data storage to WordPress post storage.
Demo Installation Steps
To install the demo data, go to Appearance and click on Demi menu.
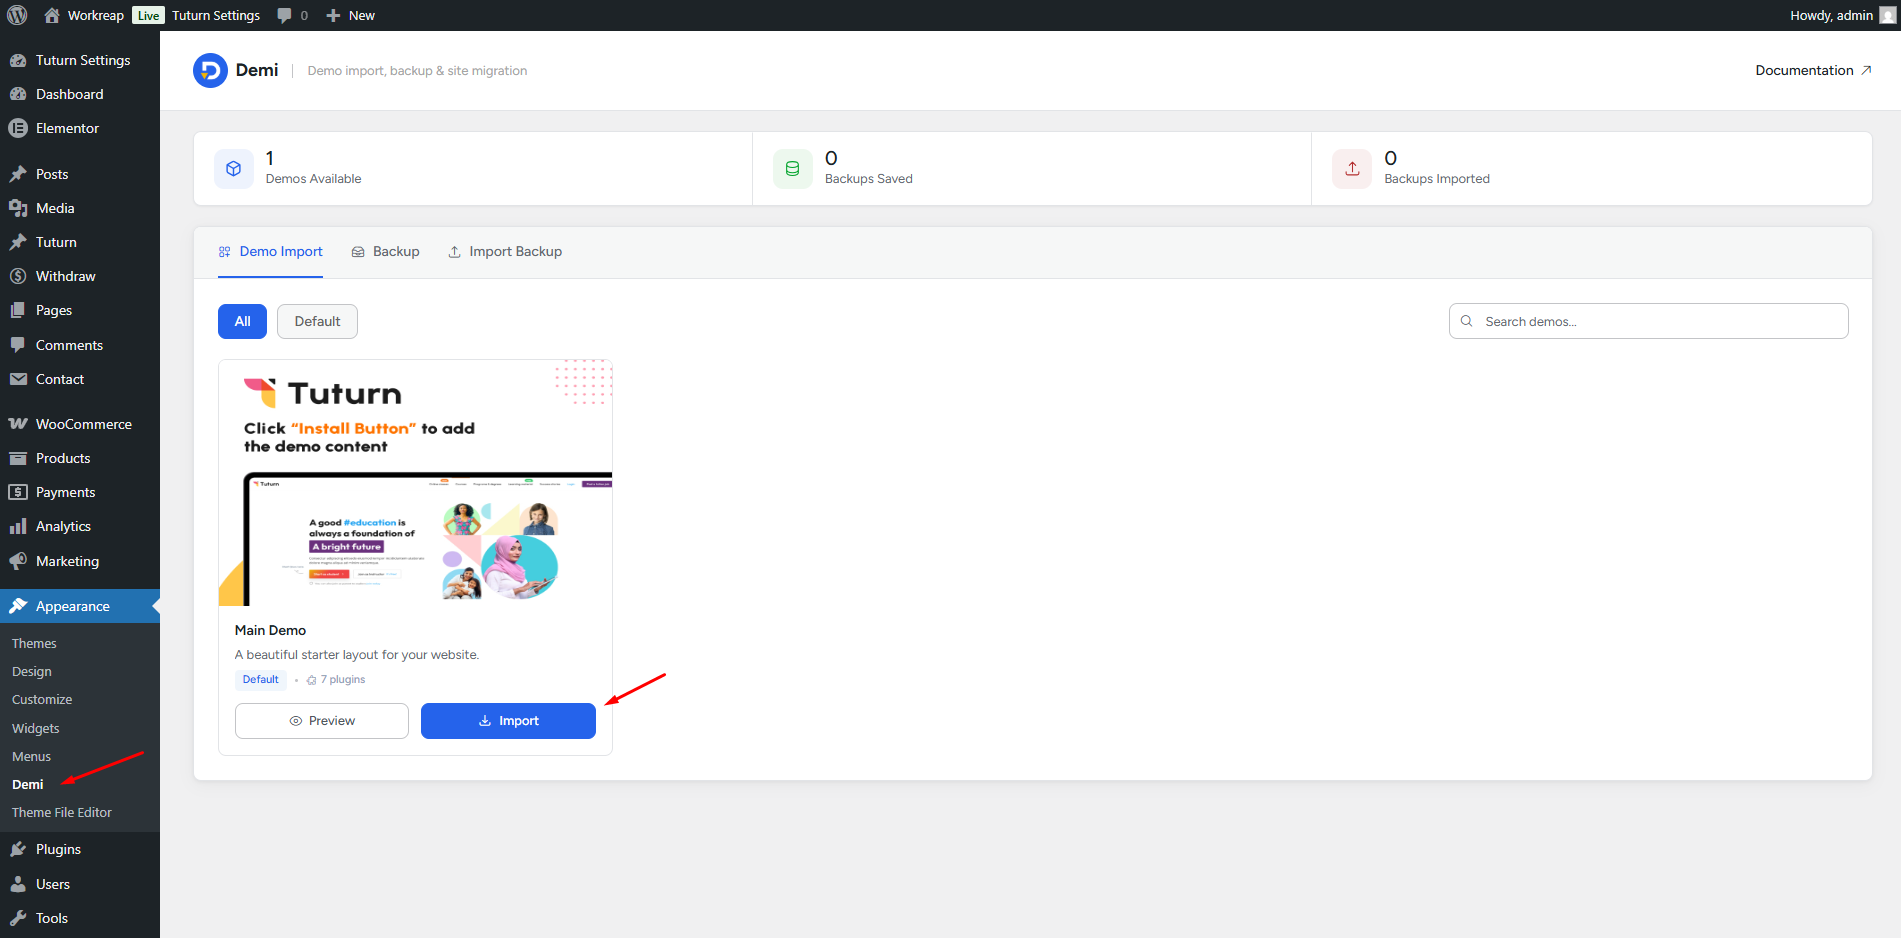
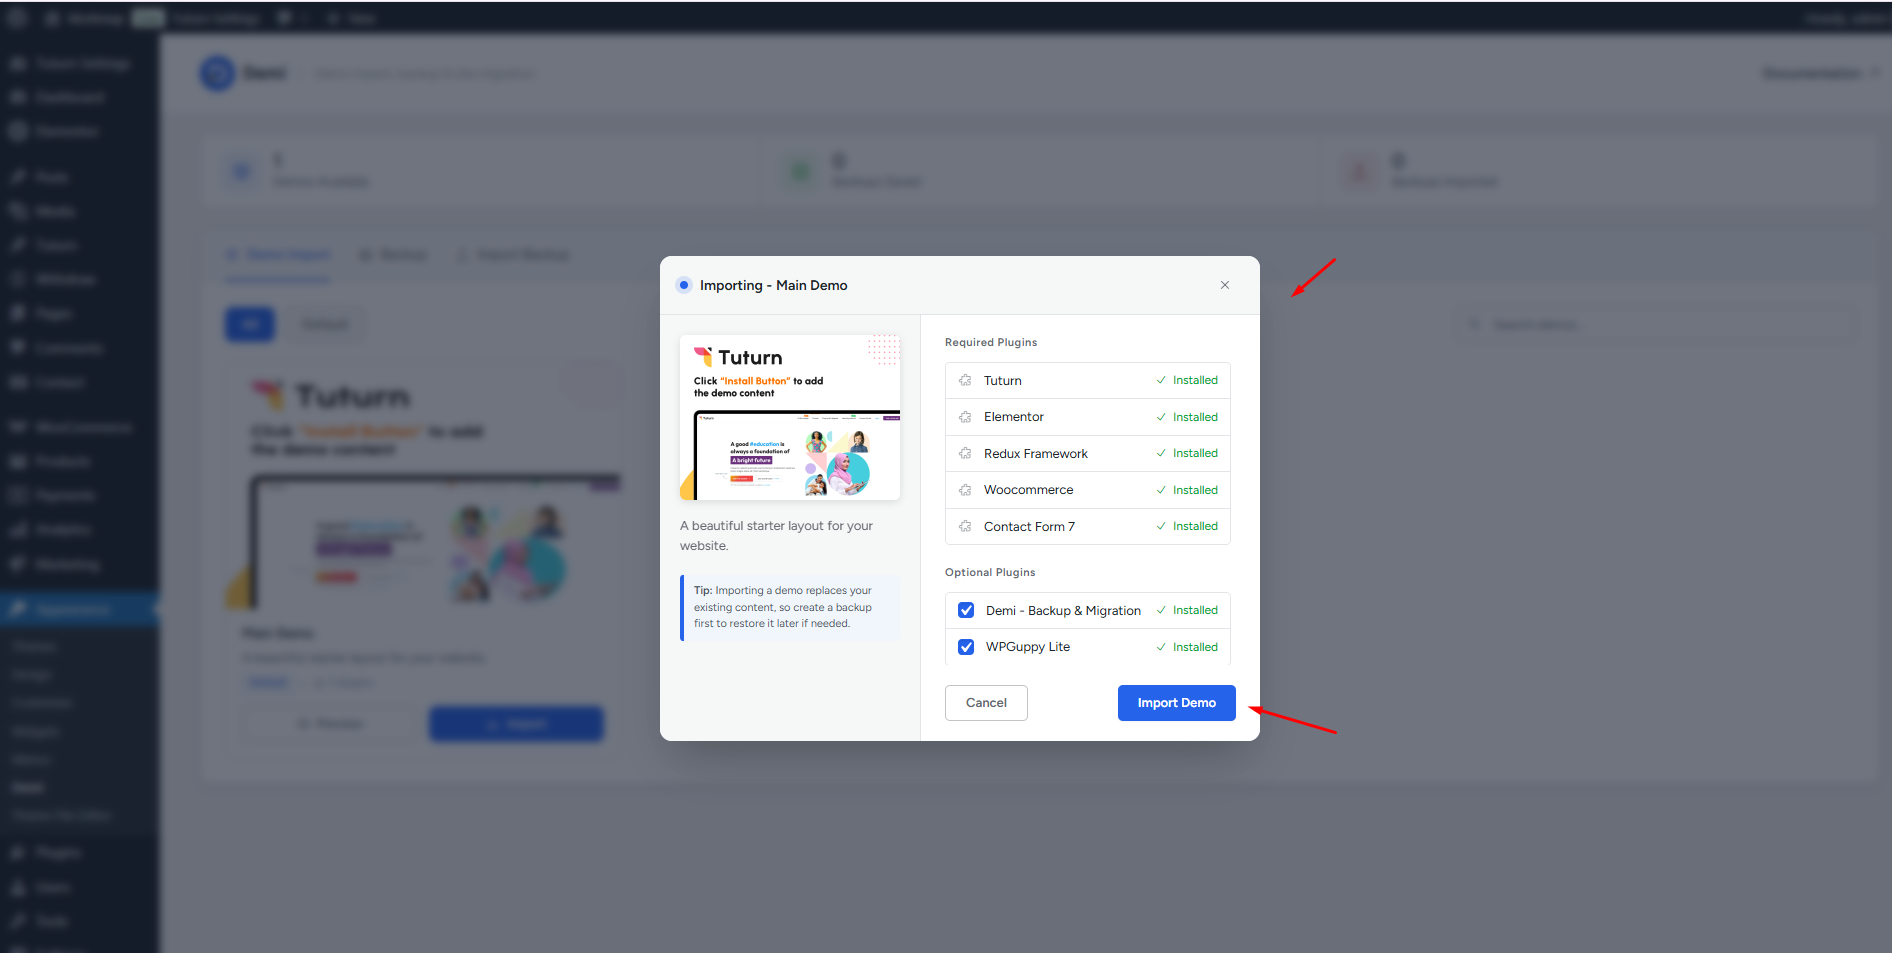
After click on Import button, you will see the popup modal. Click on Import Demo button to import the demo data.
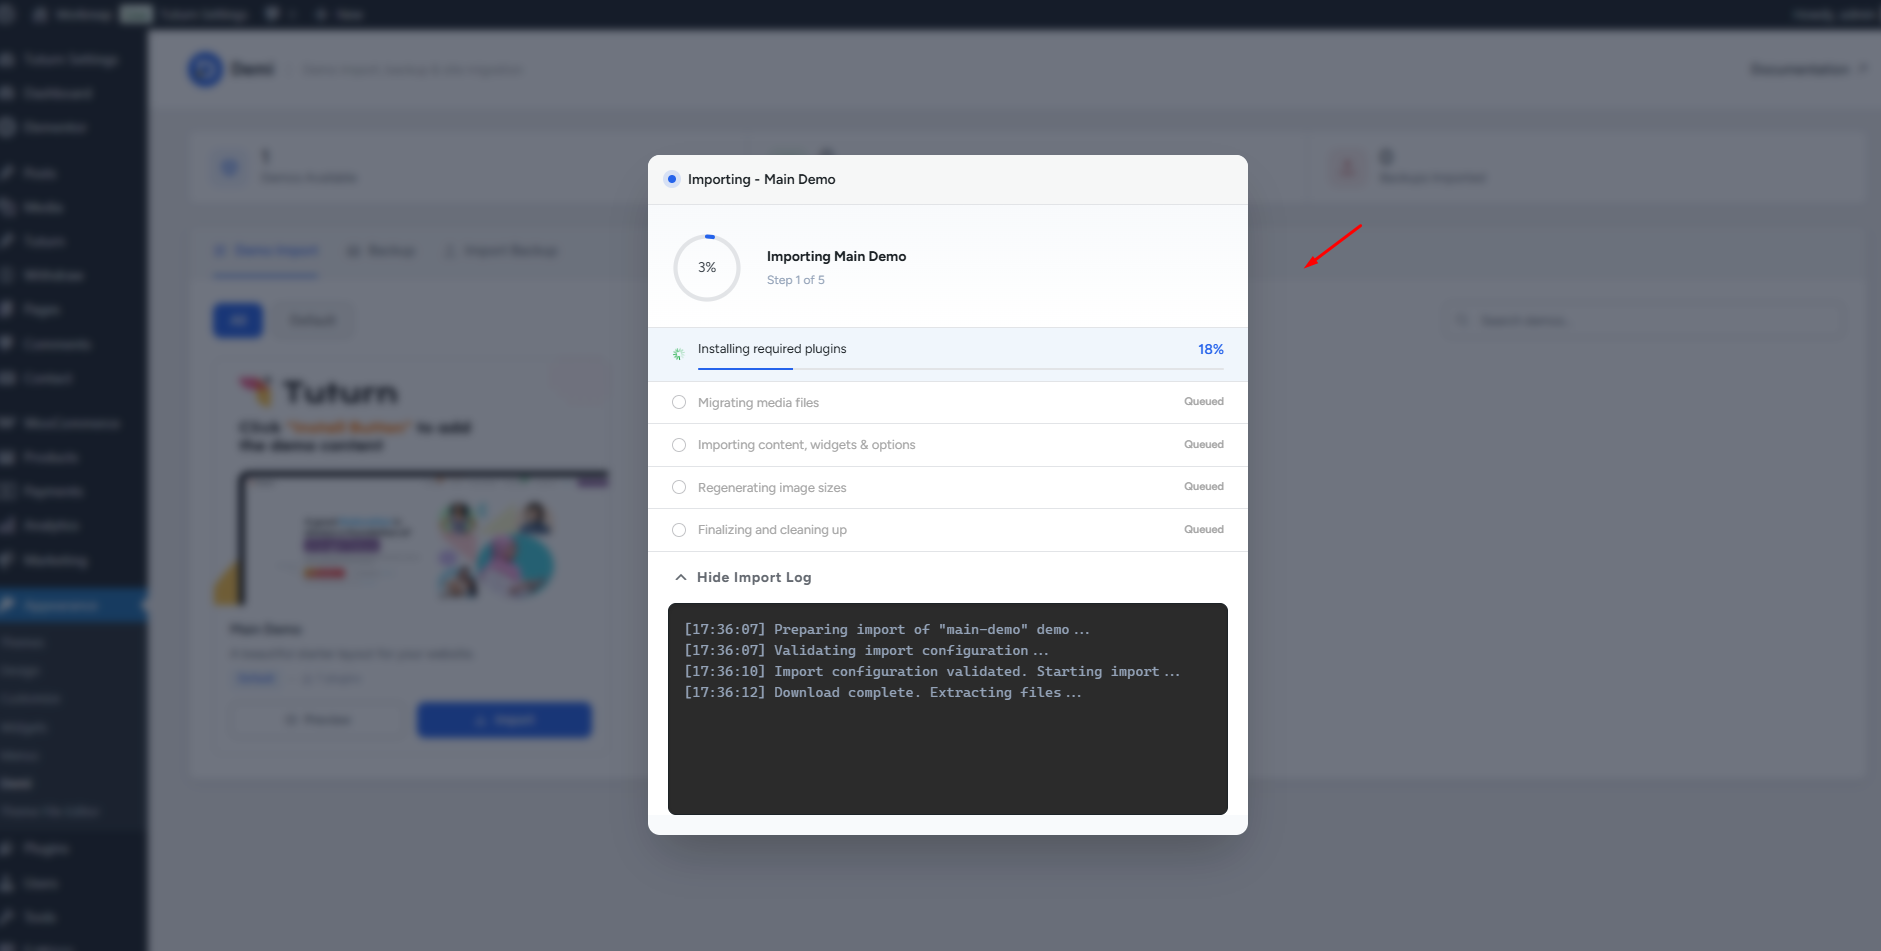
After clicking on Import Demo button, wait sometime to complete the import process.
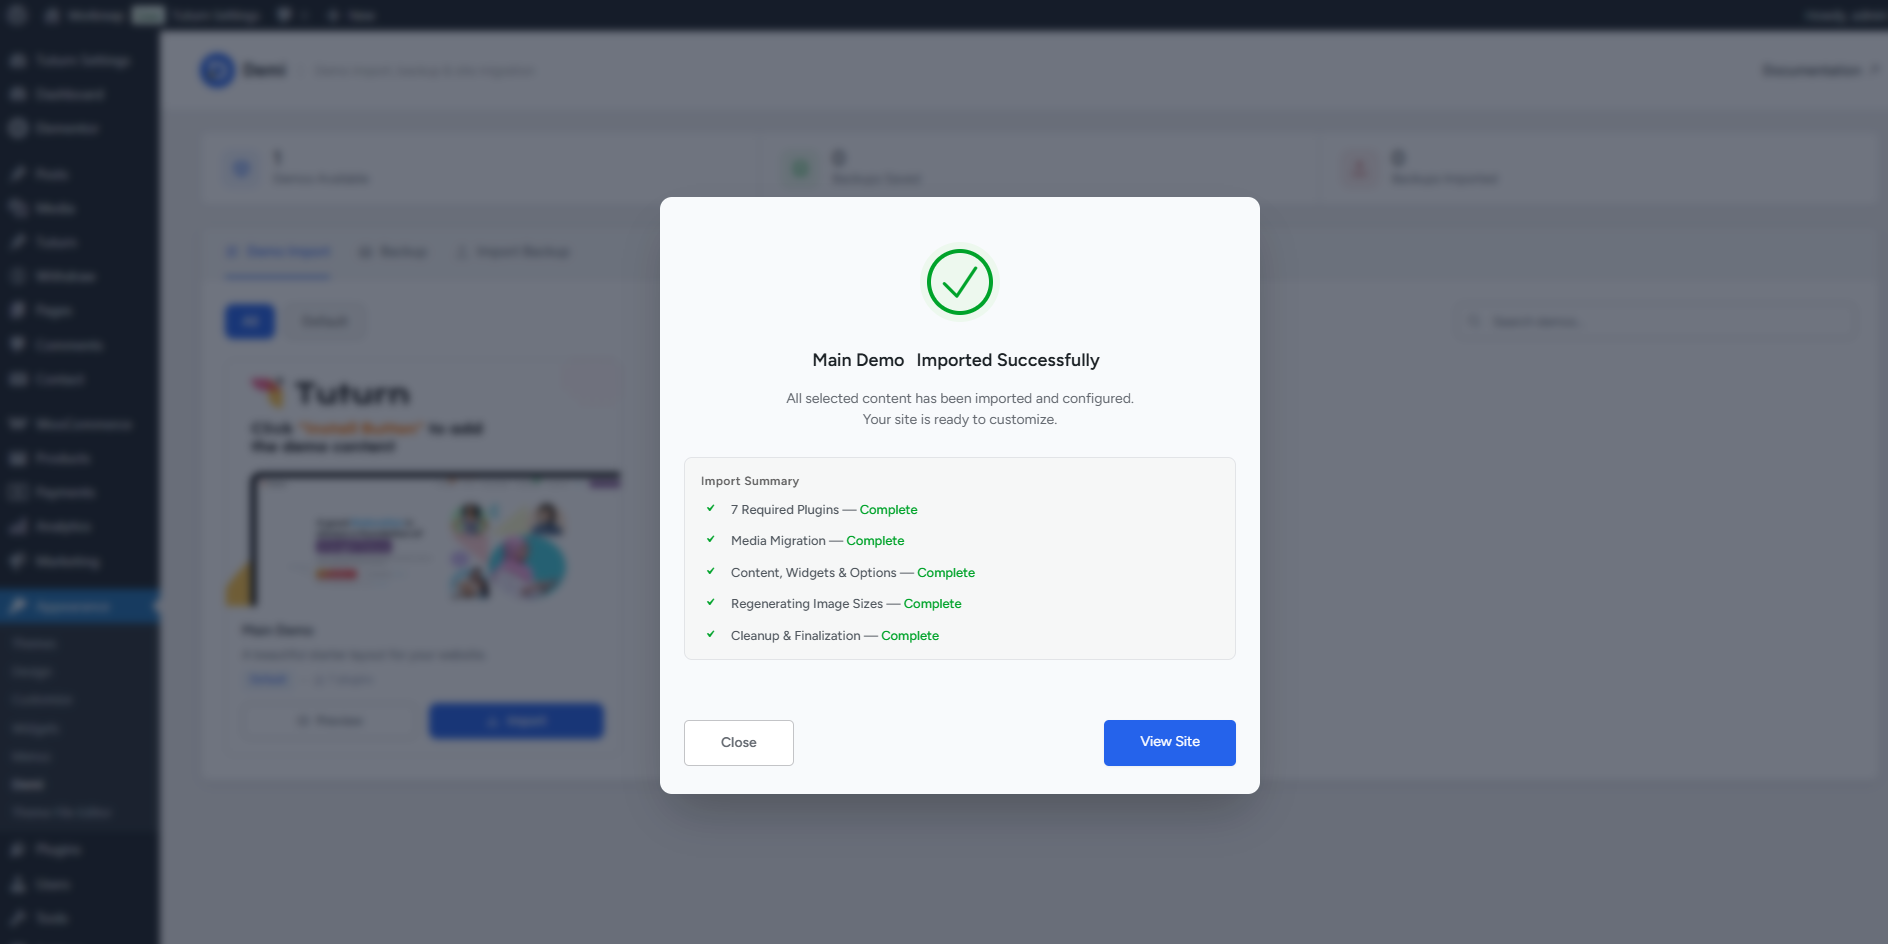
After completing all the required processes for the demo import, the final screen will appear. Your demo data has now been installed successfully.
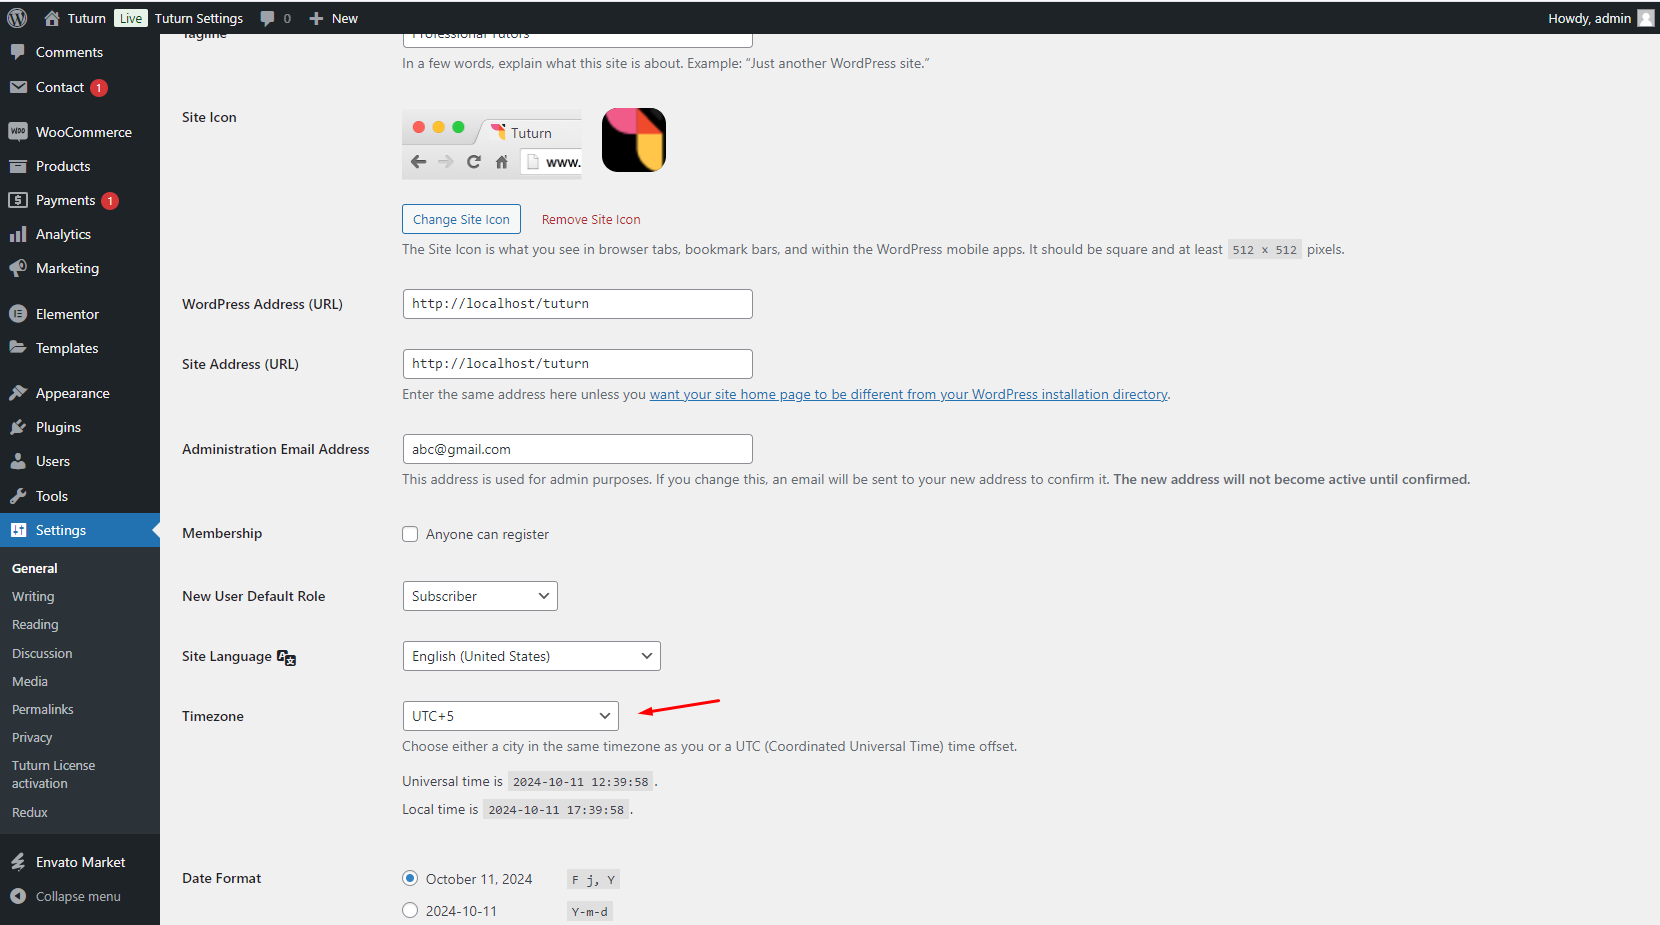
After installing the demo data, navigate to Settings → General and set the Date format and Time format according to your needs and save the changes.
After doing above, navigate to WordPress Dashboard → Appearance → Settings → Permalinks. Save the permalinks. Your site is now ready.
Import Dummy Users
To import dummy users, navigate to your WordPress administrator dashboard, then go to Tuturn > Import user. Click on the Import dummy button to import the demo users.
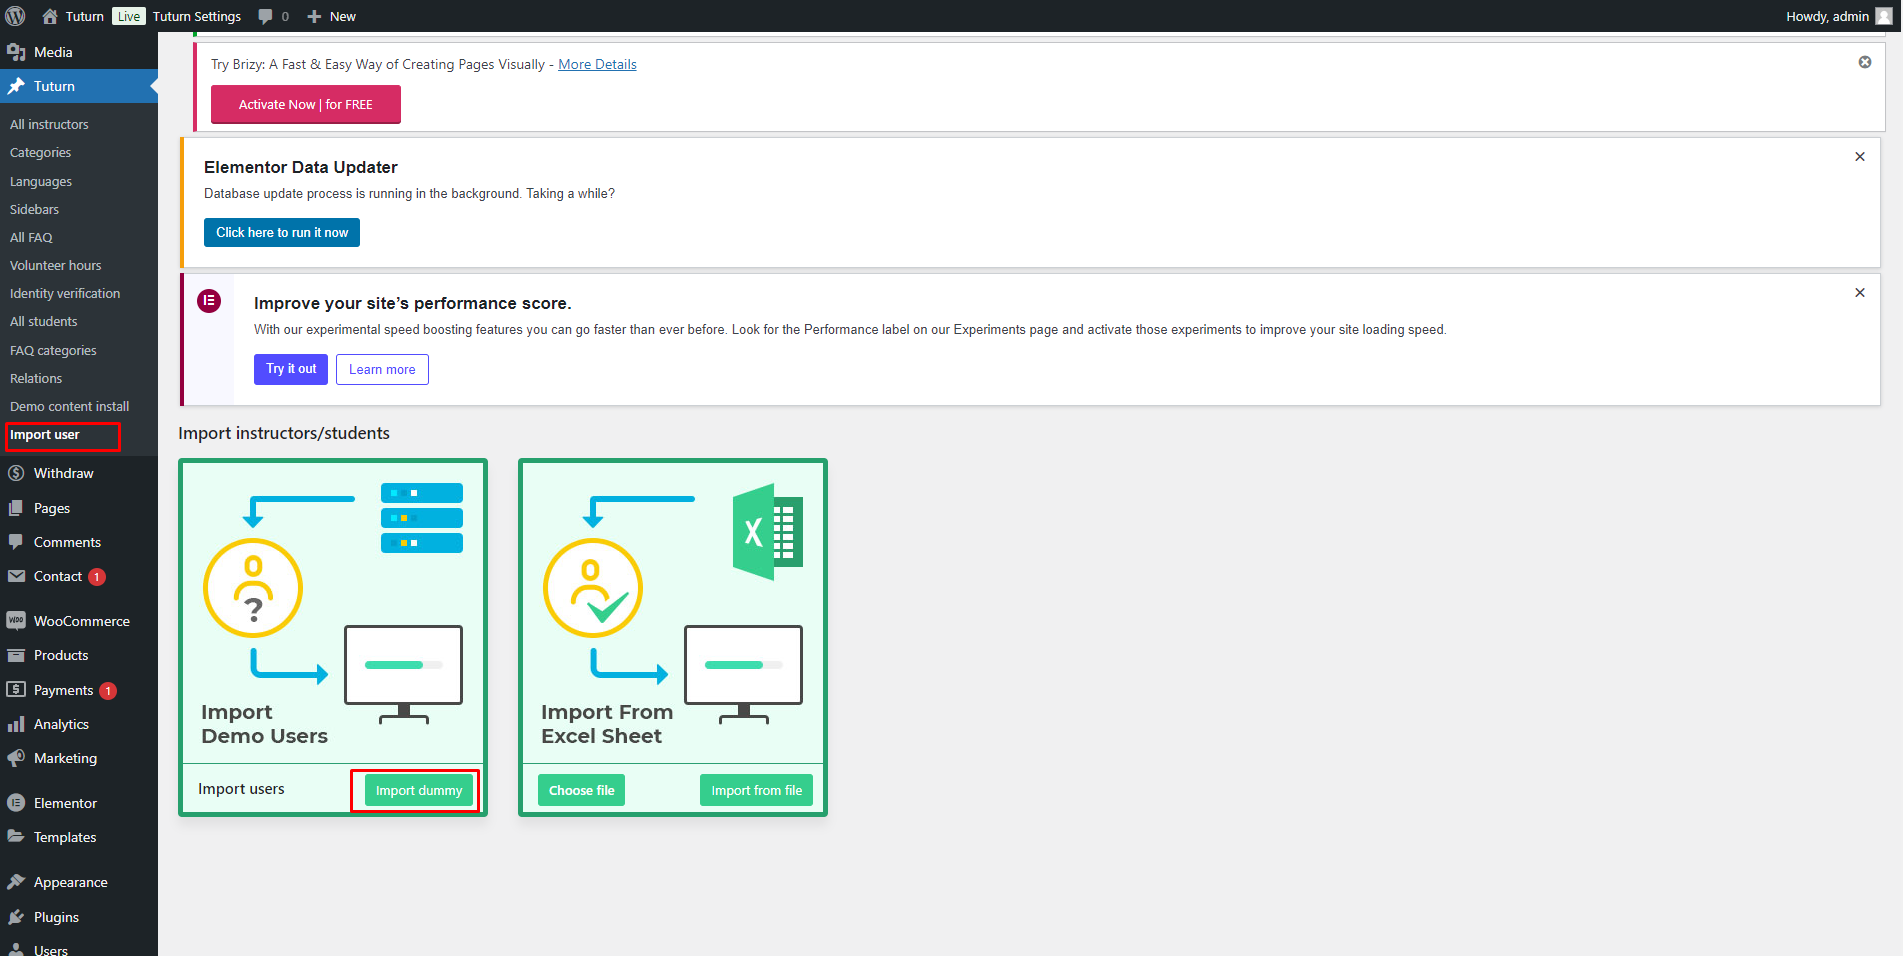
Import dummy users and enjoy your site with demo content and customize it according to your needs! If you need any further assistance, feel free to contact us.
Set timezone
Set the timezone according to your region. This step is crucial and is used during the creation of instructor booking intervals.
Theme settings
404 page settings
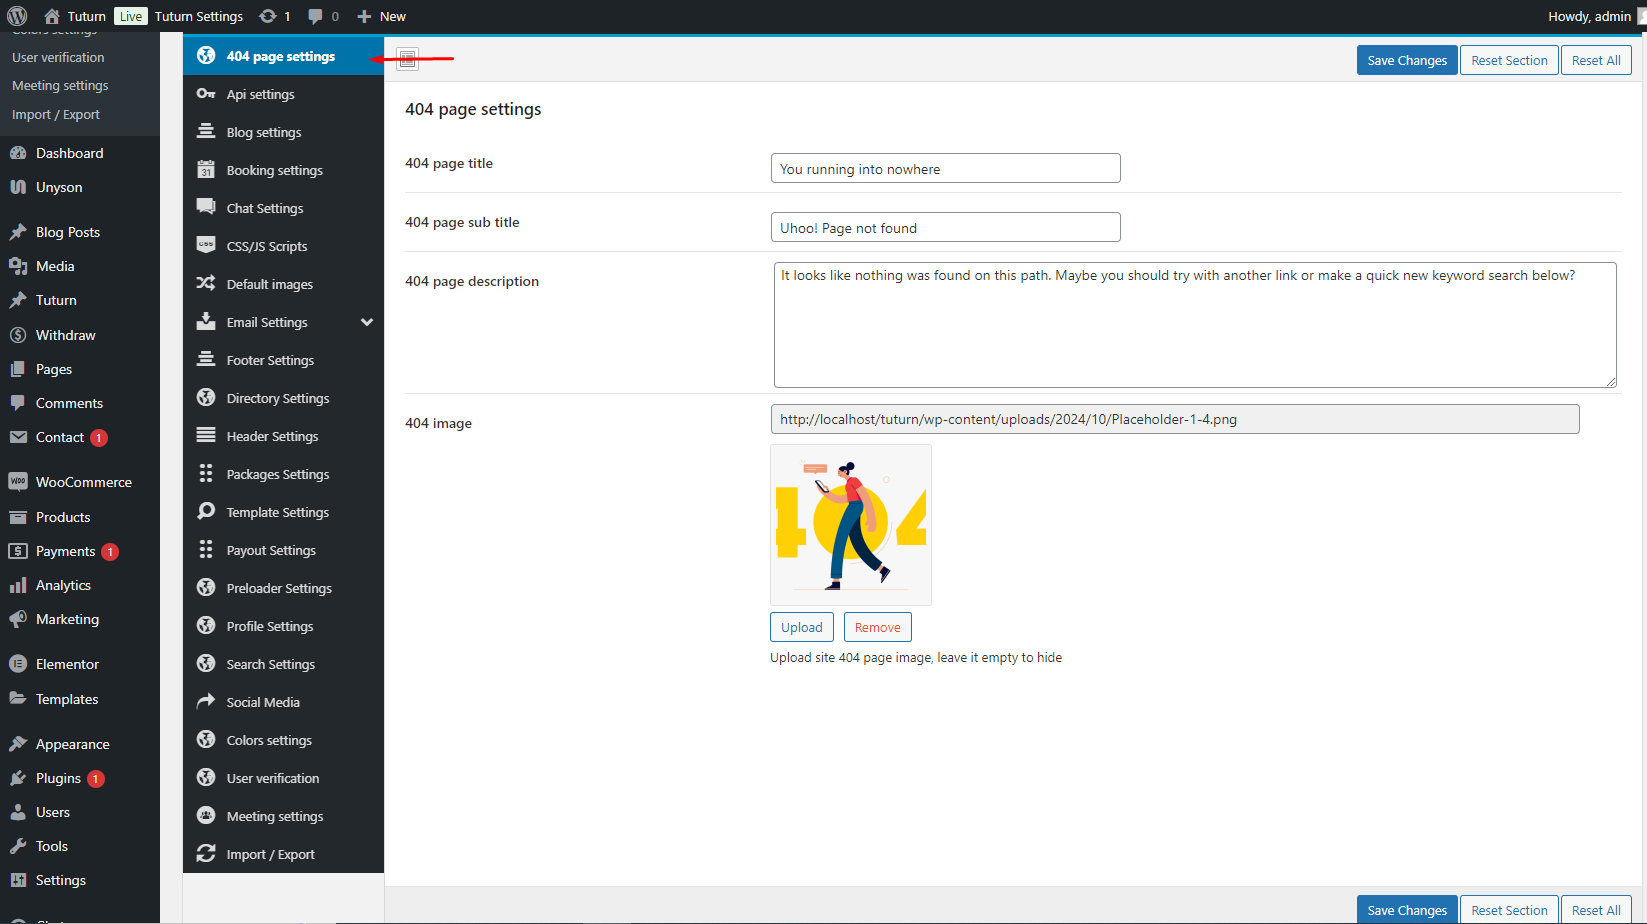
In this section, you can set the content that will appear when a visitor tries to access a page that doesn't exist on your website.
Api settings
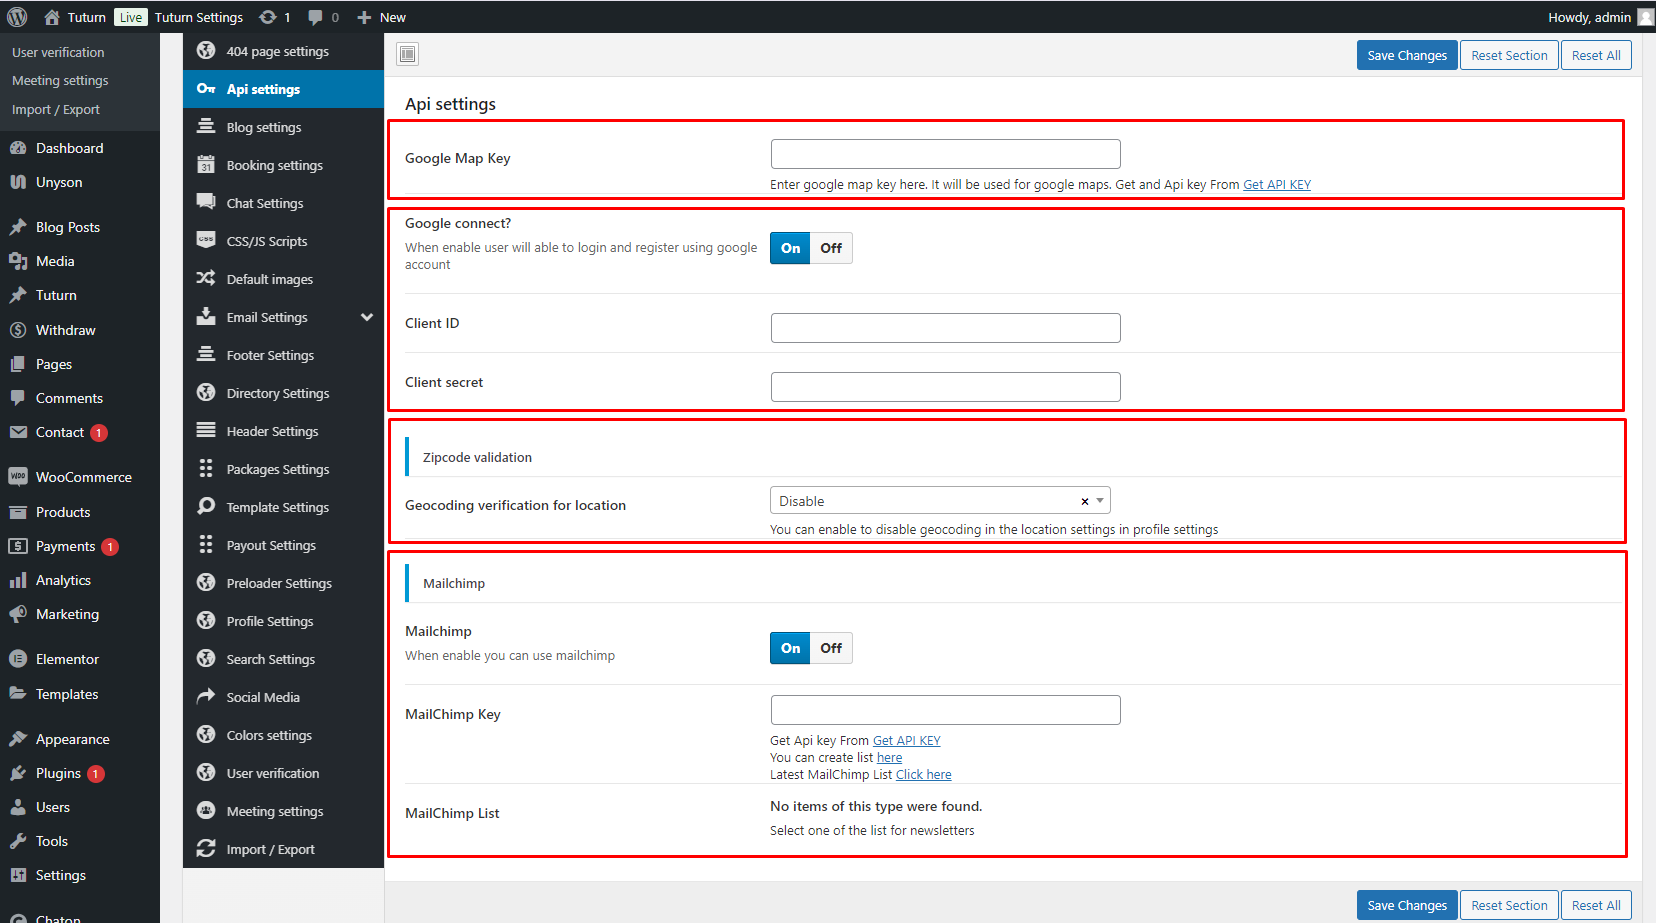
You can adjust the API settings for Map key, Google Connect, Zip Code, and MailChimp within the theme options panel.
Option 1: To use the Map feature, you need a Google Map API Key. Simply insert your API key, and save the settings.
Option 2: In this option, you can enable the Google login/register feature. You need to have a Google Client ID and Secret Key to enable this feature. Simply enable the switch button, insert the keys, and save the changes.
Option 3: In this option, you can enable the MailChimp feature. Simply enable the switch button, insert the keys, choose the list and save the changes.
Blog settings
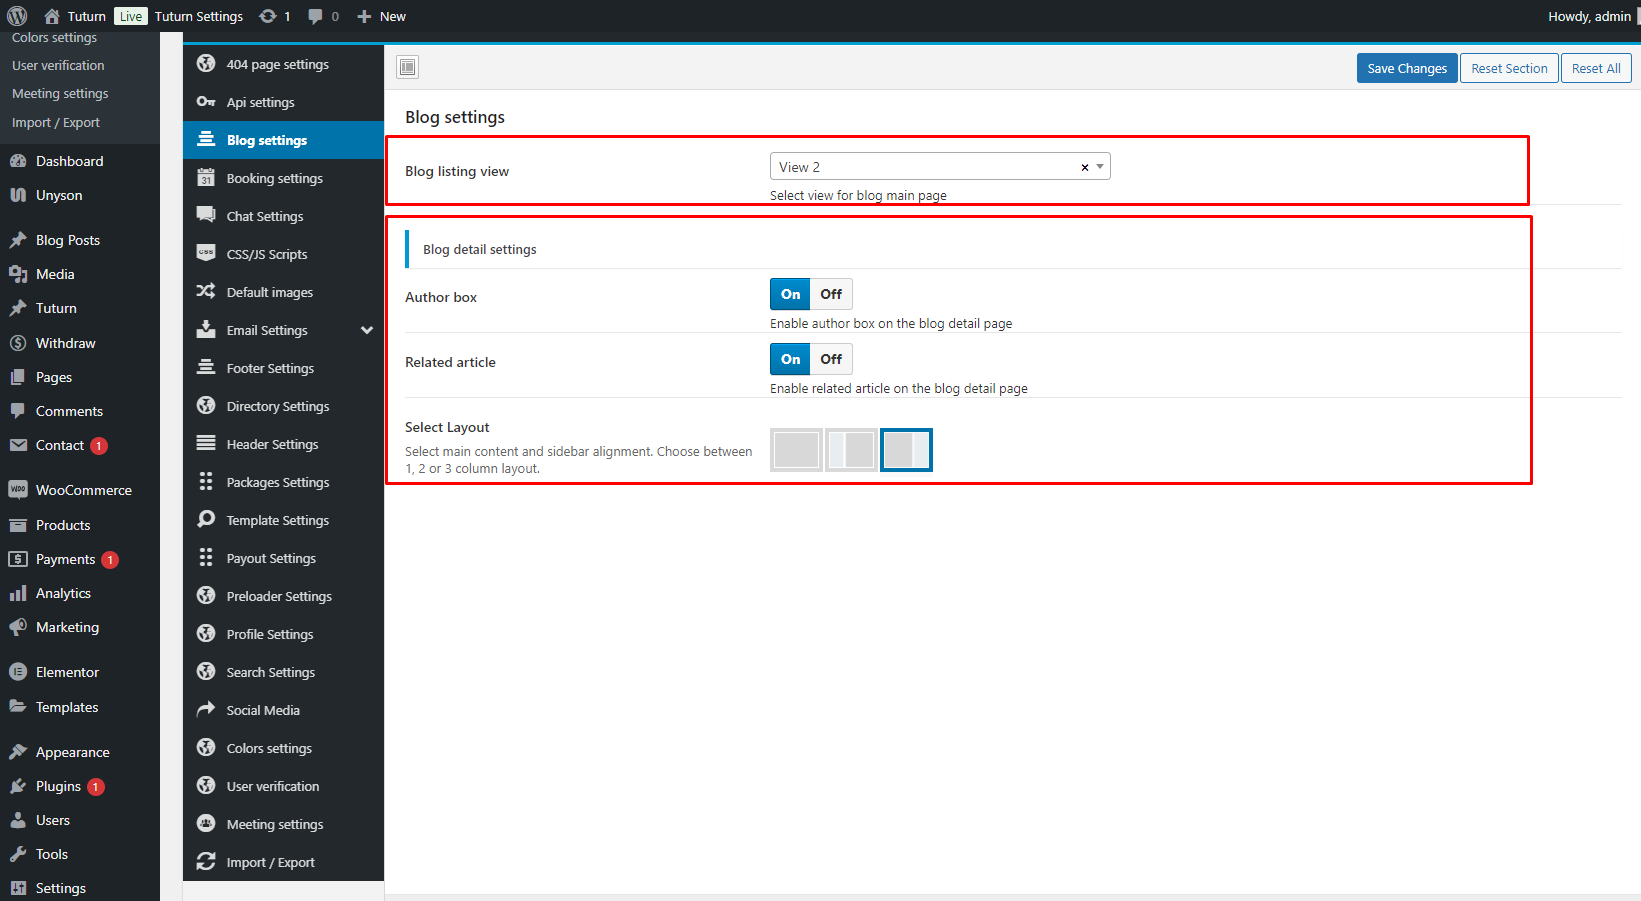
You can adjust the settings for Blog List & Detail page.
Option 1: To set the required blog post list view simply choose the requreid option and save the settings.
Option 2: On the blog detail page, you can toggle the switch to show or hide the Author box and Related Articles. Additionally, you can choose the desired layout, either with or without a sidebar, and save your changes.
Booking settings
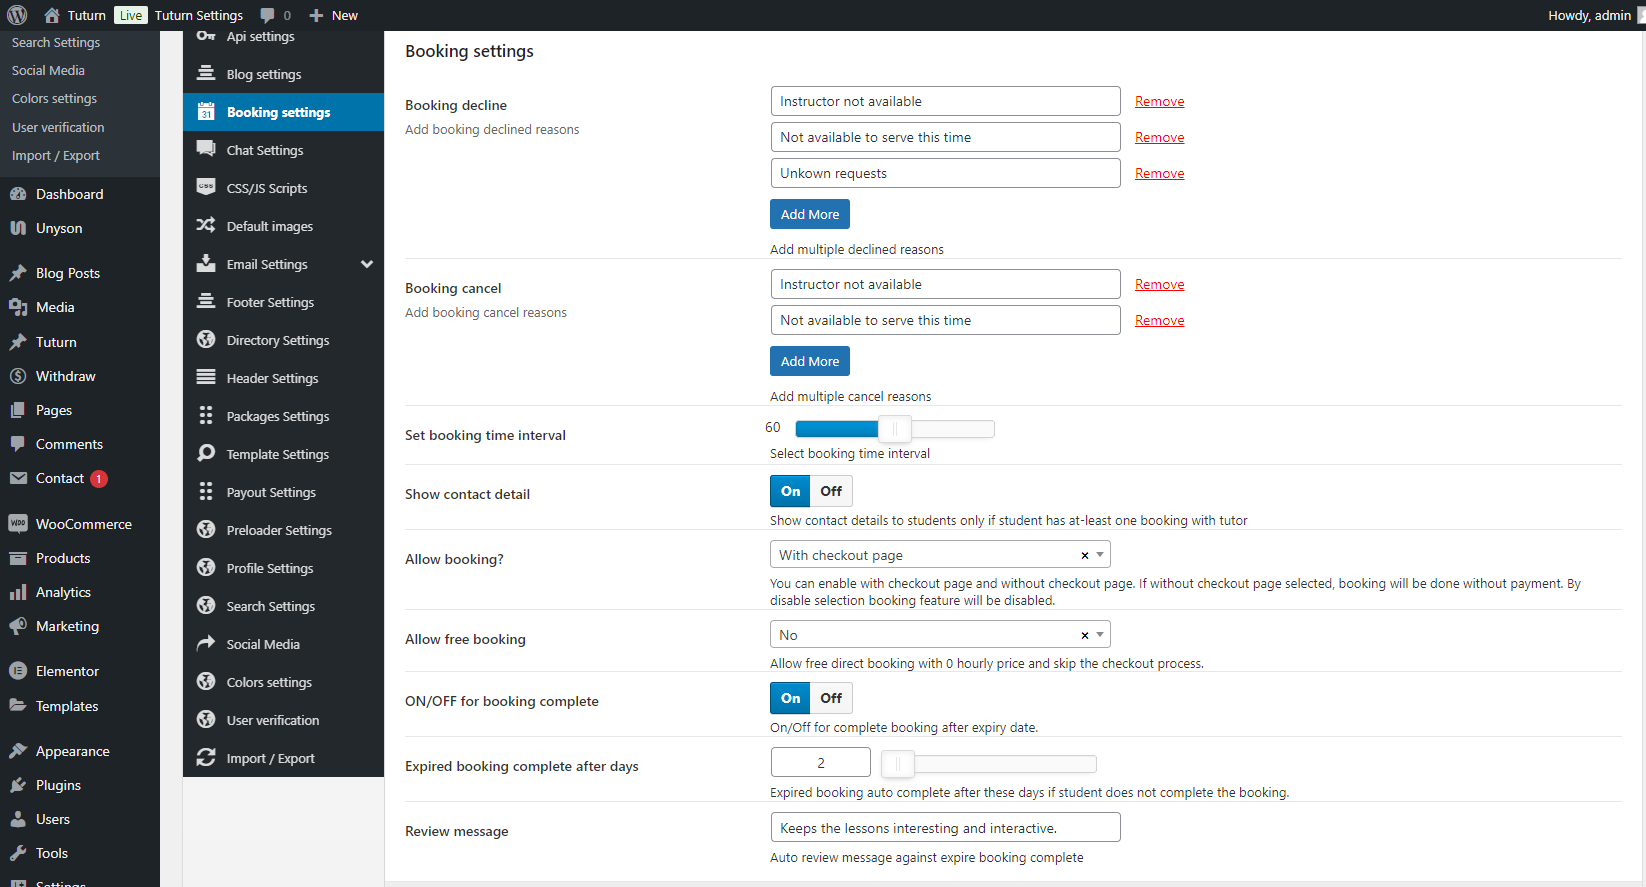
You can set and save the settings for different Booking parts.
Option 1: Add the booking decline reasons that the user will select during the booking decline.
Option 2: Add the booking cancel reasons that the user will select during the booking cancel.
Option 3: Booking time interval is used when instructors create booking intervals.
Option 4: When Show contact detail switch is turned On, the instructor contact details will be displayed to the student if he has made at least one booking with that tutor.
Option 5: You can configure bookings with or without a checkout process, and you also have the option to disable the booking process for students.
Option 6: You can configure bookings with or without a checkout process, and you also have the option to disable the booking process for students. If without checkout page selected, booking will be done without payment.
Option 7: If Allow Free Booking set to Yes, the booking will be completed with a zero hourly rate of the instructor. Student can perform booking without checkout process. Otherwise, the instructor will need to specify an hourly fee.
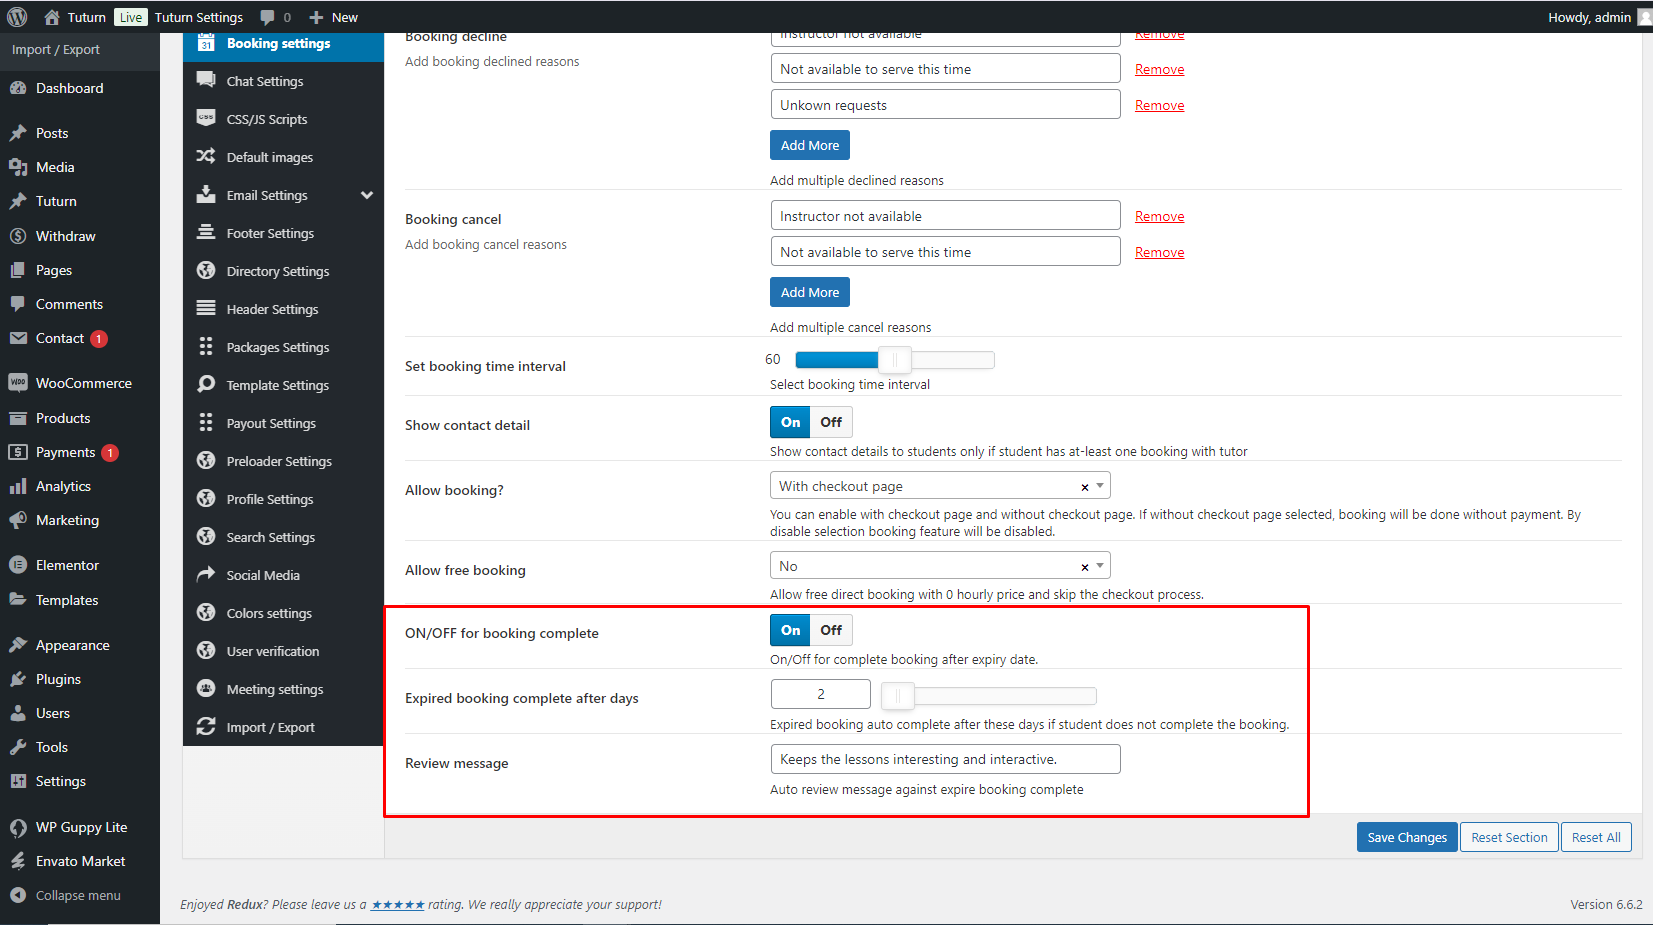
Option 8: If Booking Complete is set to On, the booking will automatically be marked as complete if the student does not finalize it within the required number of days set by the Admin. The Admin can also customize the review message for the instructor.
Chat Settings
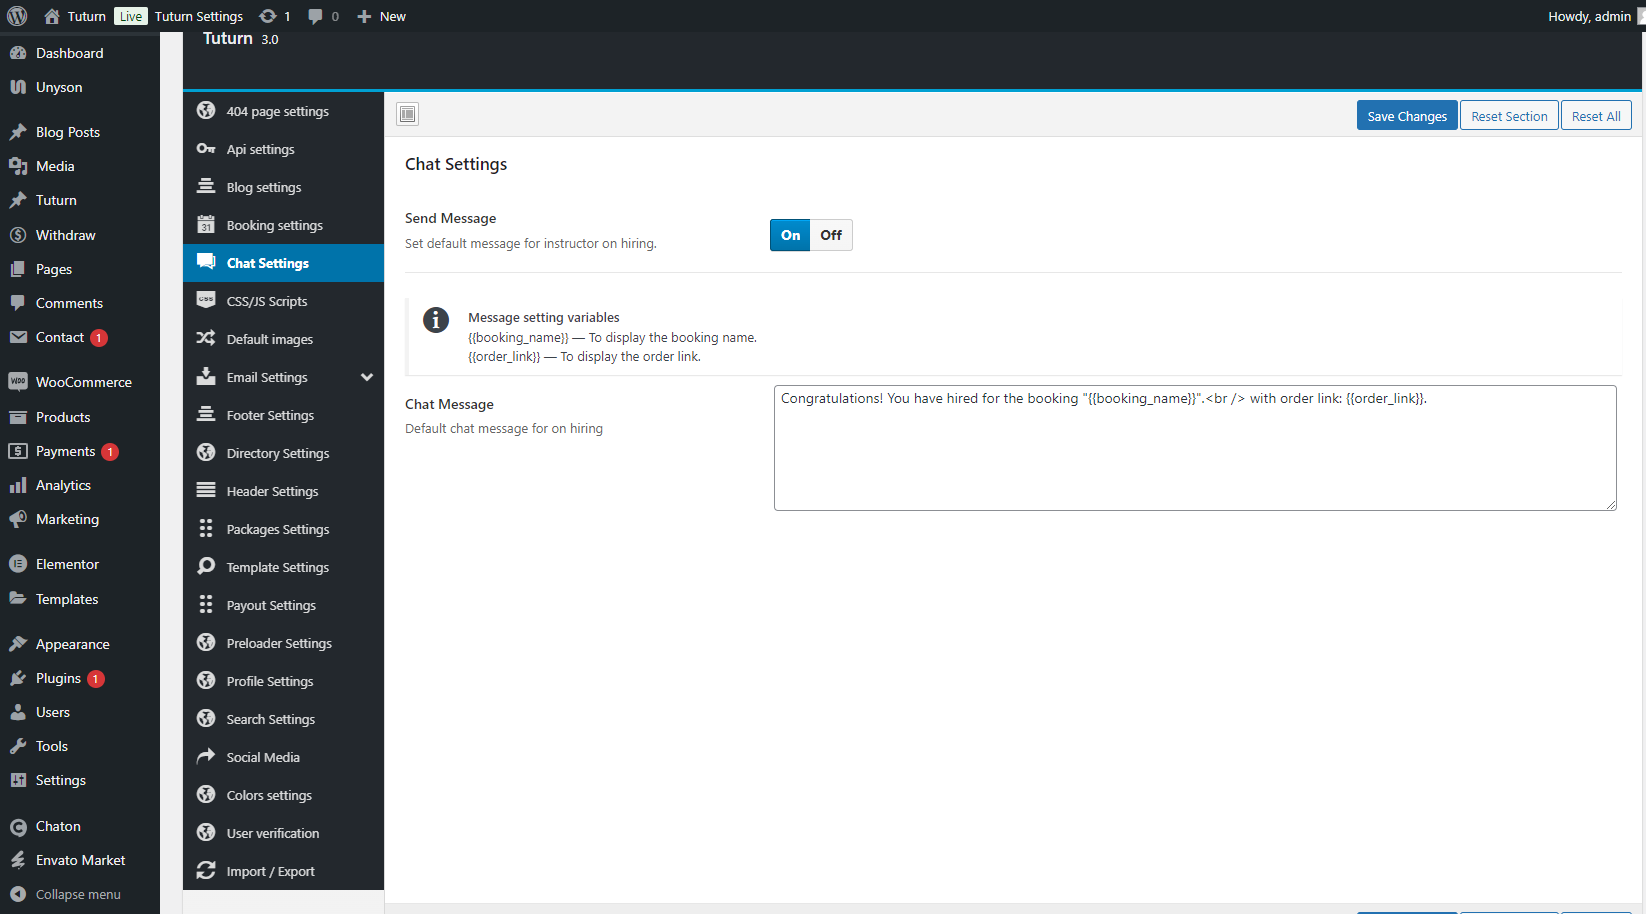
If Send Message is enabled, the message will be sent to the instructor based on the content of the chat message. However, you must have Guppy Lite or Guppy Pro installed. The instructor can view the message in their inbox.
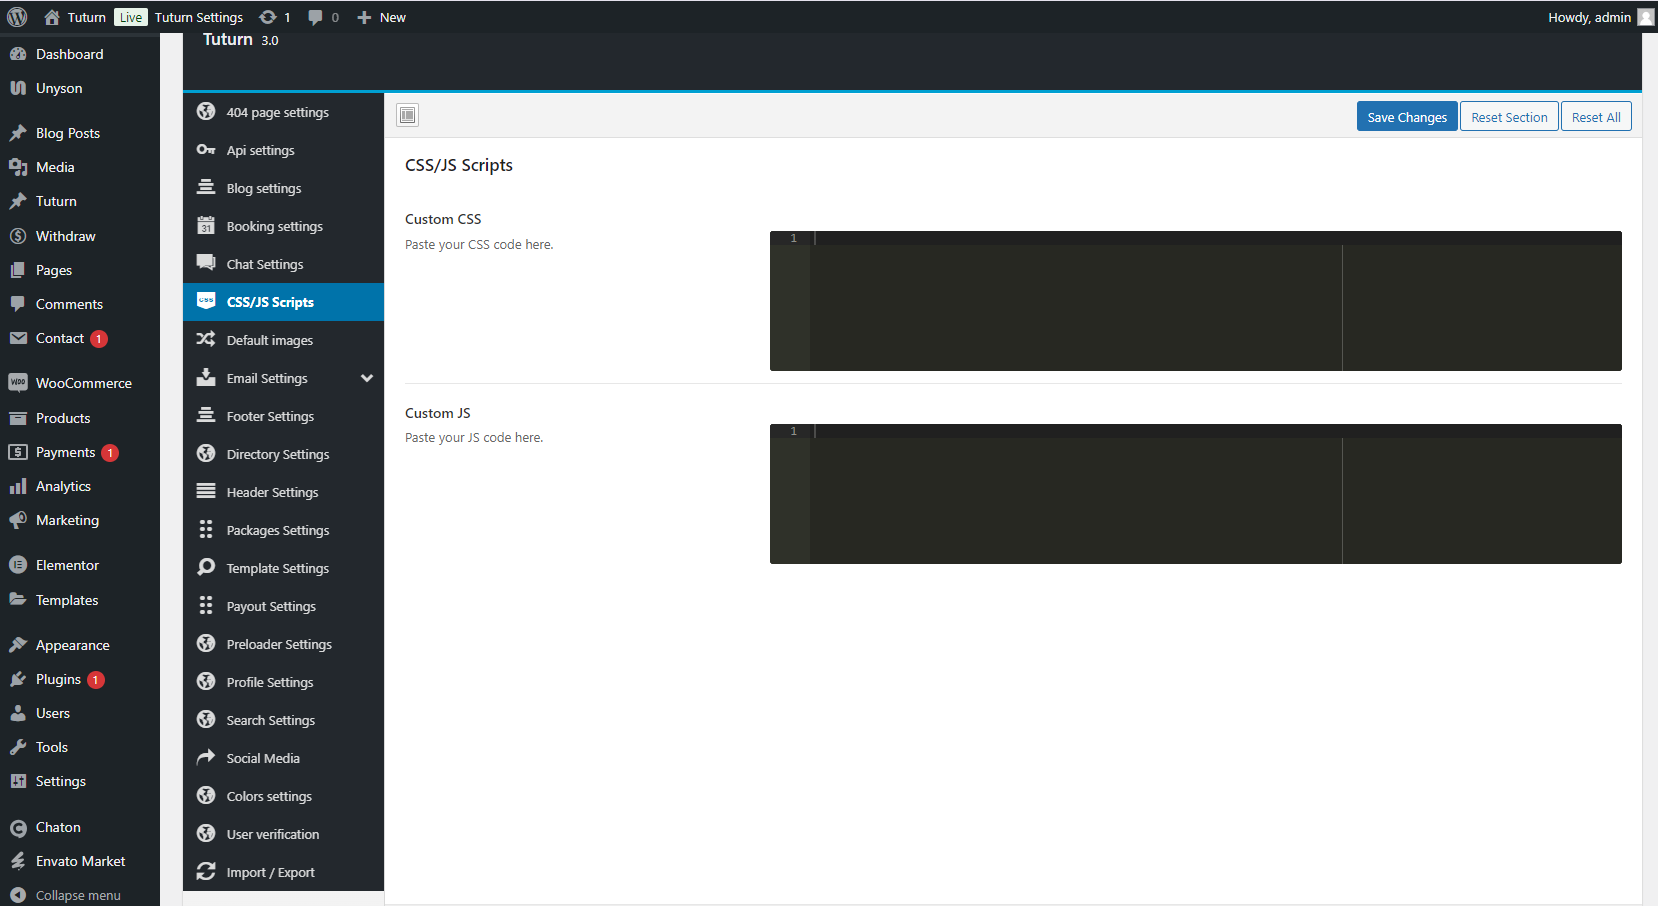
CSS/JS Scripts
In this option section, you have the ability to add custom CSS and JavaScript code. This feature allows you to further customize the appearance and functionality of your site by inserting your own code snippets directly.
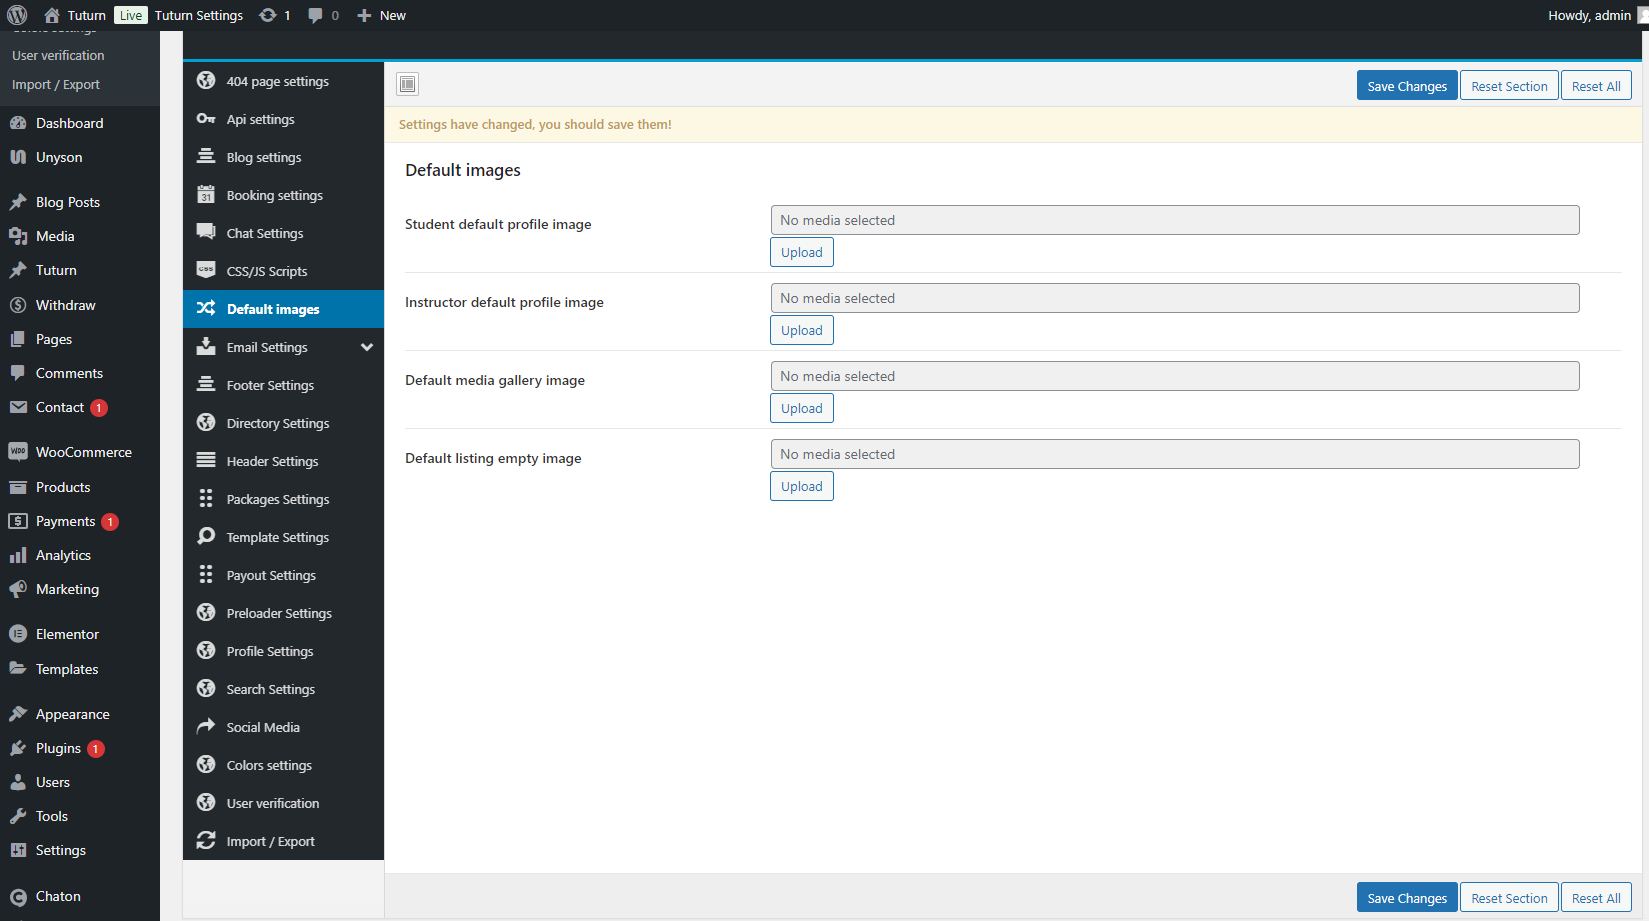
Default images
This section allows you to upload default images for various parts of the Tuturn theme and dashboard, ensuring a visually cohesive design even without specific images uploaded.
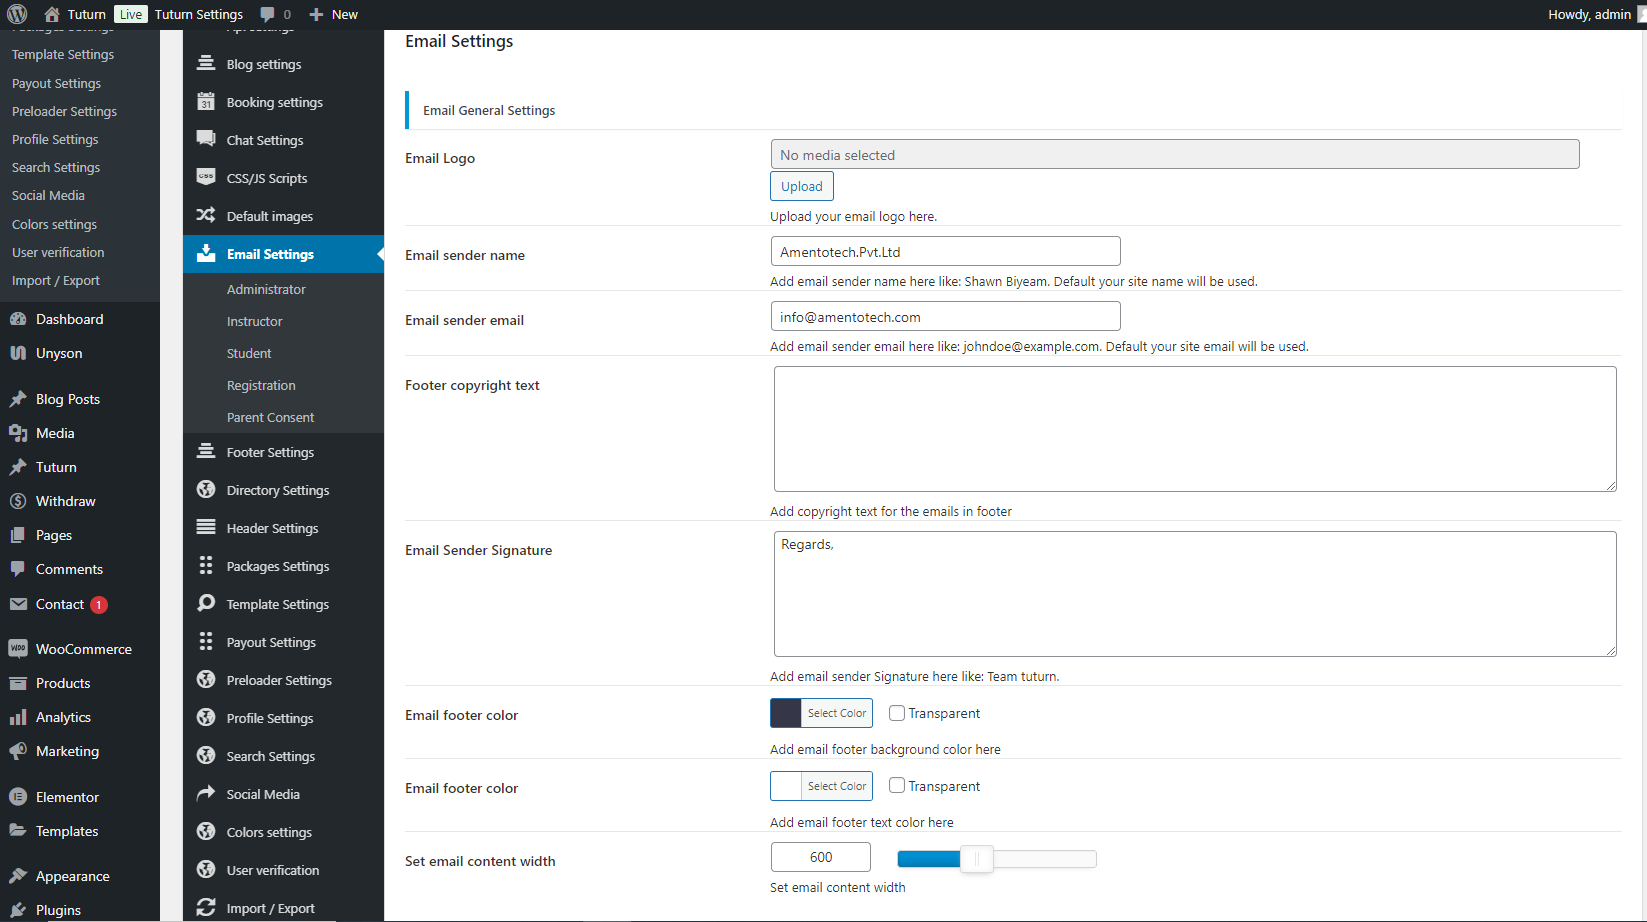
Email Settings
In the email settings, you have the ability to manage and customize all aspects of the Tuturn email system. This includes settings for emails sent to administrators, instructors, students, as well as emails related to parent consent and registrations. By configuring these settings, you can personalize the content, layout, and functionality of each email to align with your branding and communication needs.
Please ensure that the sender email you add belongs to your domain.
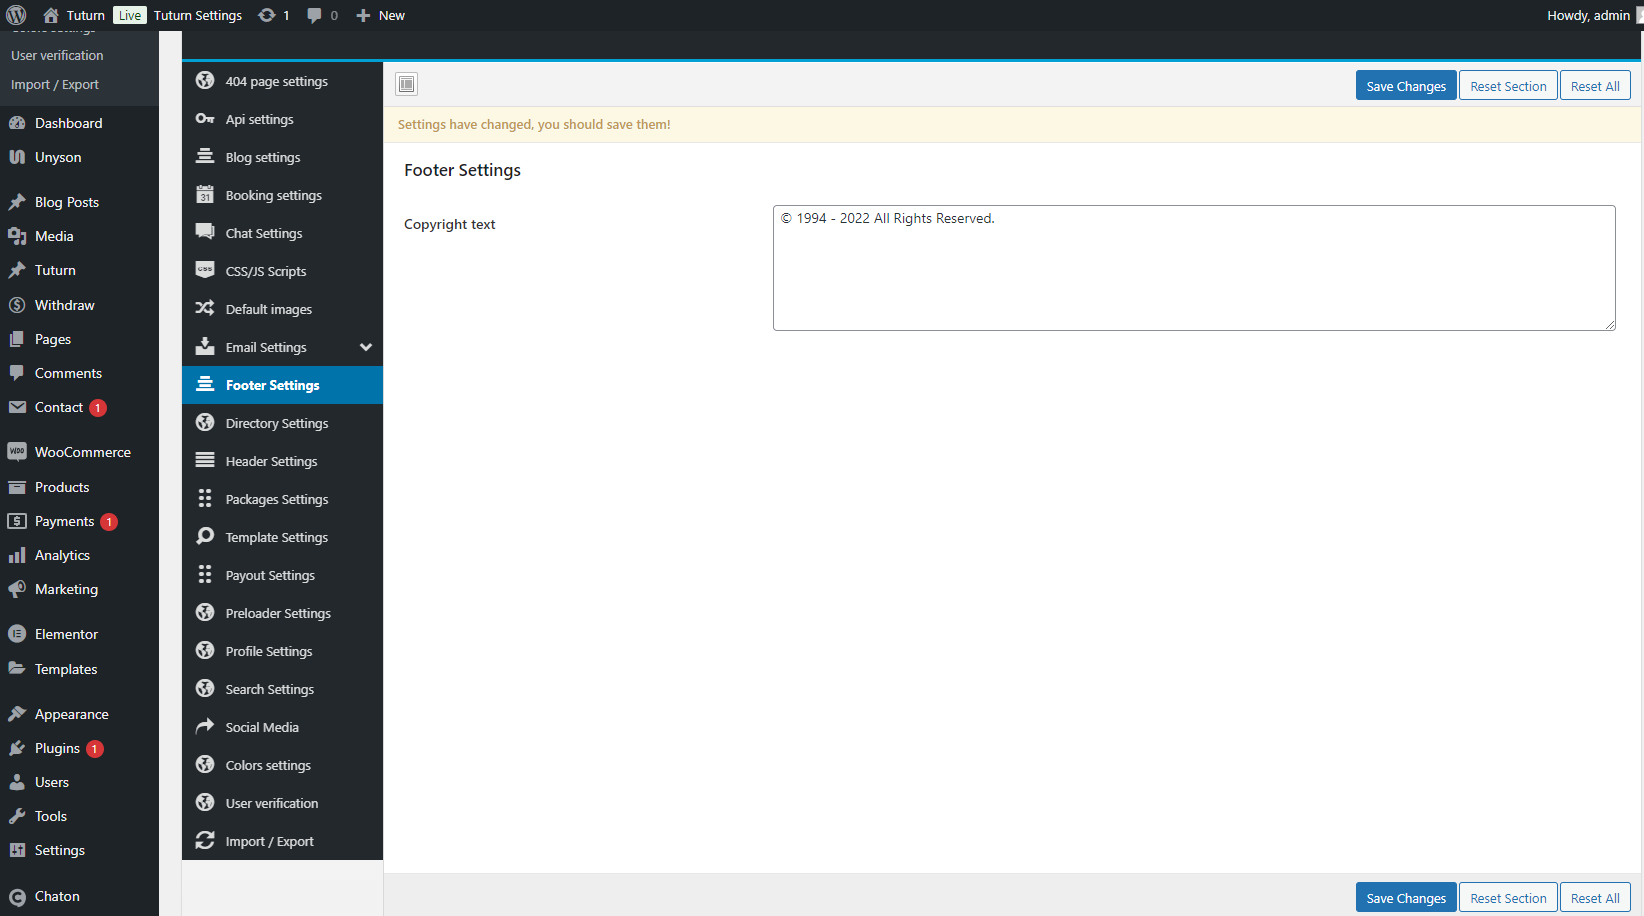
Footer Settings
This section allows you to add the copyright text that appears in the footer.
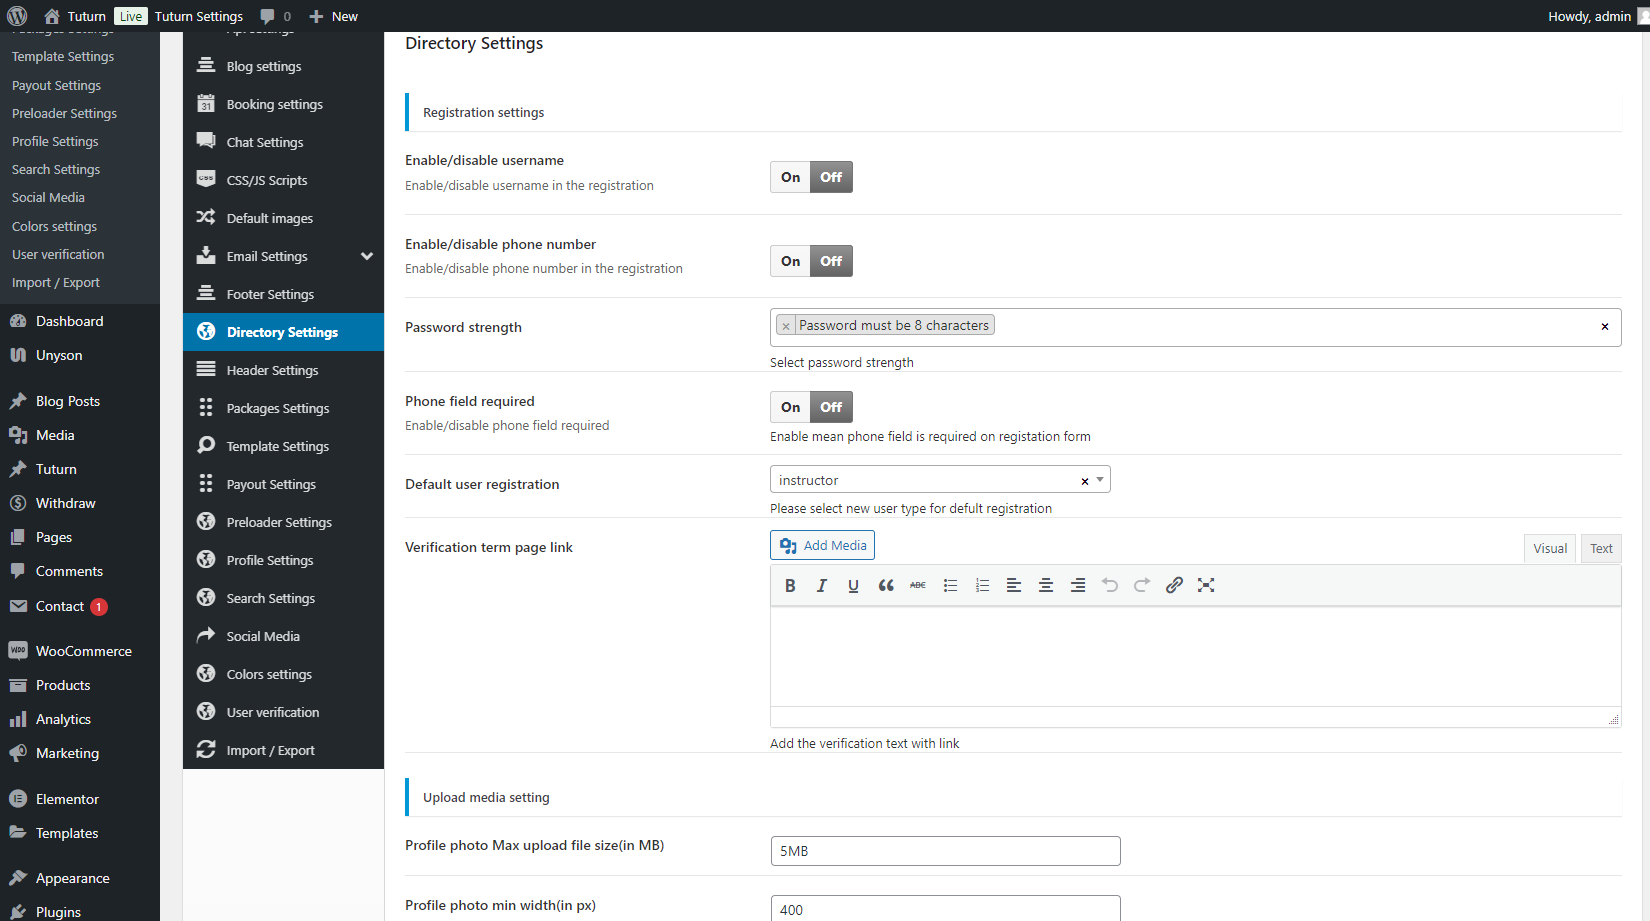
Directory Settings
In the directory settings, you can manage and modify all settings related to the Tuturn directory. This includes settings for registration, projects, tasks, proposals, and more. These settings allow you to customize the behavior and functionality of the directory to suit your specific needs, ensuring a seamless and tailored experience for users interacting with your site.
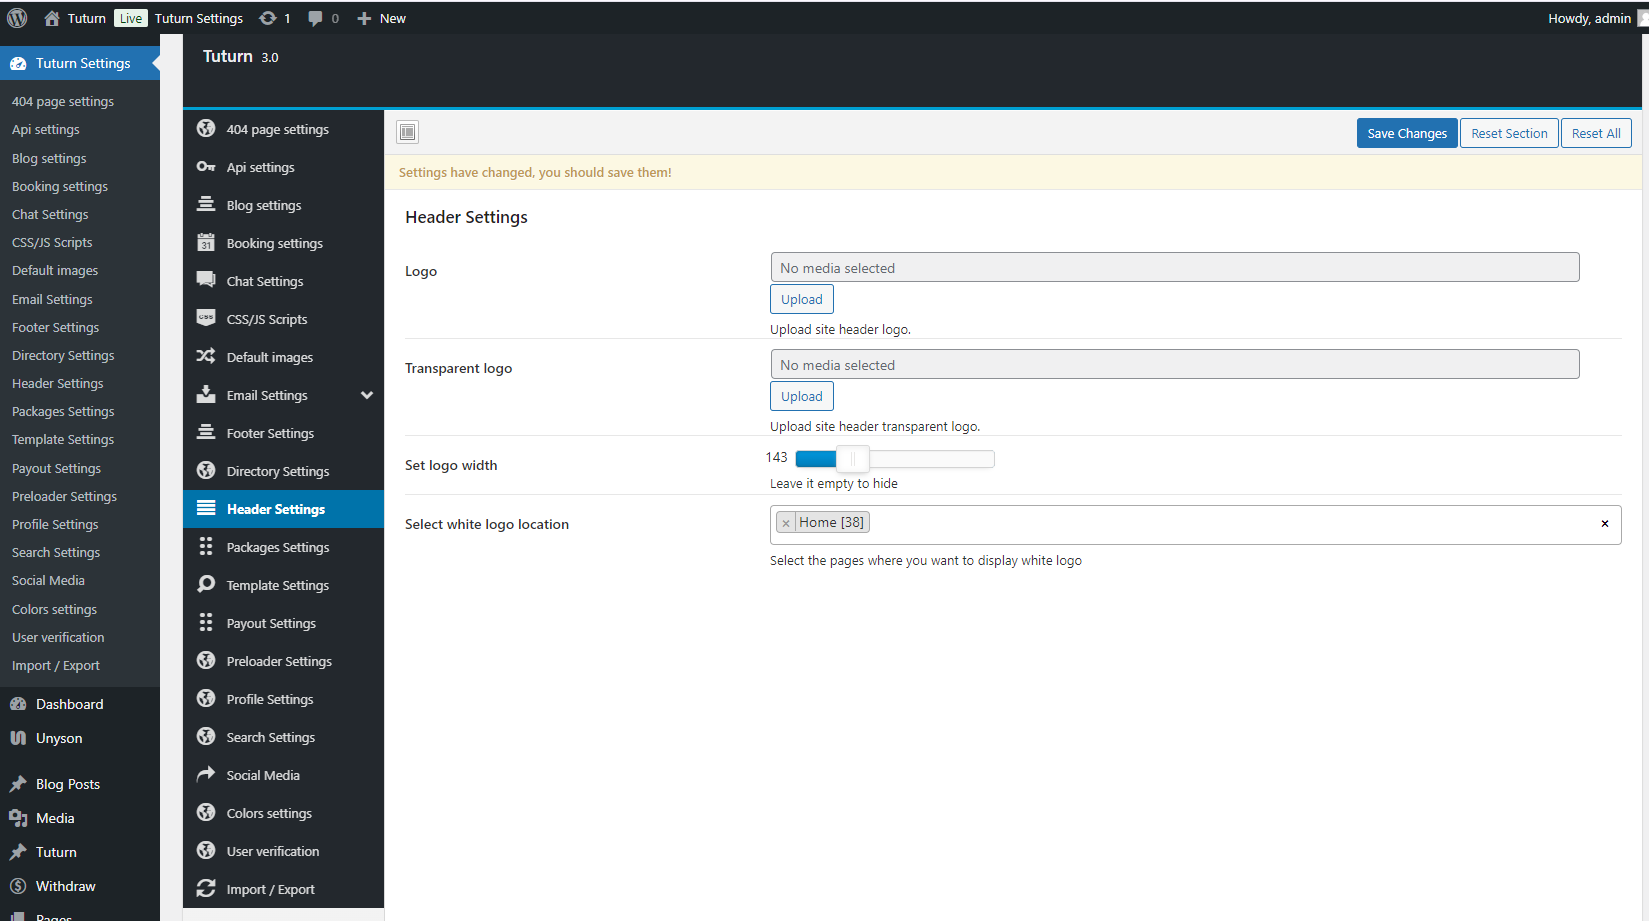
Header Settings
You can manage the header's appearance by managing and modifying logos in the header section.
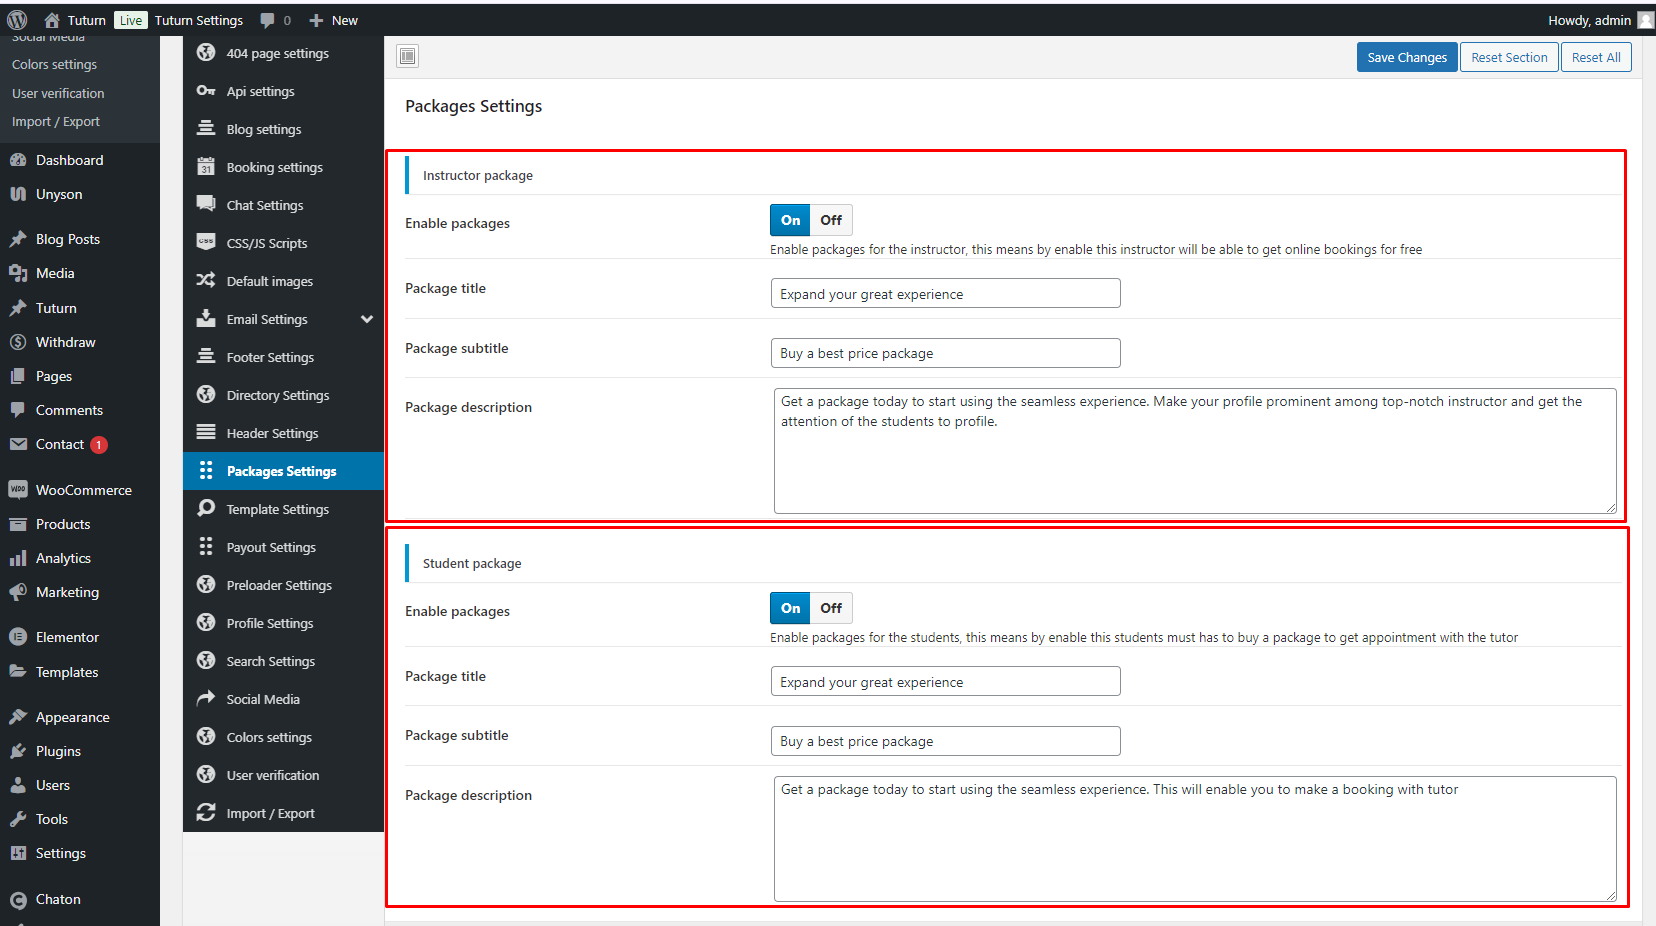
Package Settings
In this section, the package management for both the Student and Instructor.
Template Settings
Tuturn utilizes a system of template fields to define the structure and content of various pages within the platform. By assigning specific pages to these template fields, you ensure they display the correct information and functionality.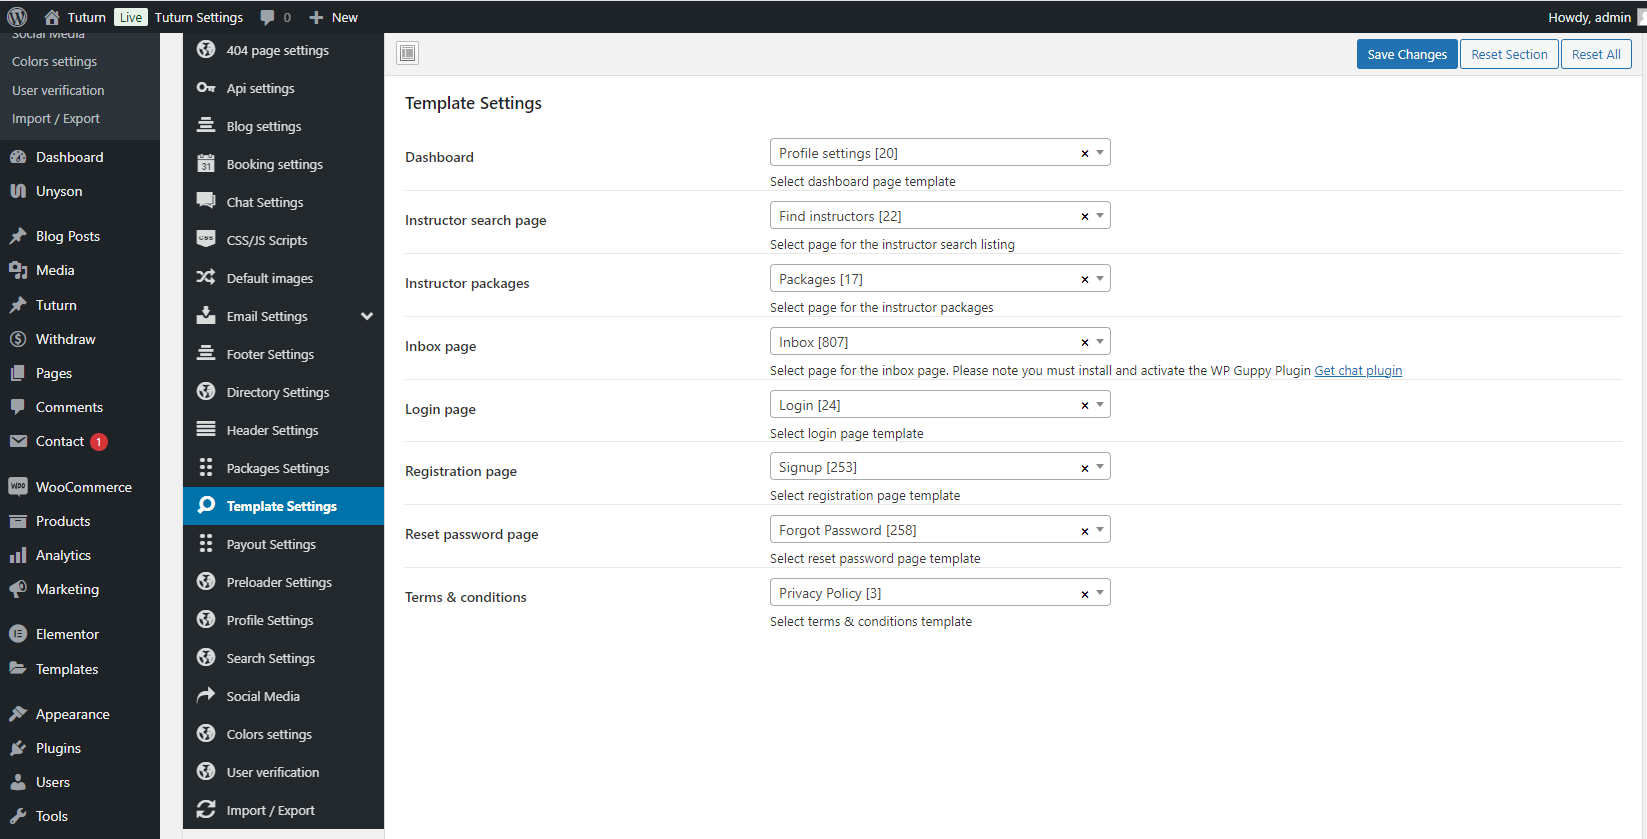
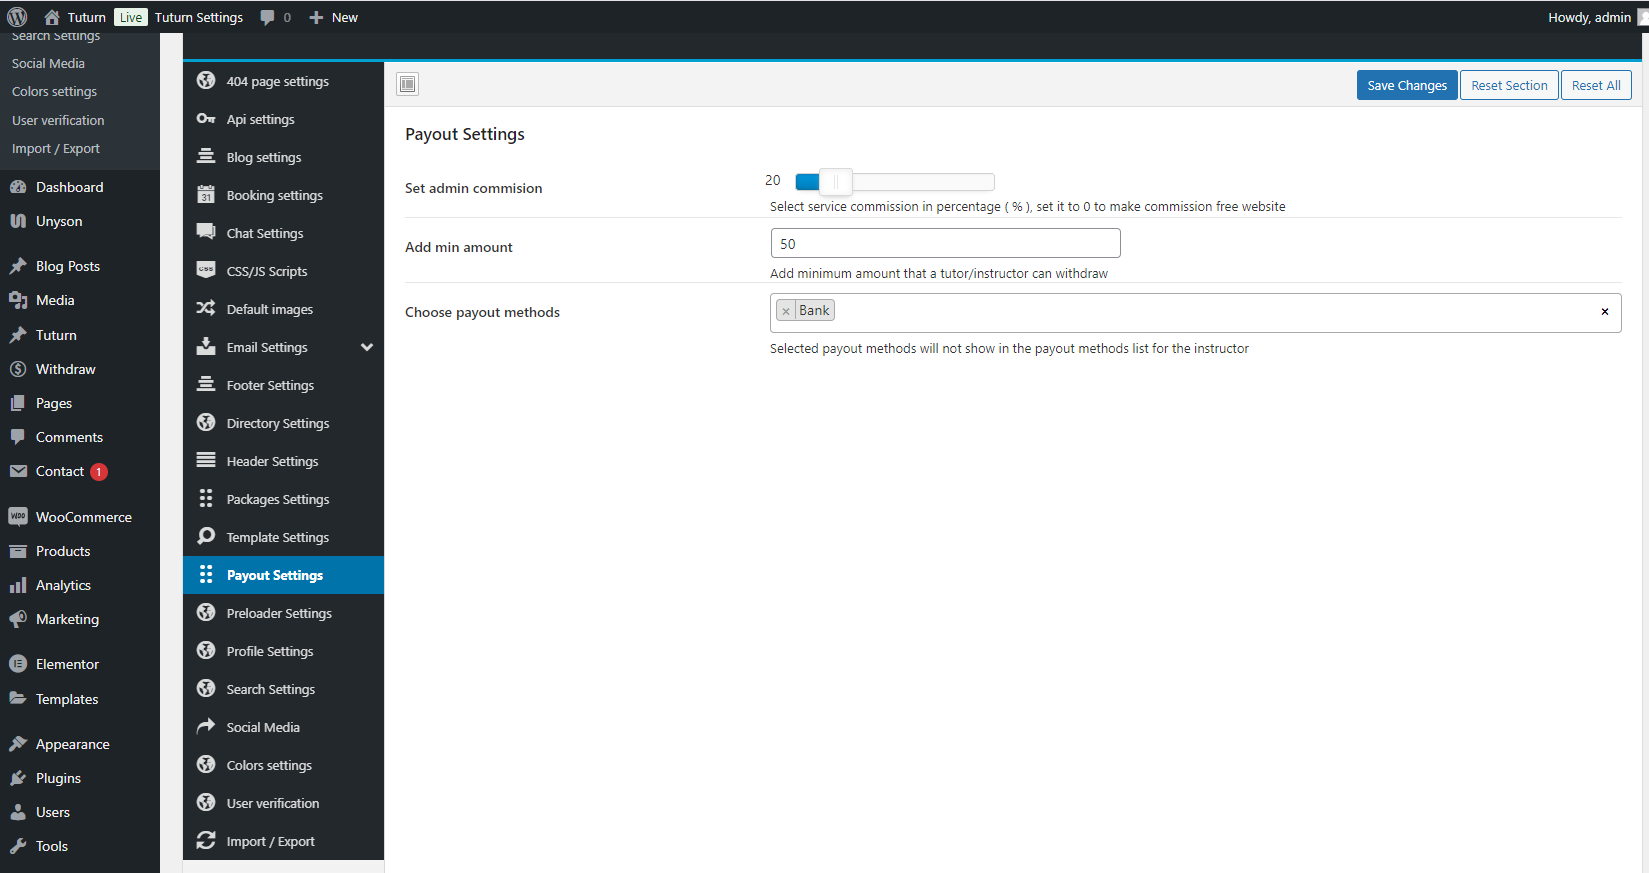
Payout Settings
Tuturn's payout settings allow you to customize commission rates and selectively hide payment methods.
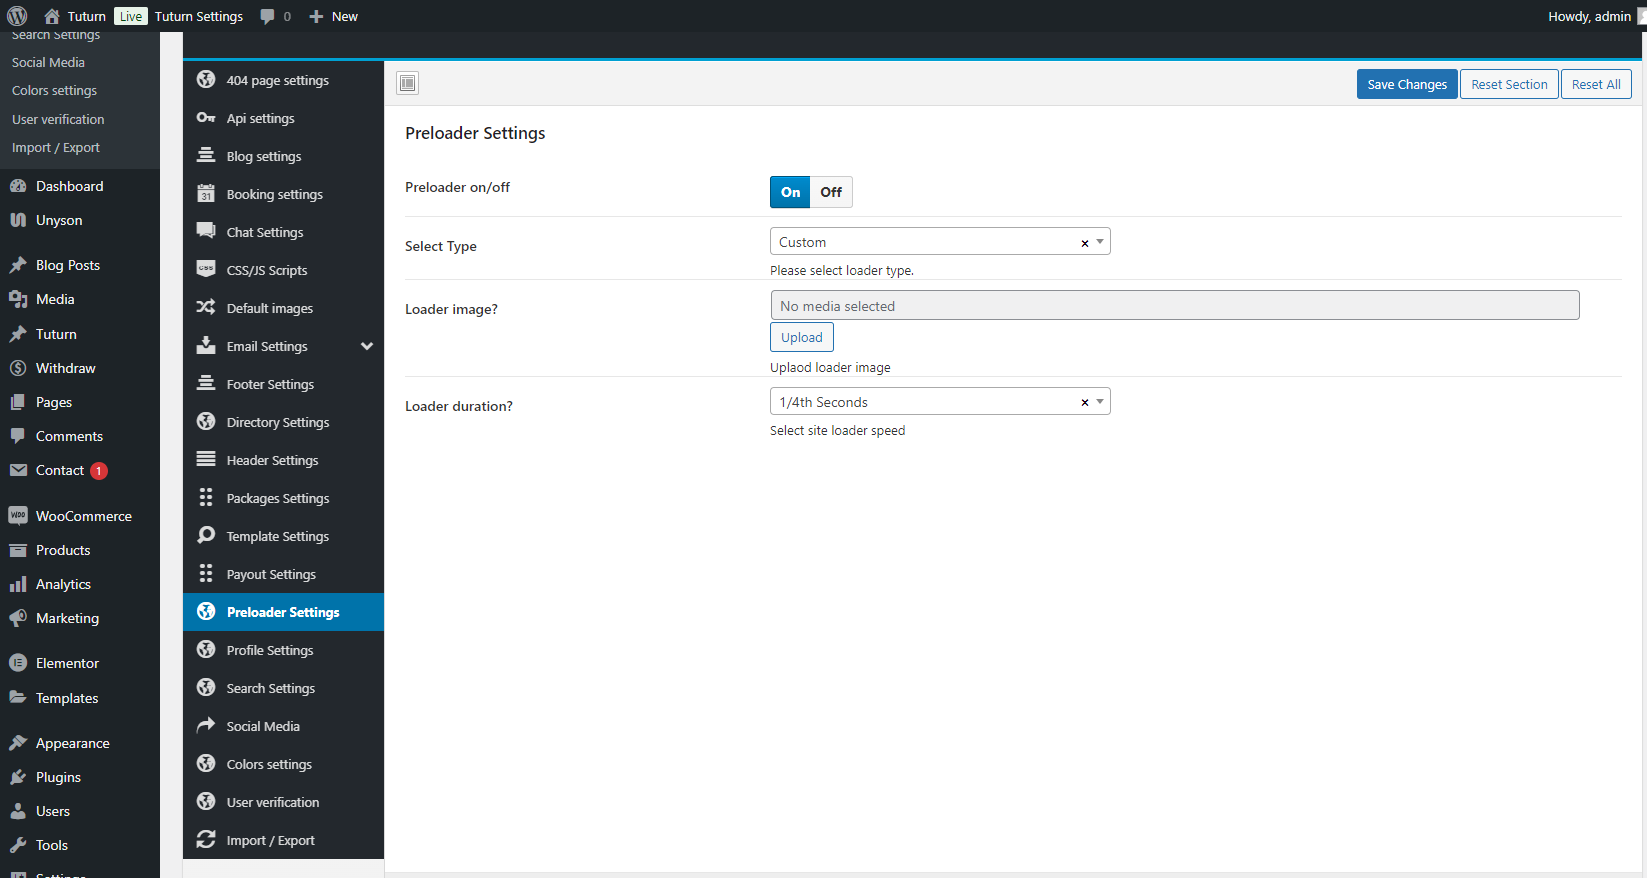
Preloader Settings
The preloader section lets you manage the pre-loading animation: enable/disable it, choose a custom style (including displaying your logo), and set a timeout delay.
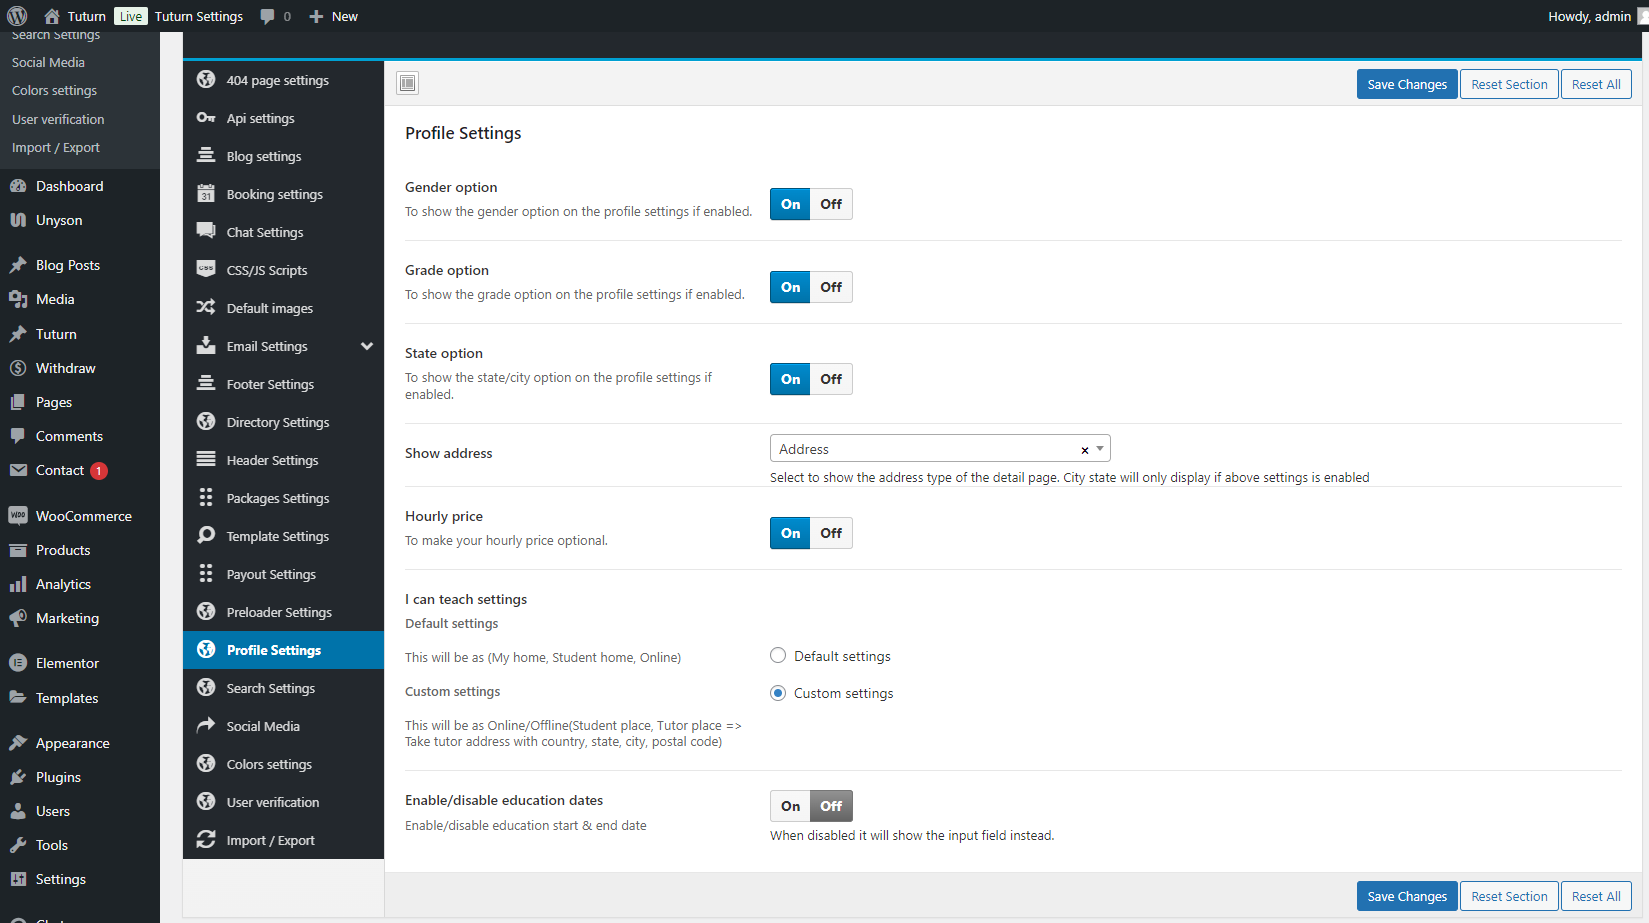
Profile Settings
This section used to customize the fields displayed on your dashboard by adjusting the profile settings.
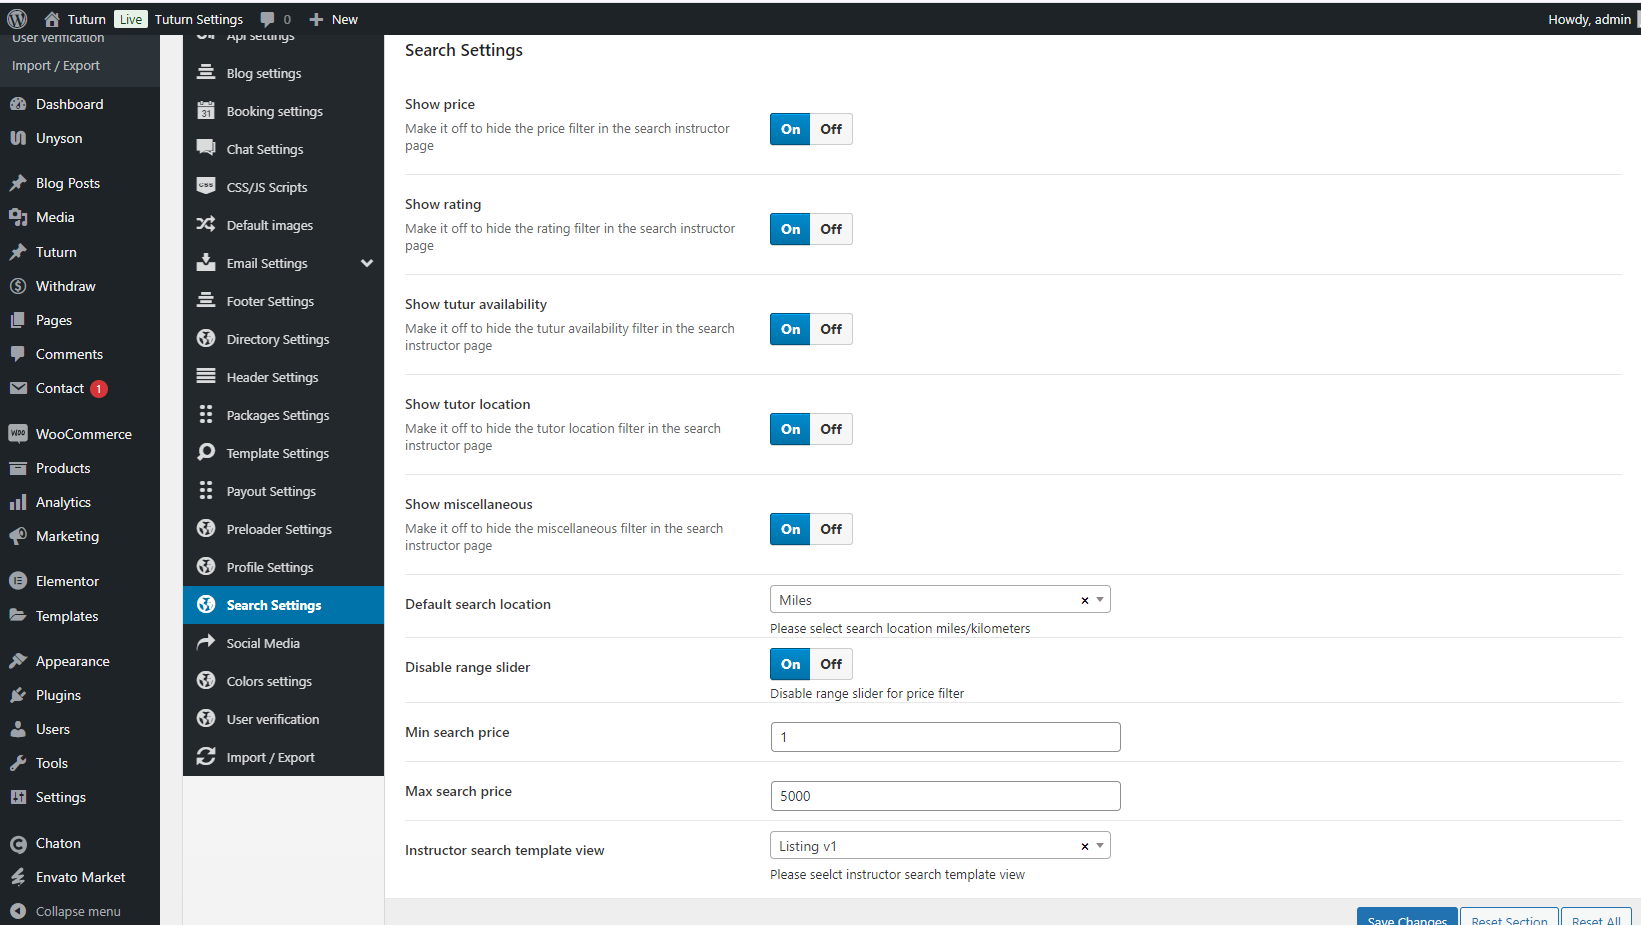
Search Settings
The search section allows you to manage and customize the search layout for various pages, such as Freelance, Project, and Tasks. You can choose between a top or left style layout and also control the visibility of filters, showing or hiding them as needed to enhance the user experience.
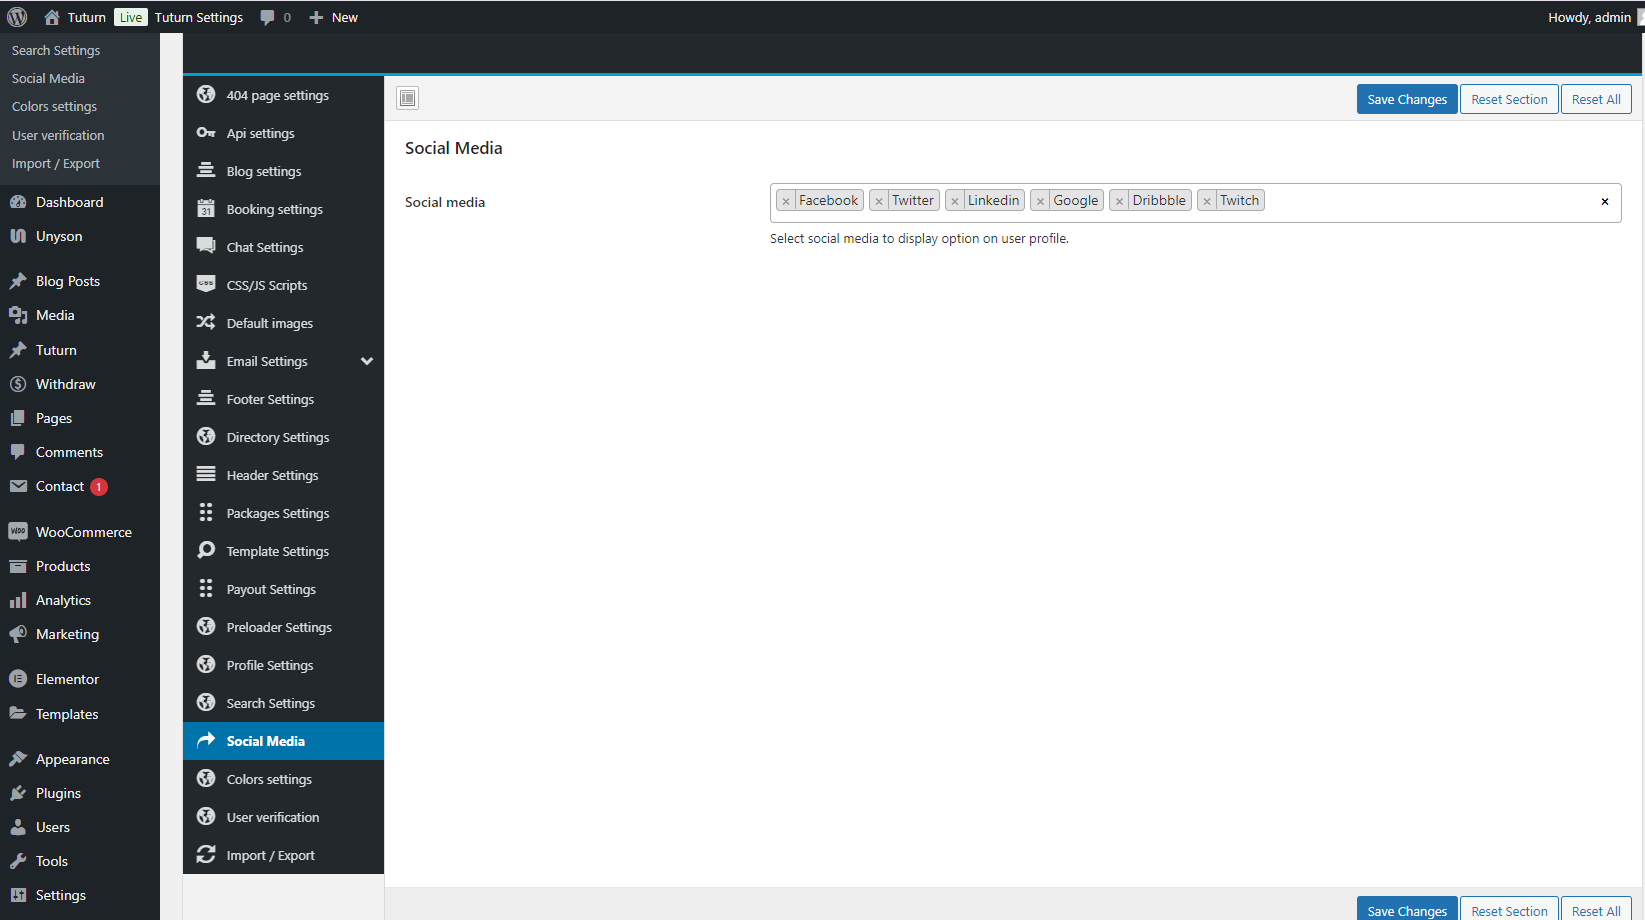
Social Media Settings
This section used to customize the social profile fields, which will be displayed on the user dashboard based on the selected social media platforms..
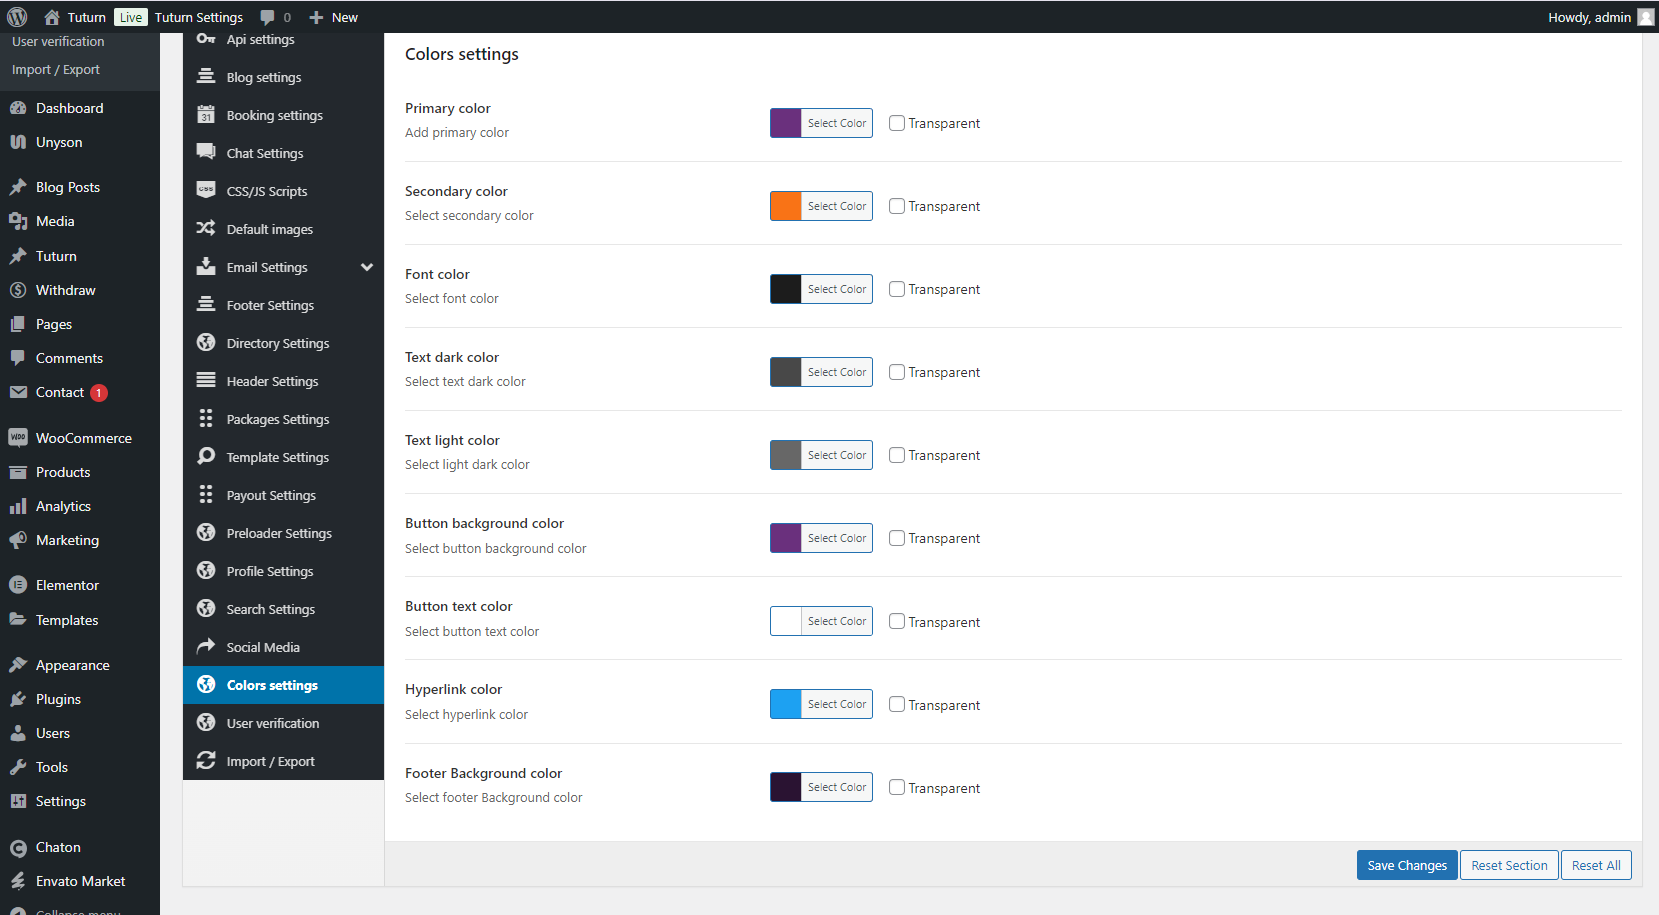
Colors Settings
The colors section enables you to manage and customize all the colors used throughout the theme. This includes altering the primary and secondary colors, font colors, link colors and button colors, allowing you to create a cohesive and visually appealing color scheme that aligns with your brand identity.
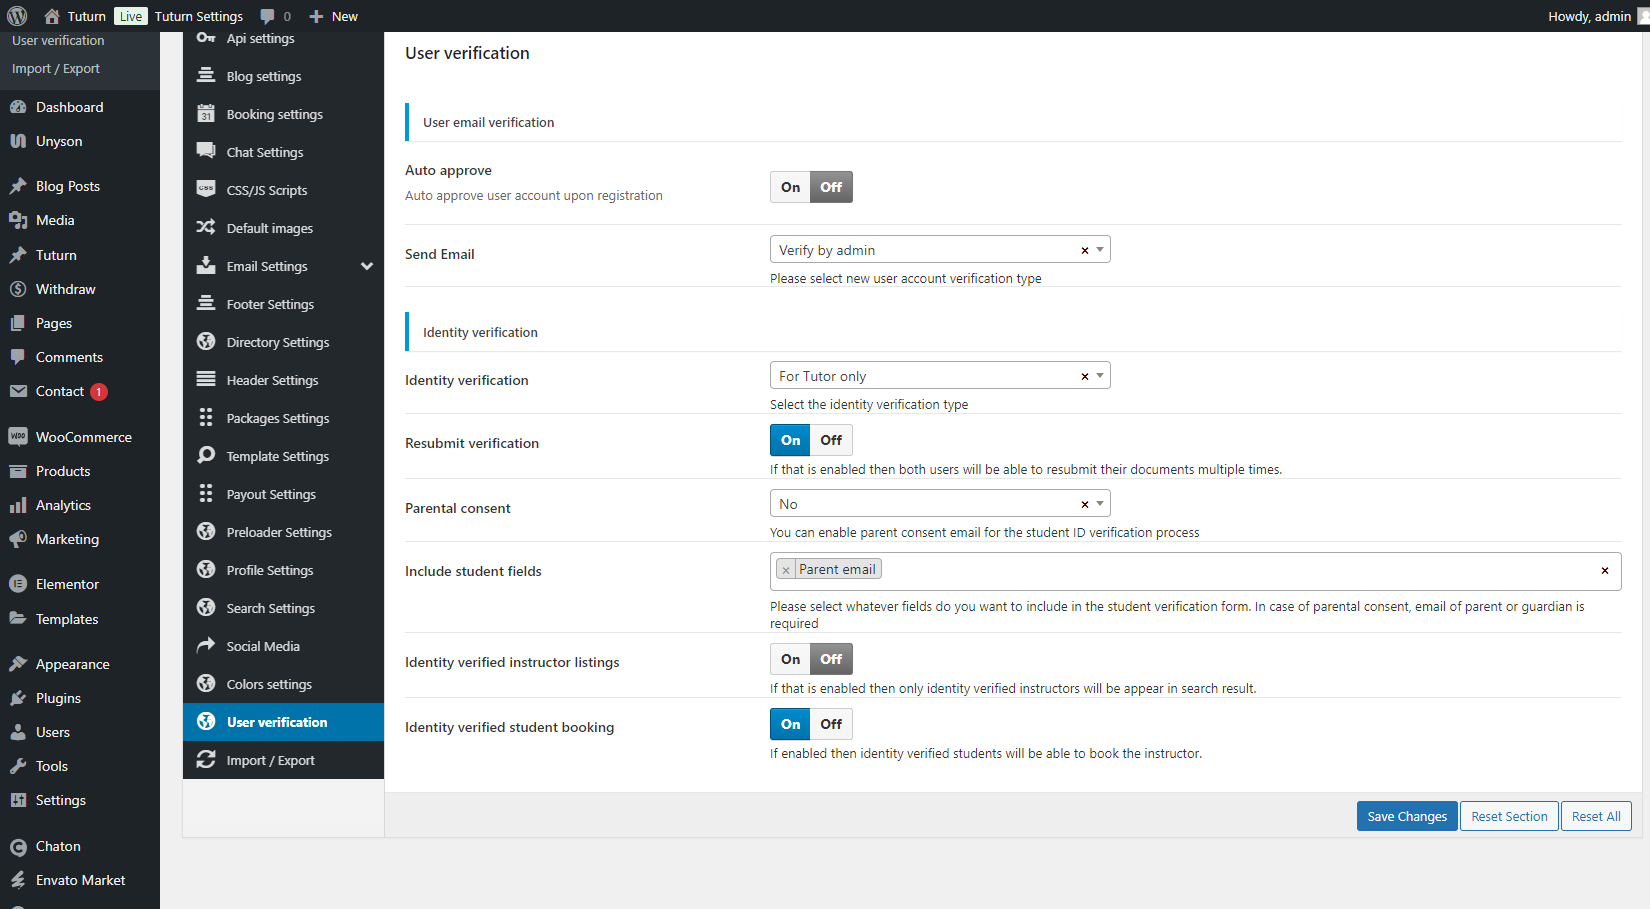
User verification Settings
This section is used to manage identity and user verification, including options like automatic user approval, requiring admin approval, or sending a verification link to the user's email. Add a condition to display only identity-verified instructors in the search results. Also, set a condition so that only identity-verified students can book instructors.
Theme Layouts
Header
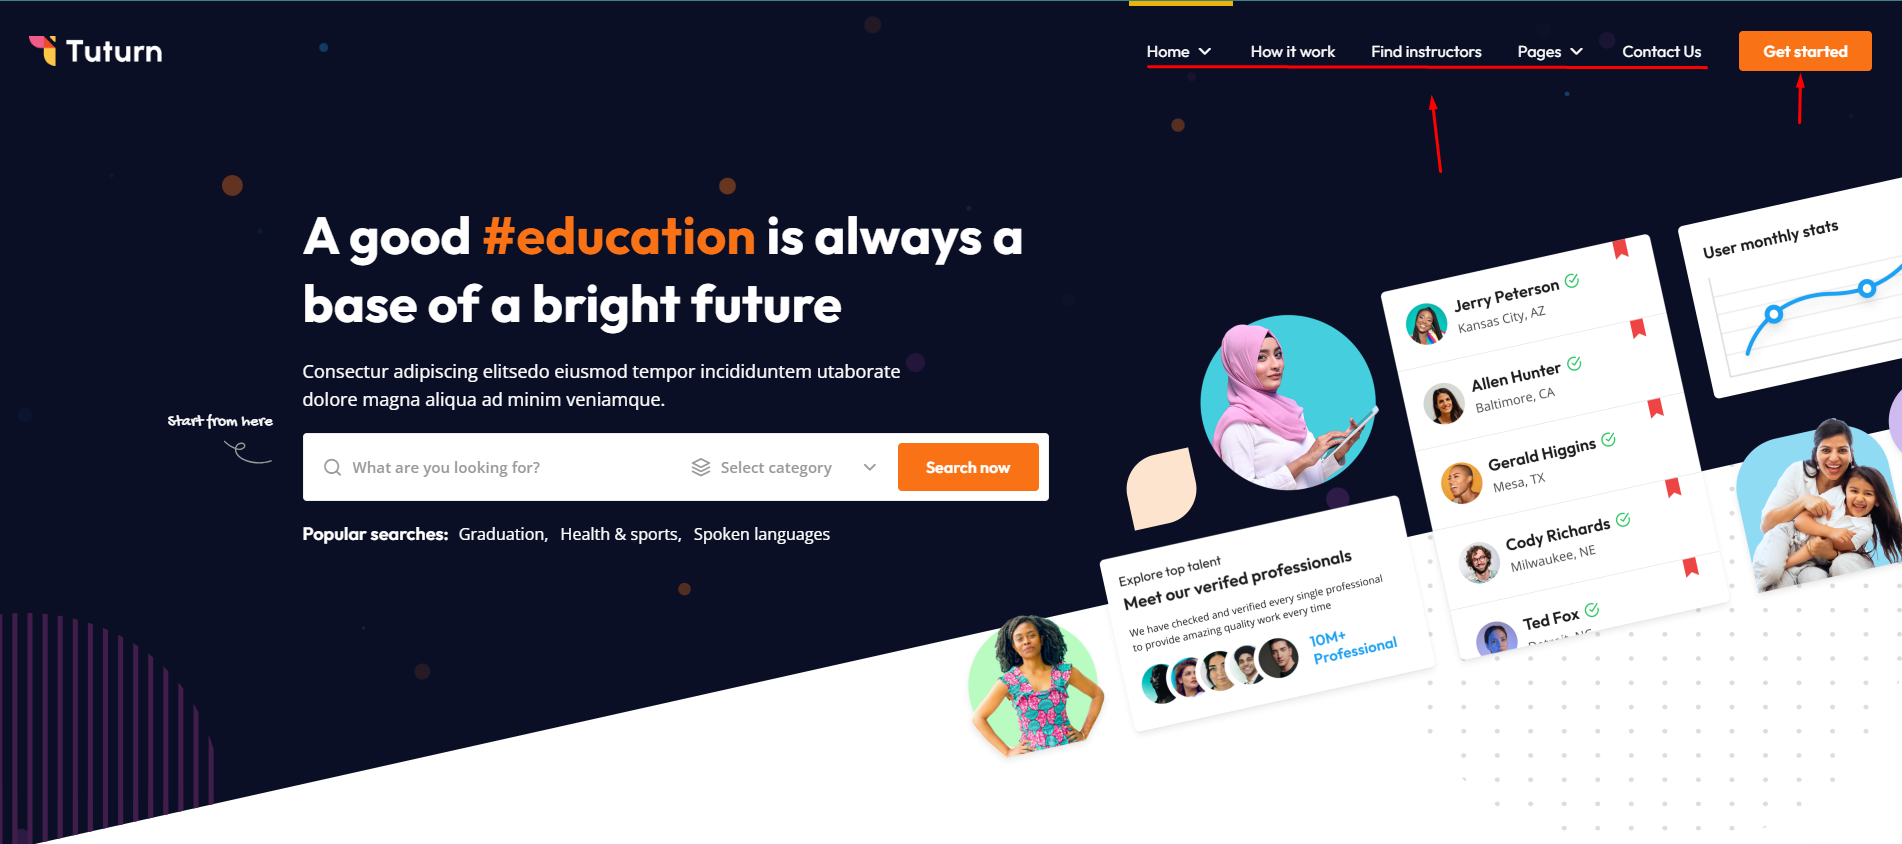
In the header section, you can configure the global header menu. To display the menu at the top, select the Primary Menu checkbox. To show the Get Started button in the header, select the Main Header Menu checkbox.
To use the Elementor header, you must select the checkbox Elementor dashboard menu. Otherwise, leave it unchecked.
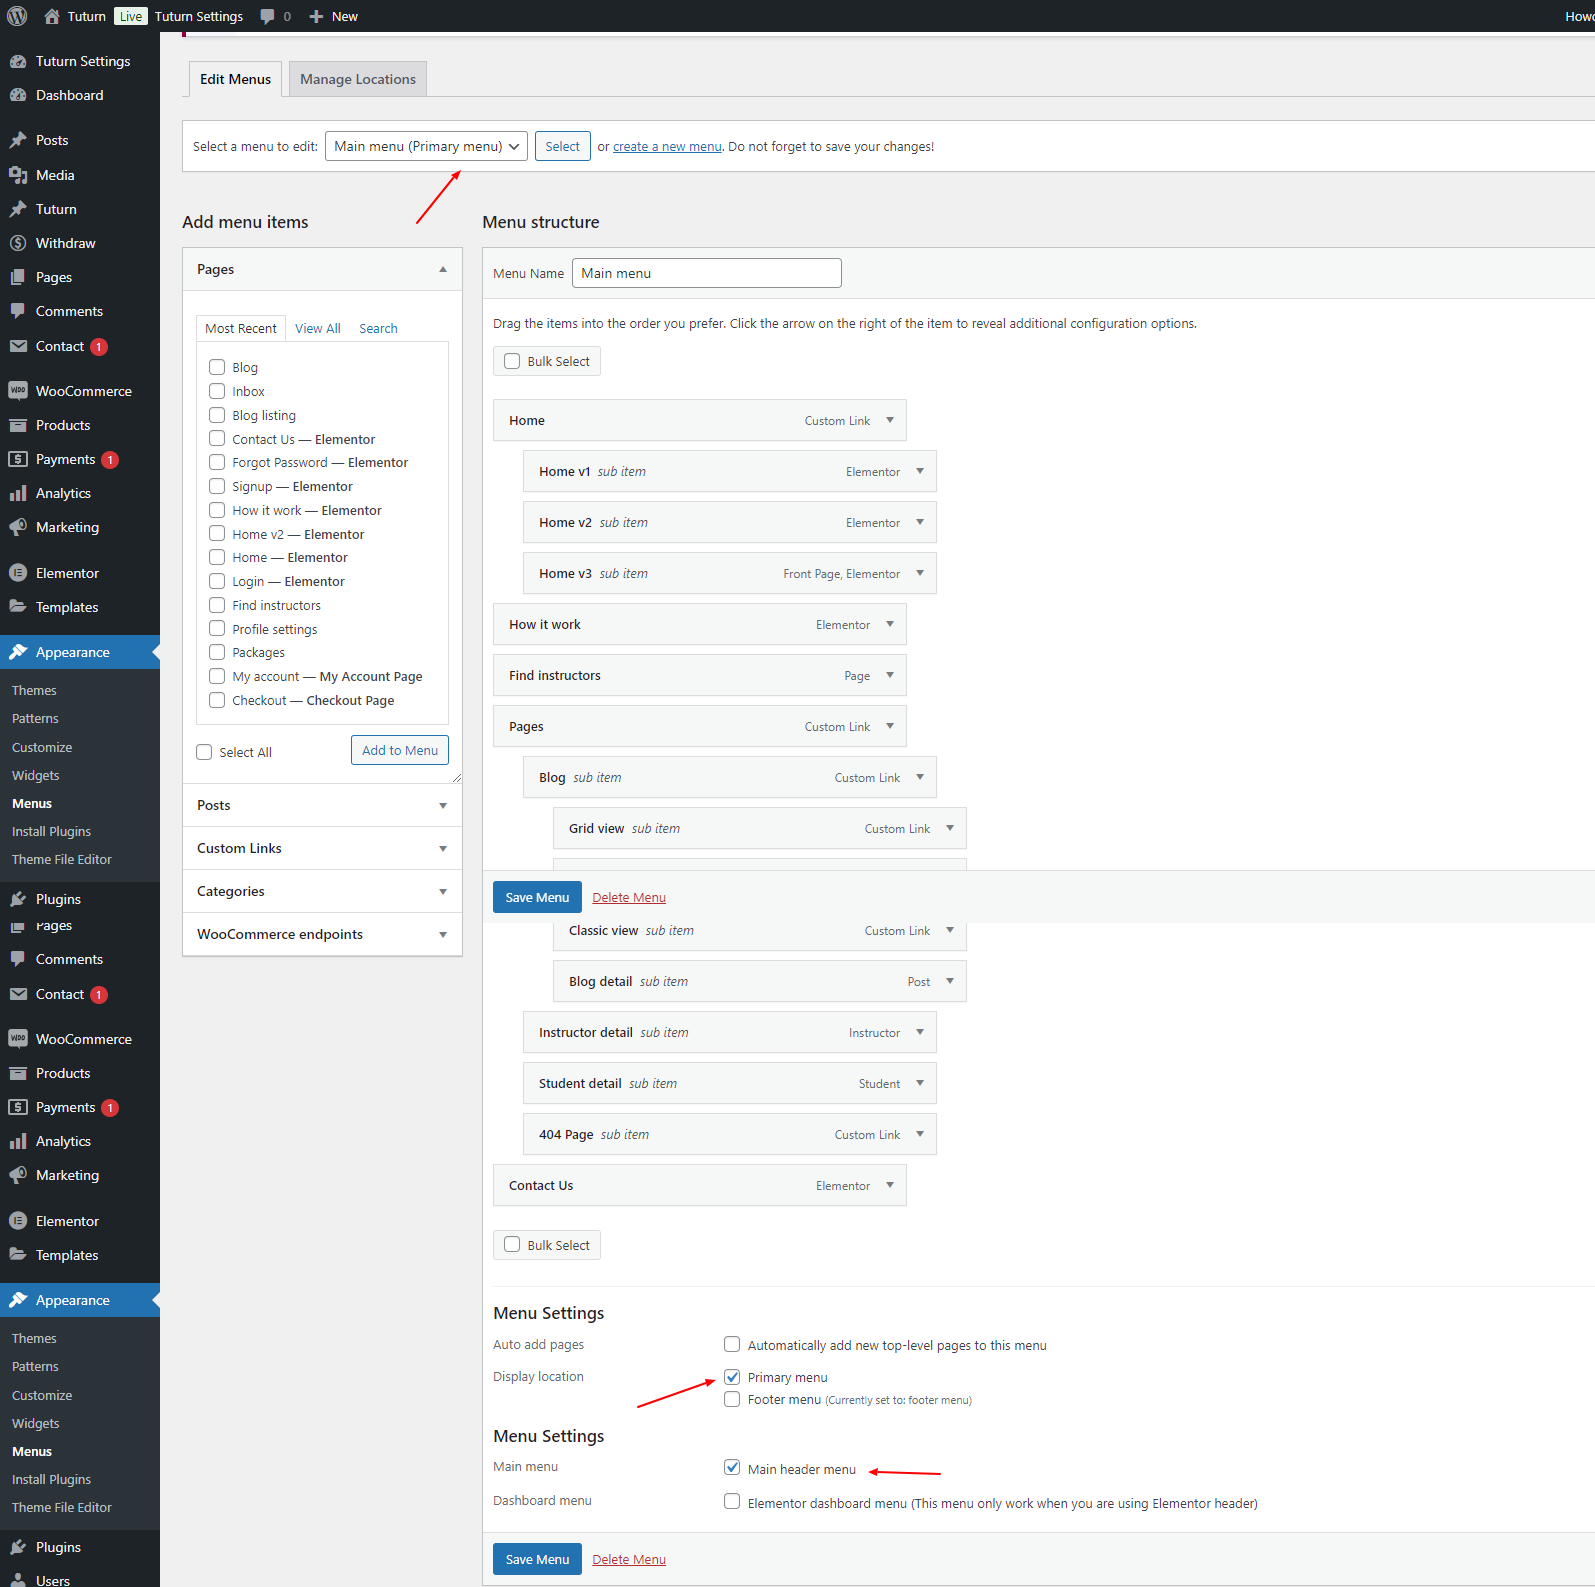
Here is a preview of the menu with the assigned location and the Get Started button enabled.
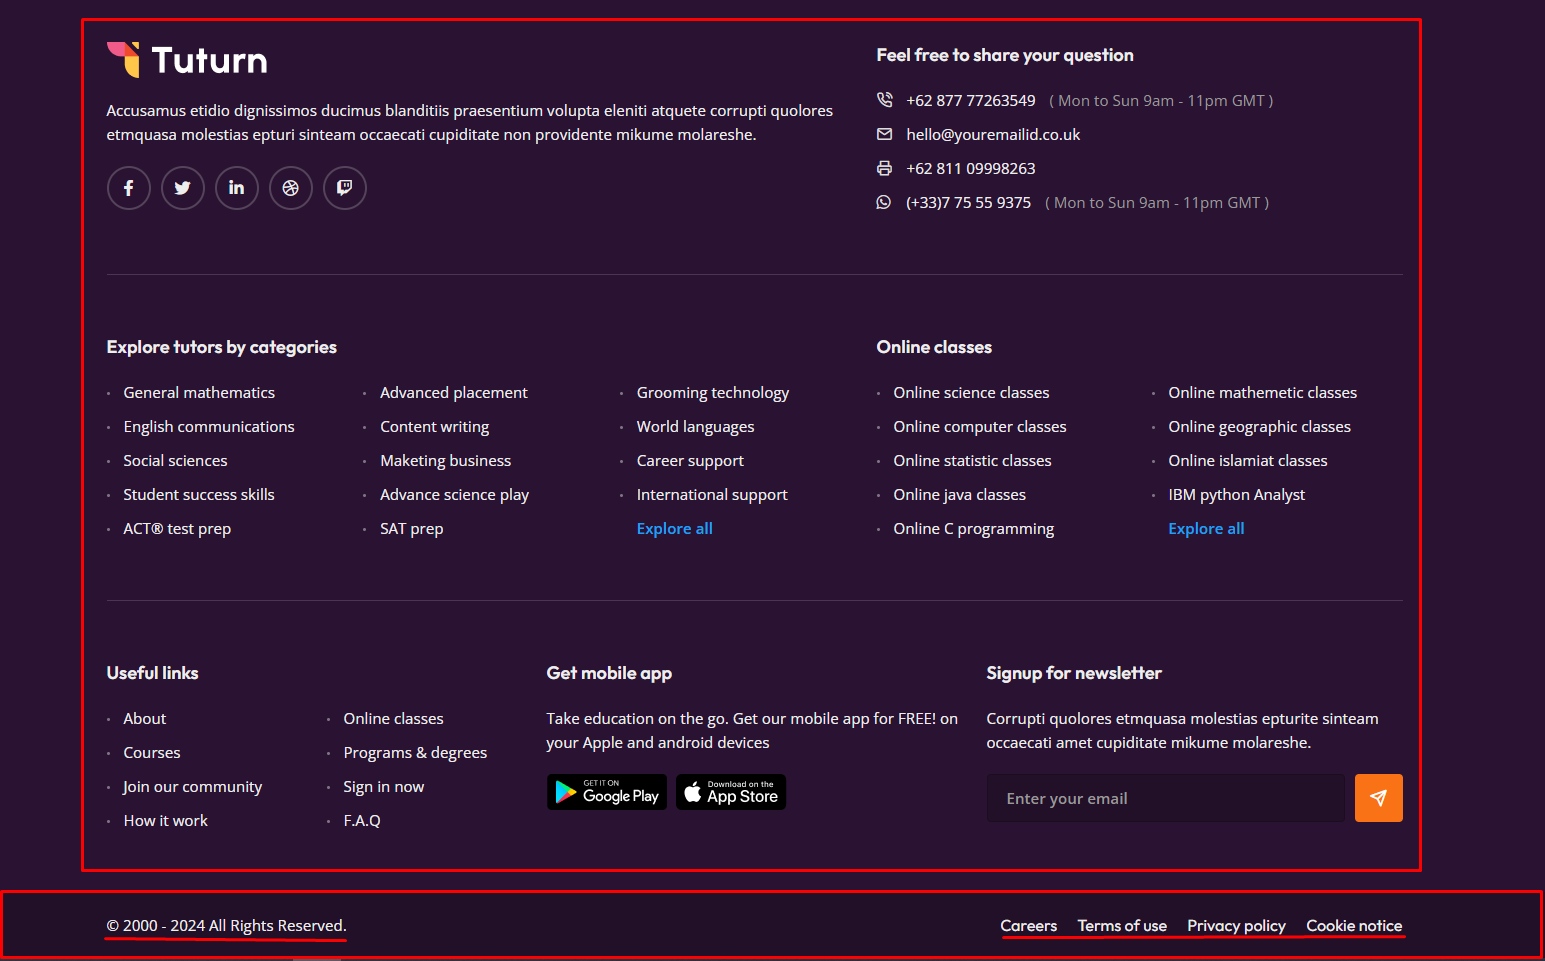
Footer
Top content: The footer top content is managed through widgets. You can add or update this content by using widgets in the Footer Sidebar areas 1 to 6.
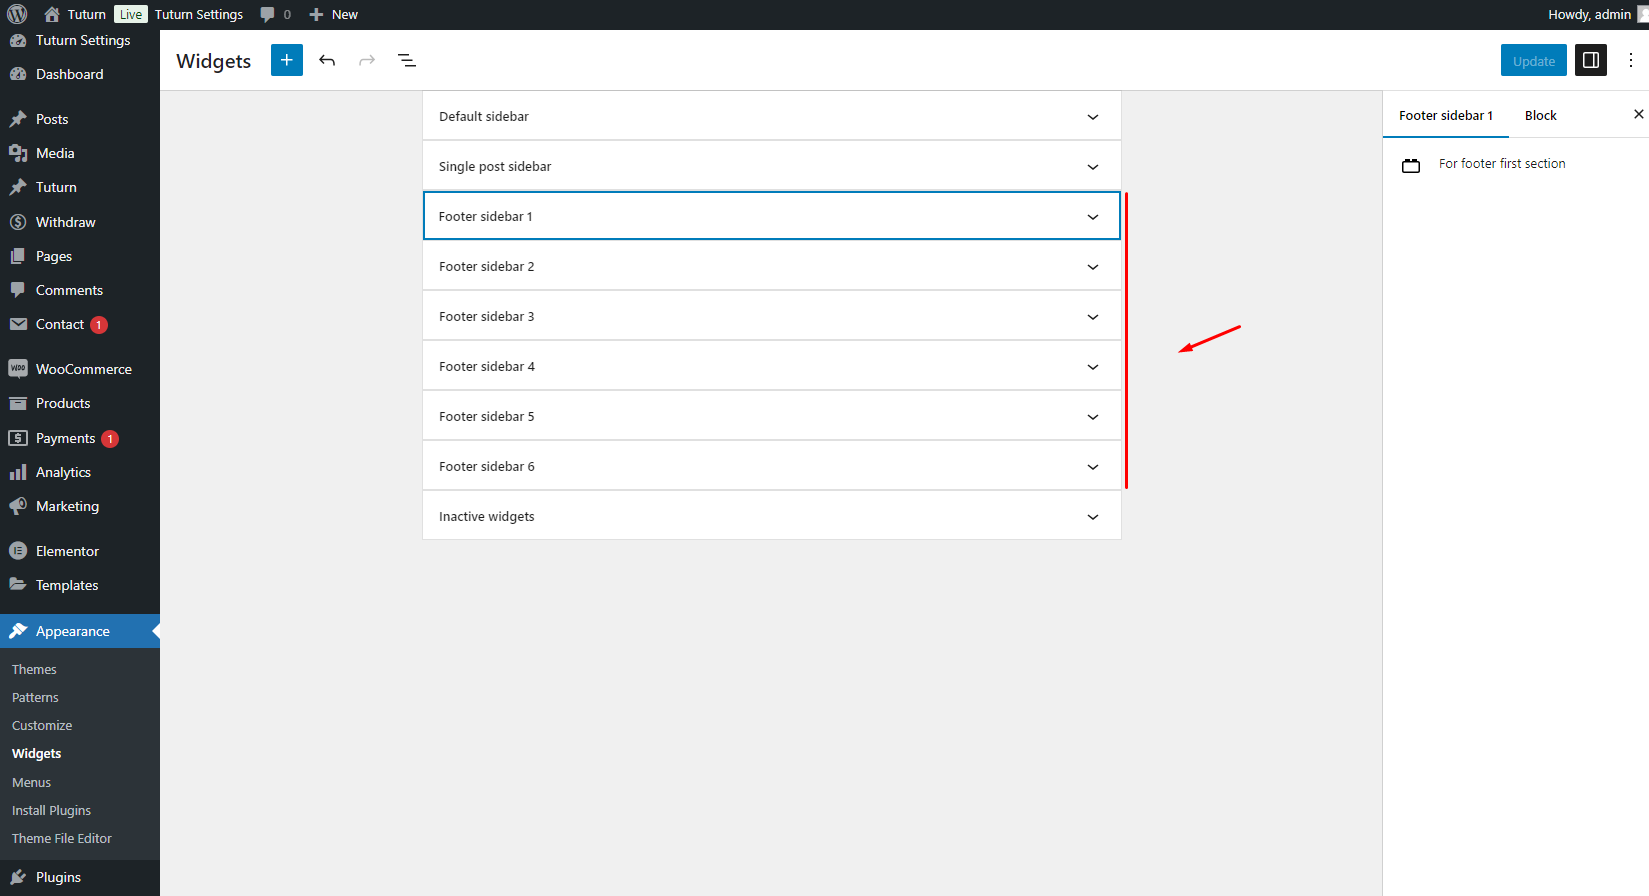
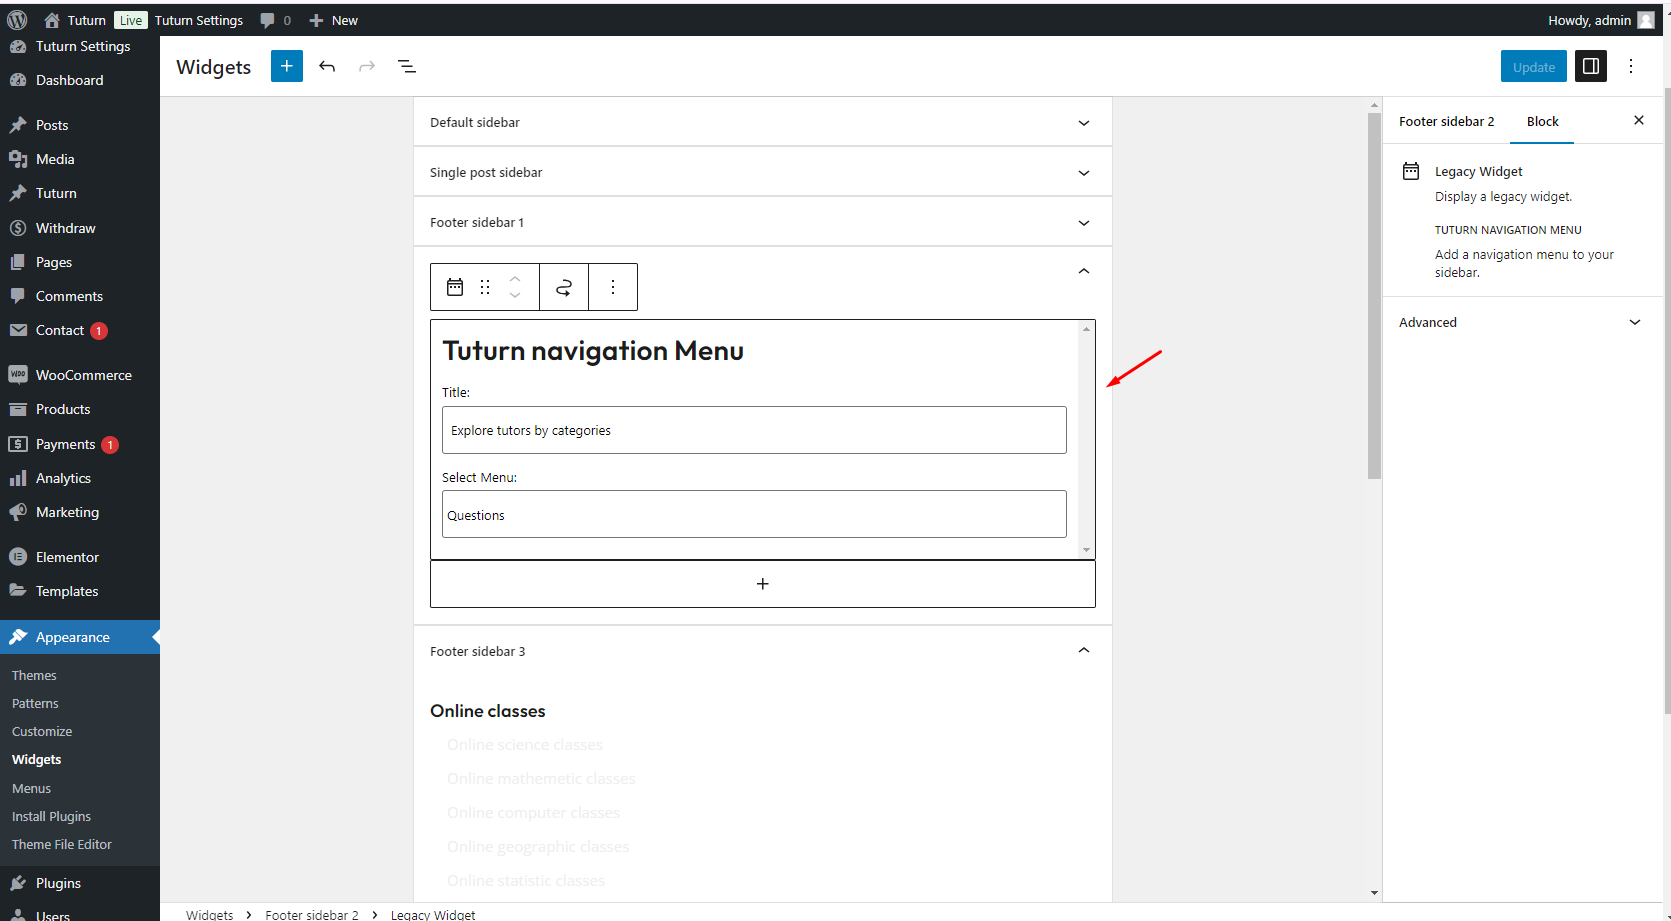
To set up the footer menu for top content, go to the WordPress administrator dashboard, then navigate to Appearance > Menus. Create a new menu, and save your changes.
Once you've created the footer menu, navigate to Appearance > Widgets, add the Tuturn Navigation Menu widget to the desired footer area, and select the appropriate menu, such as Questions.
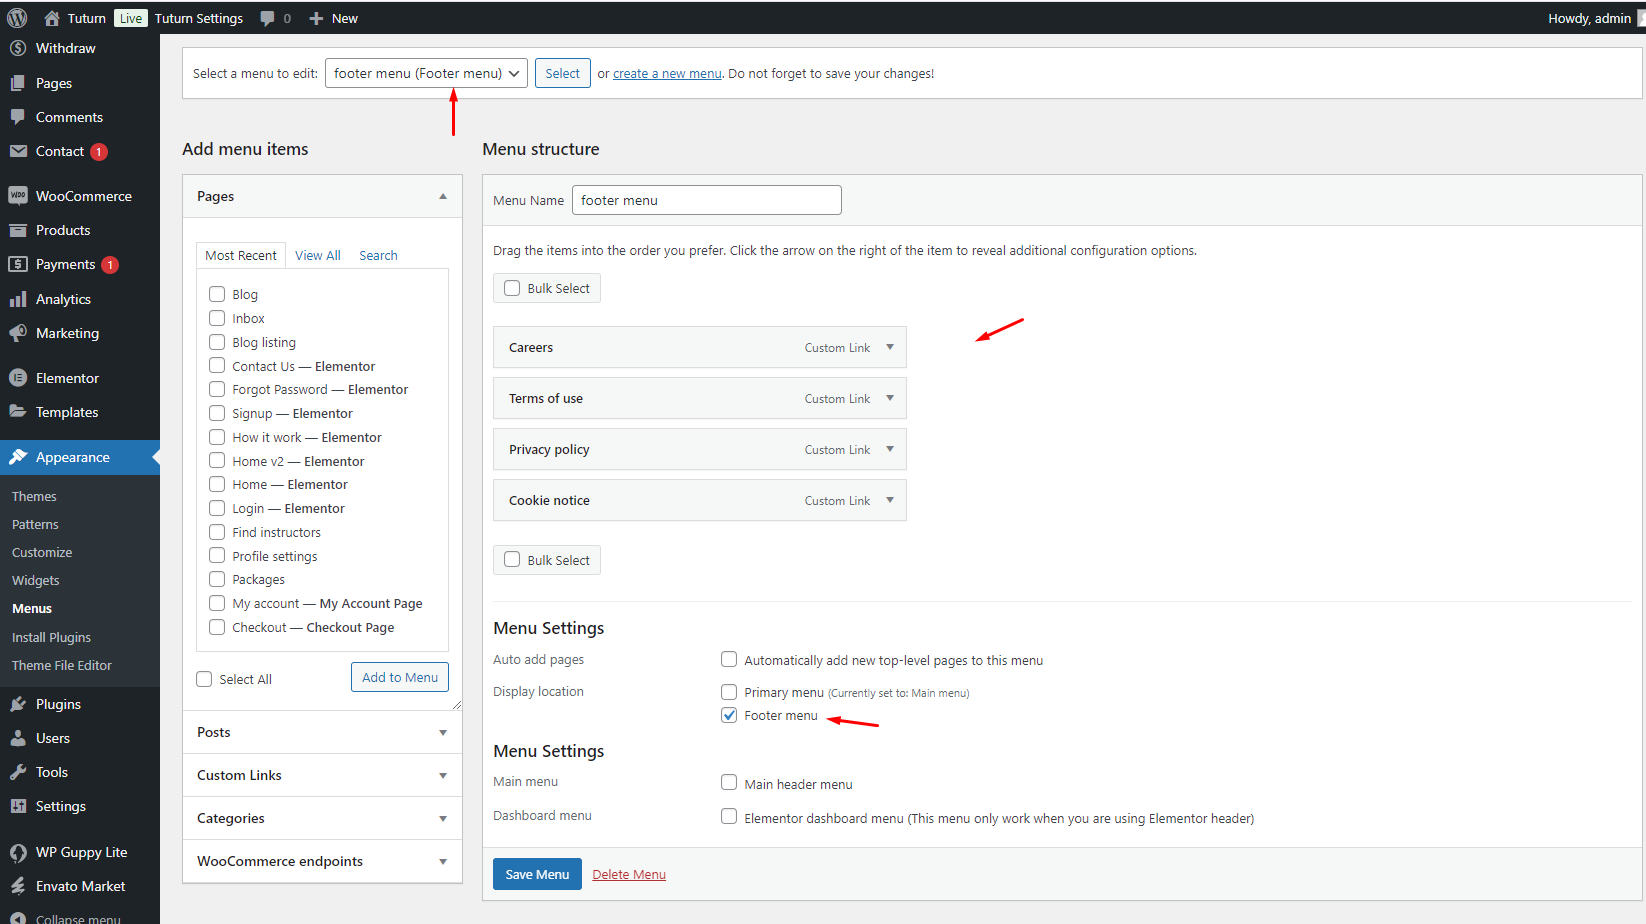
Bottom content: To set up the footer bottom content, go to the WordPress administrator dashboard, then navigate to Appearance > Menus. Create a new menu, assign its location to the footer menu, and save your changes.
Bottom content: The copyright text is sourced from the Theme settings under Footer settings.
Here is a preview of the menu with the assigned location.
Here’s a preview of the top & bottom content in the footer.
Booking Process
Instructor booking intervals
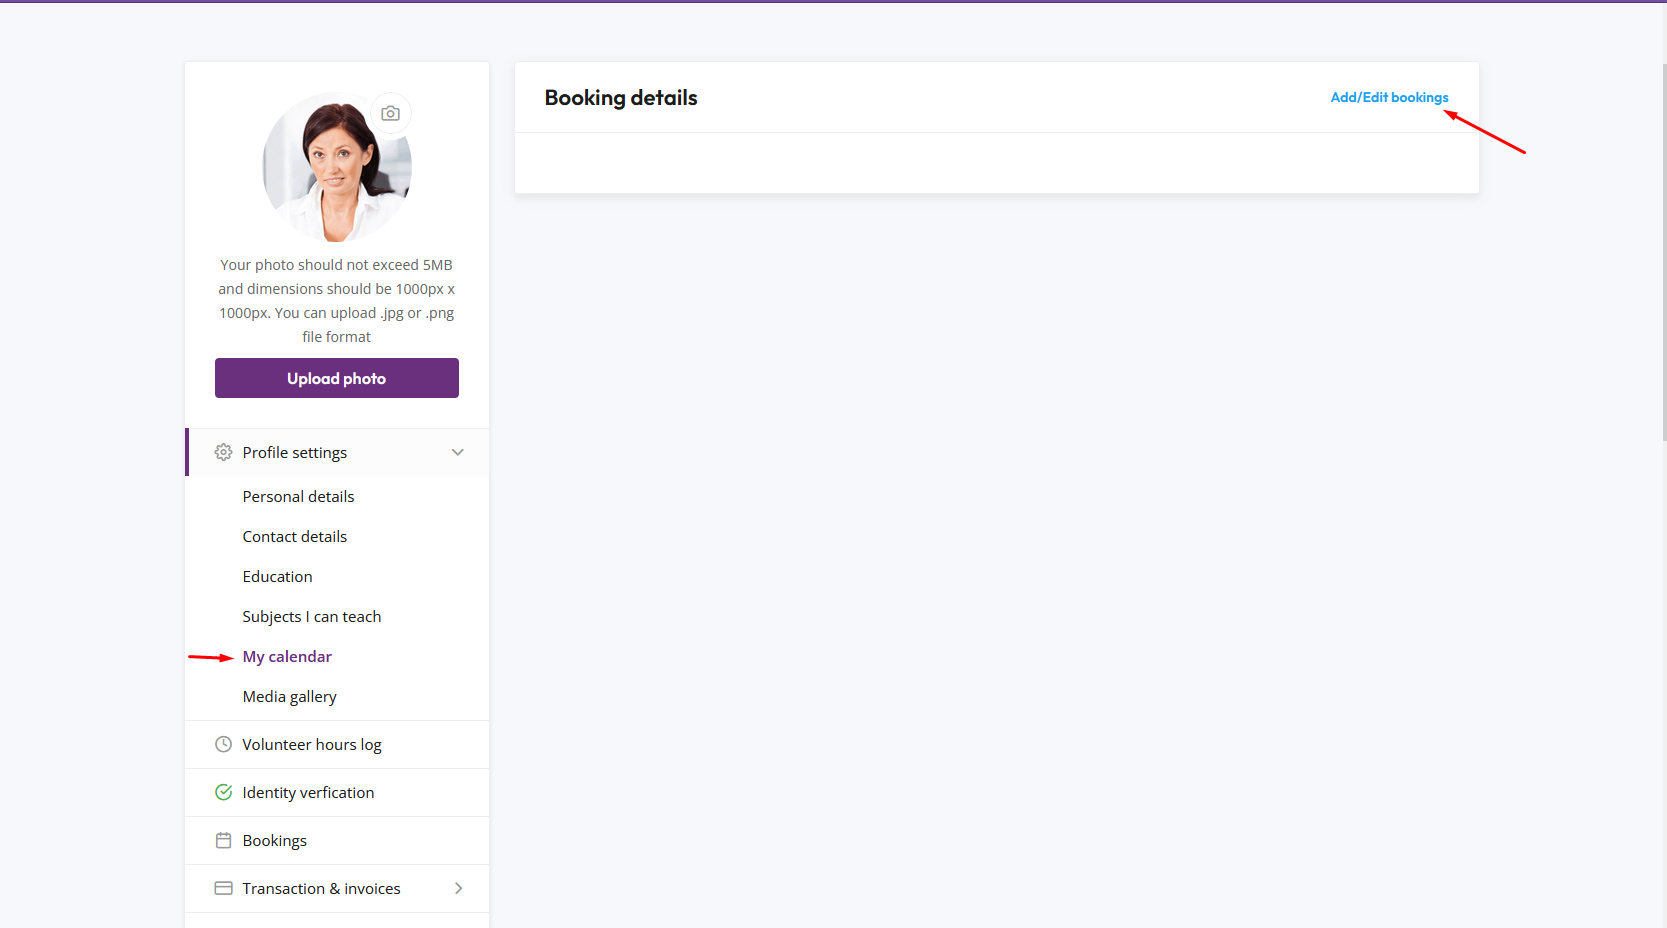
Step 1: The instructor sets their booking intervals in the dashboard by navigating to Profile Settings > My Calendar, then clicking on Add/Edit Bookings.
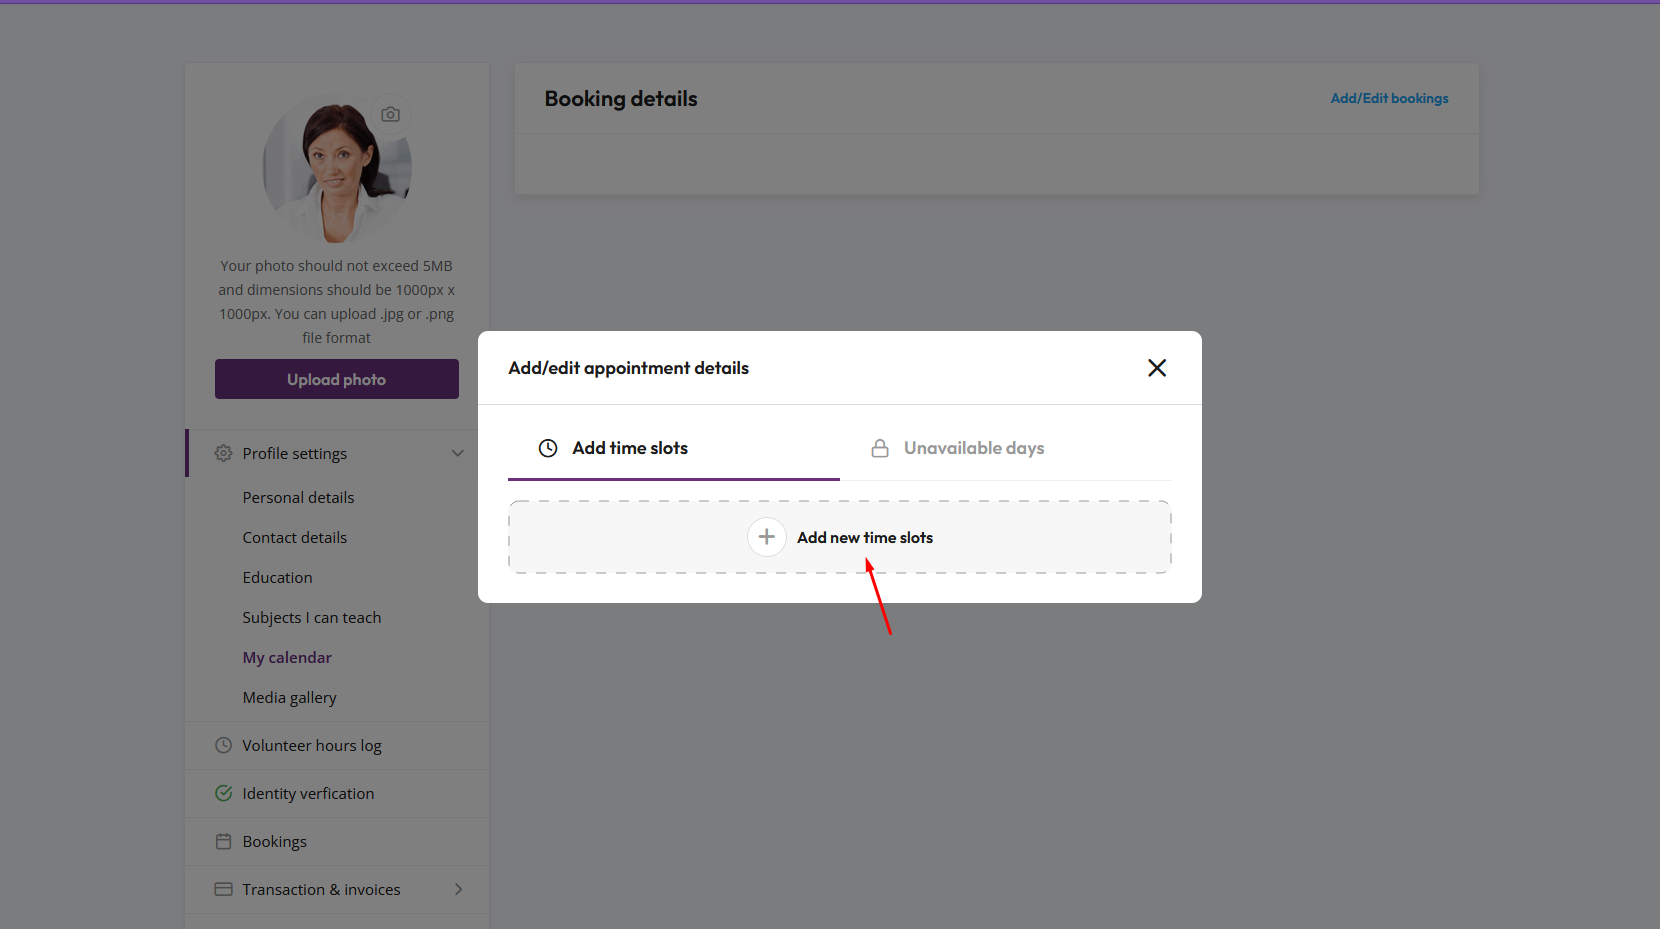
Step 2: On this screen, the instructor clicks Add New Time Slots to generate slots.
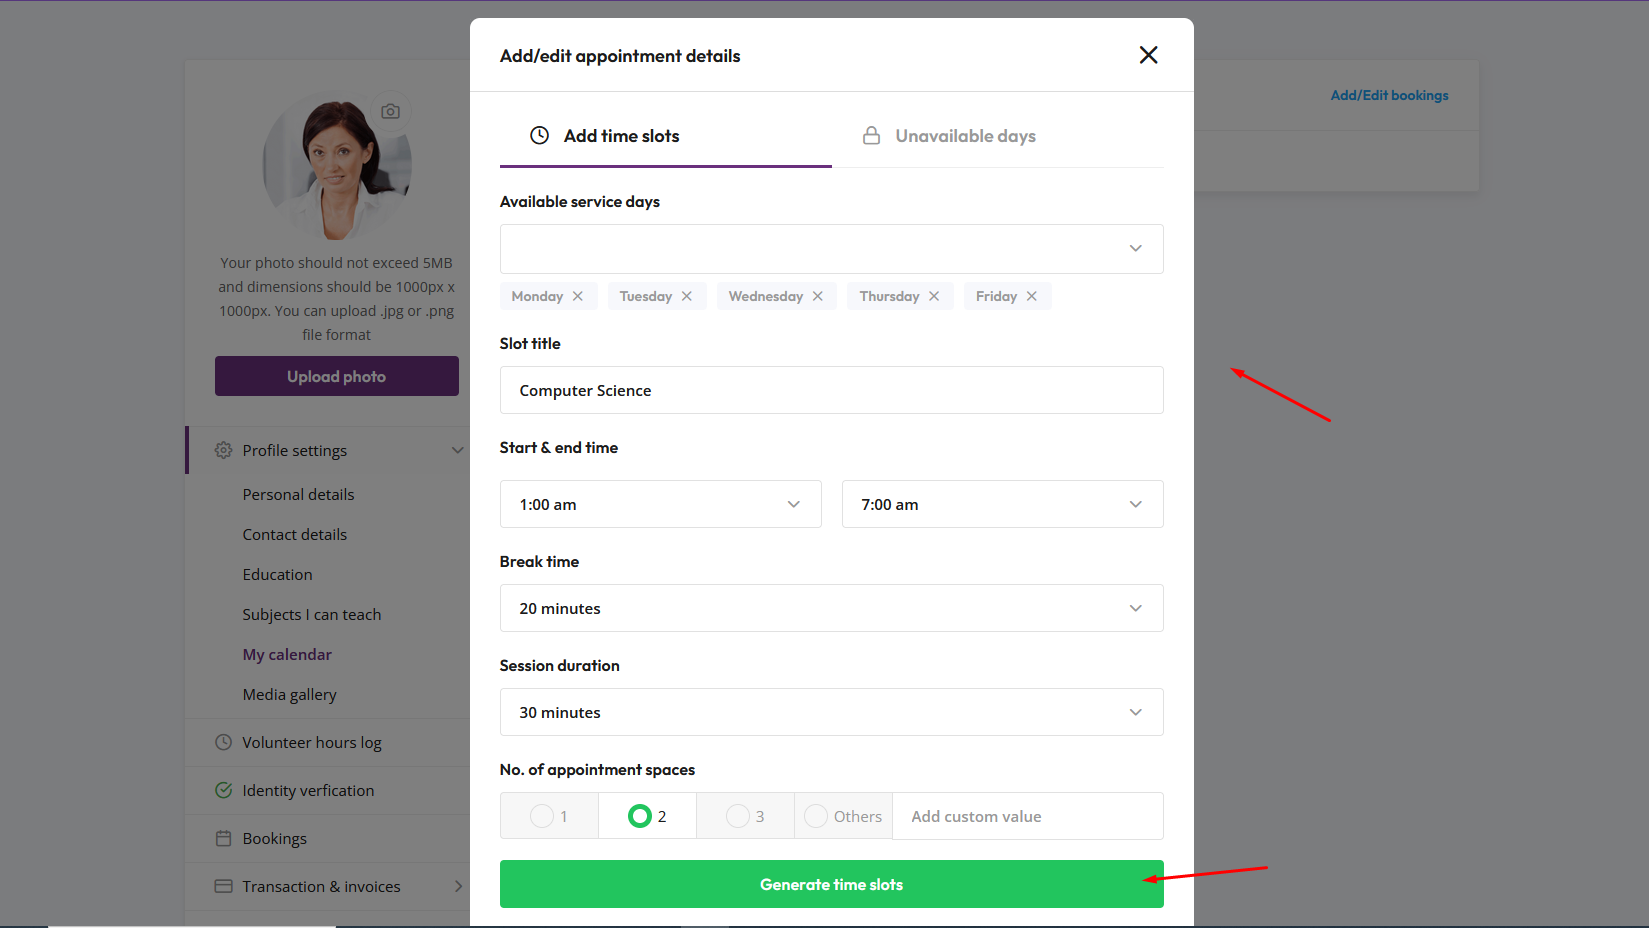
Step 3: On this screen, the instructor sets up time slots by specifying a title, start and end time, break time, session duration, and the number of available appointment spaces. The number of appointment spaces indicates how many students can join each time slot. Once done, click Generate time slots.
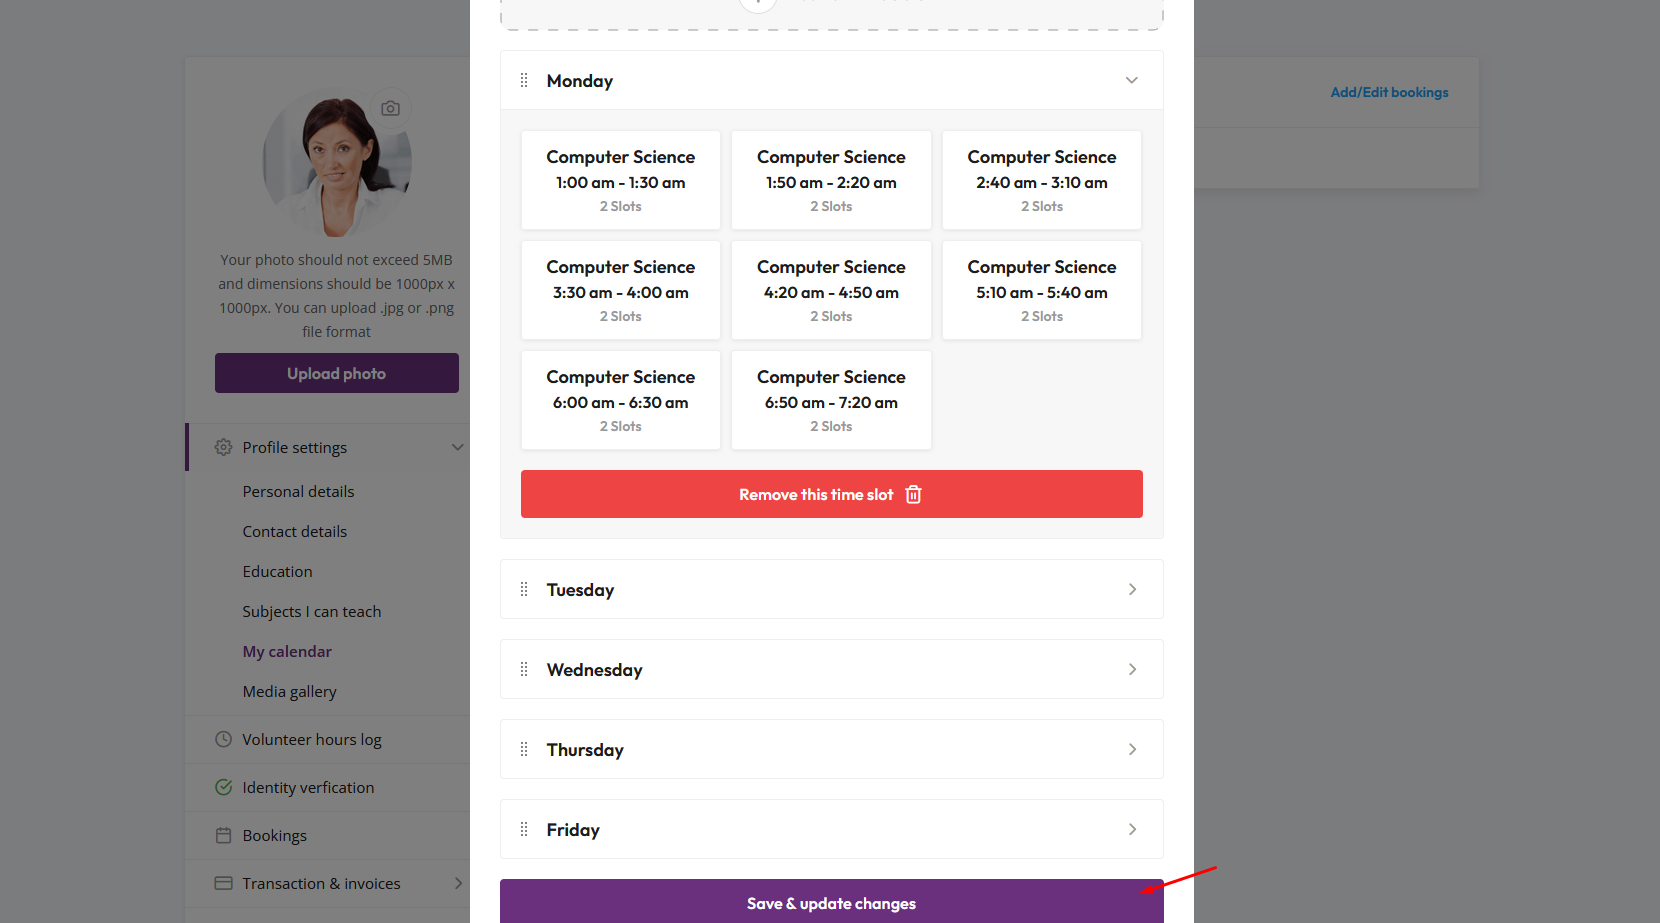
Step 4: On this screen, the instructor can view their generated slots. Once finished, click Save & Update to apply the changes.
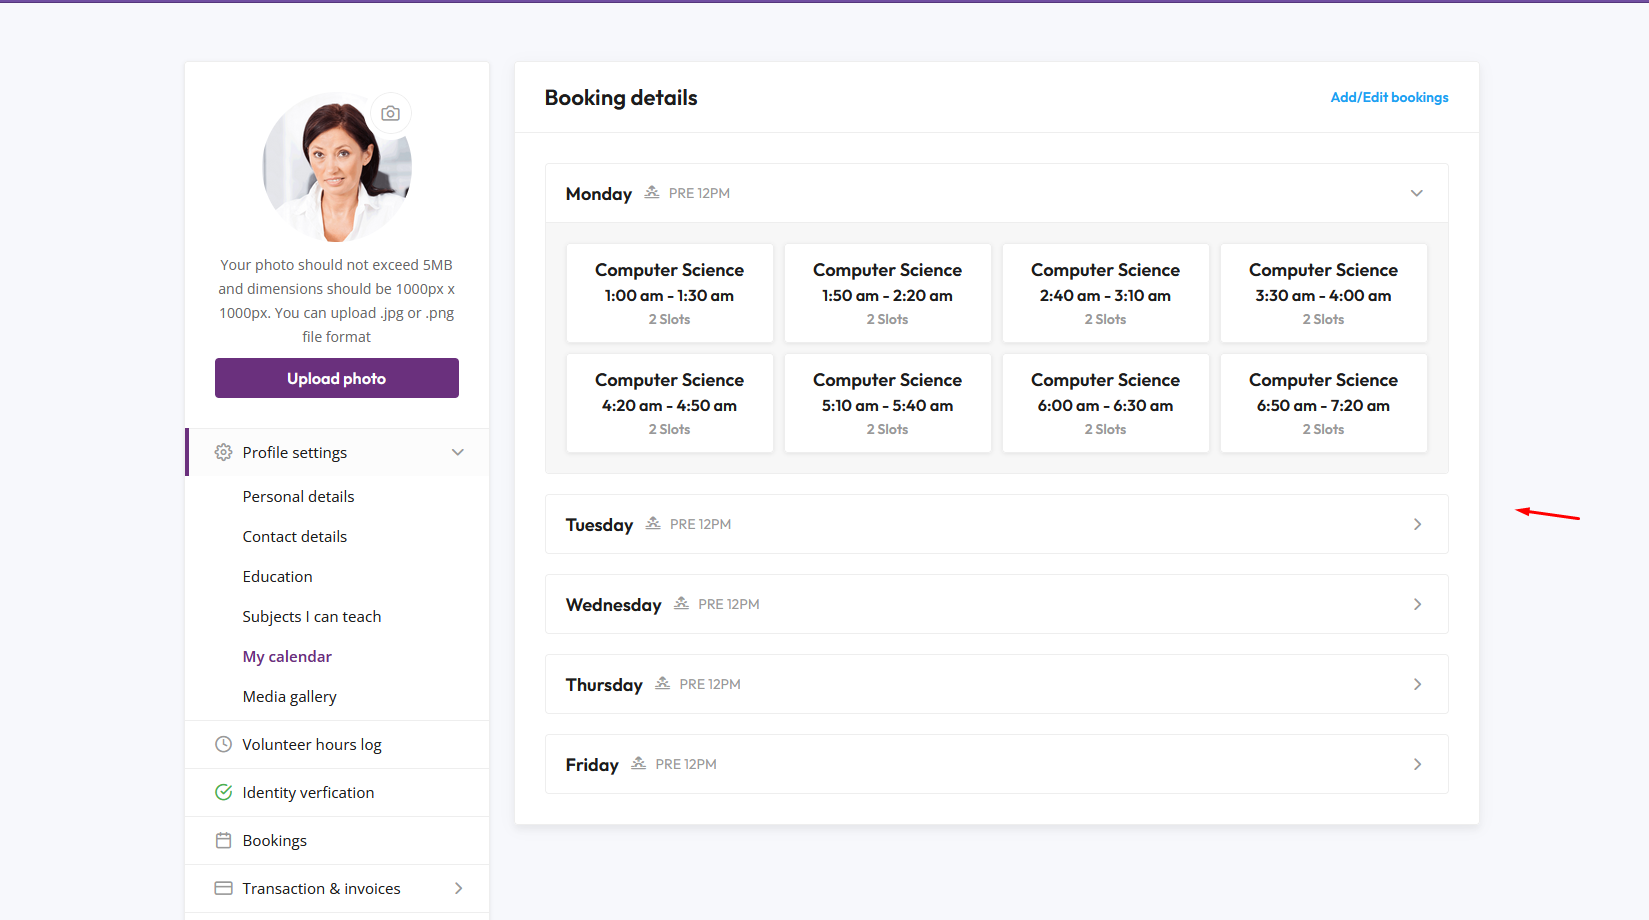
Step 5: On this screen, the booking process is completed. The Instructor can view all their available slots organized by day.
Student booking process
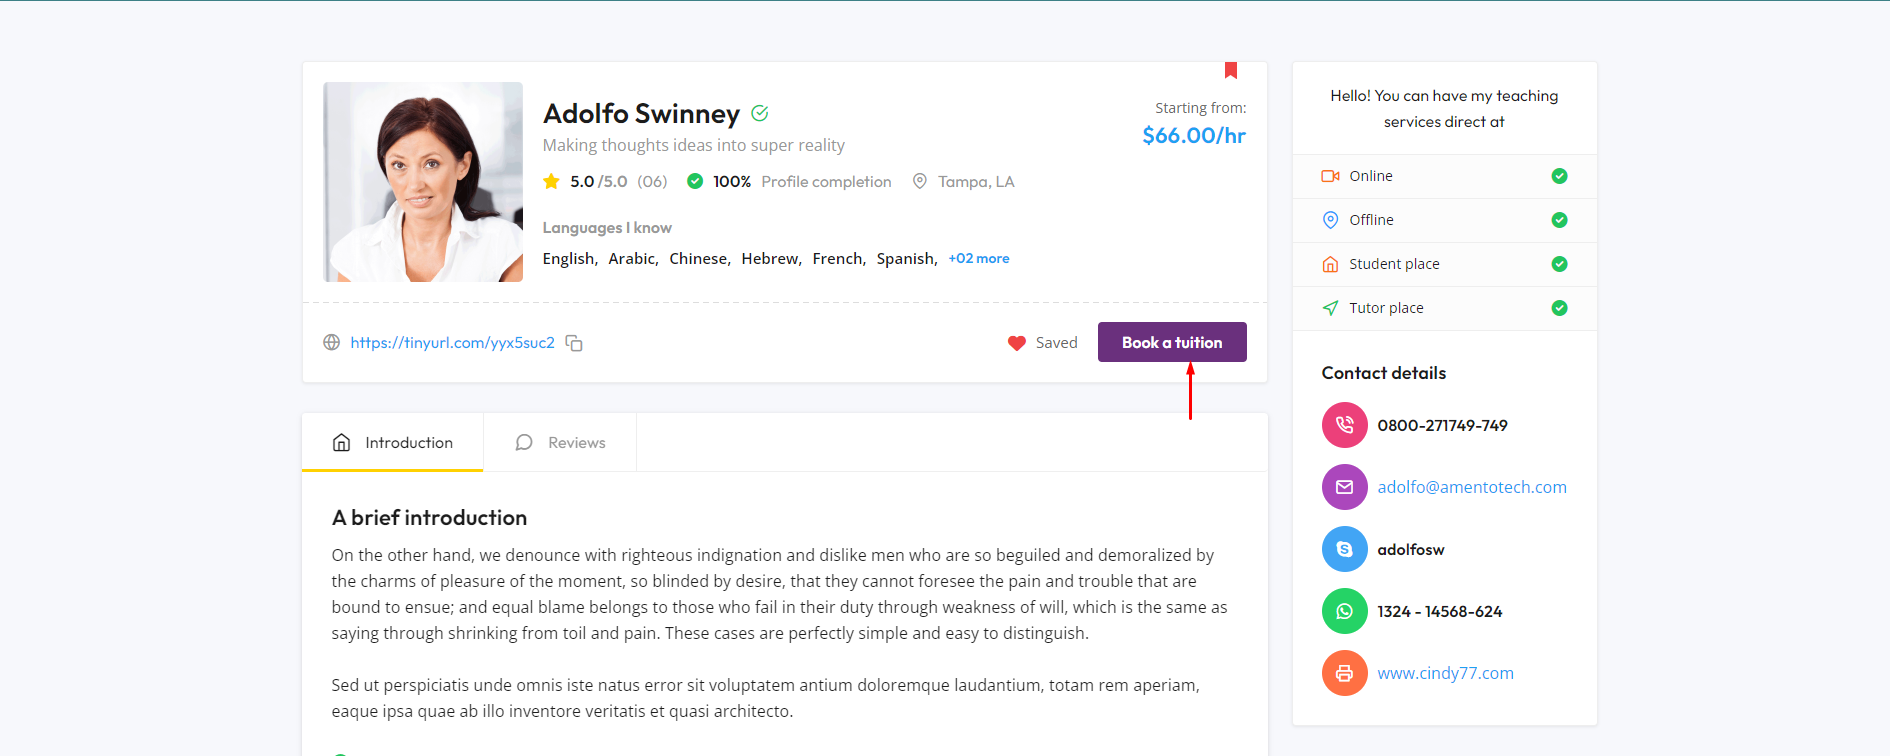
Step 1: After logging in, the student navigates to the desired instructor's profile and clicks the Book a Tuition button.
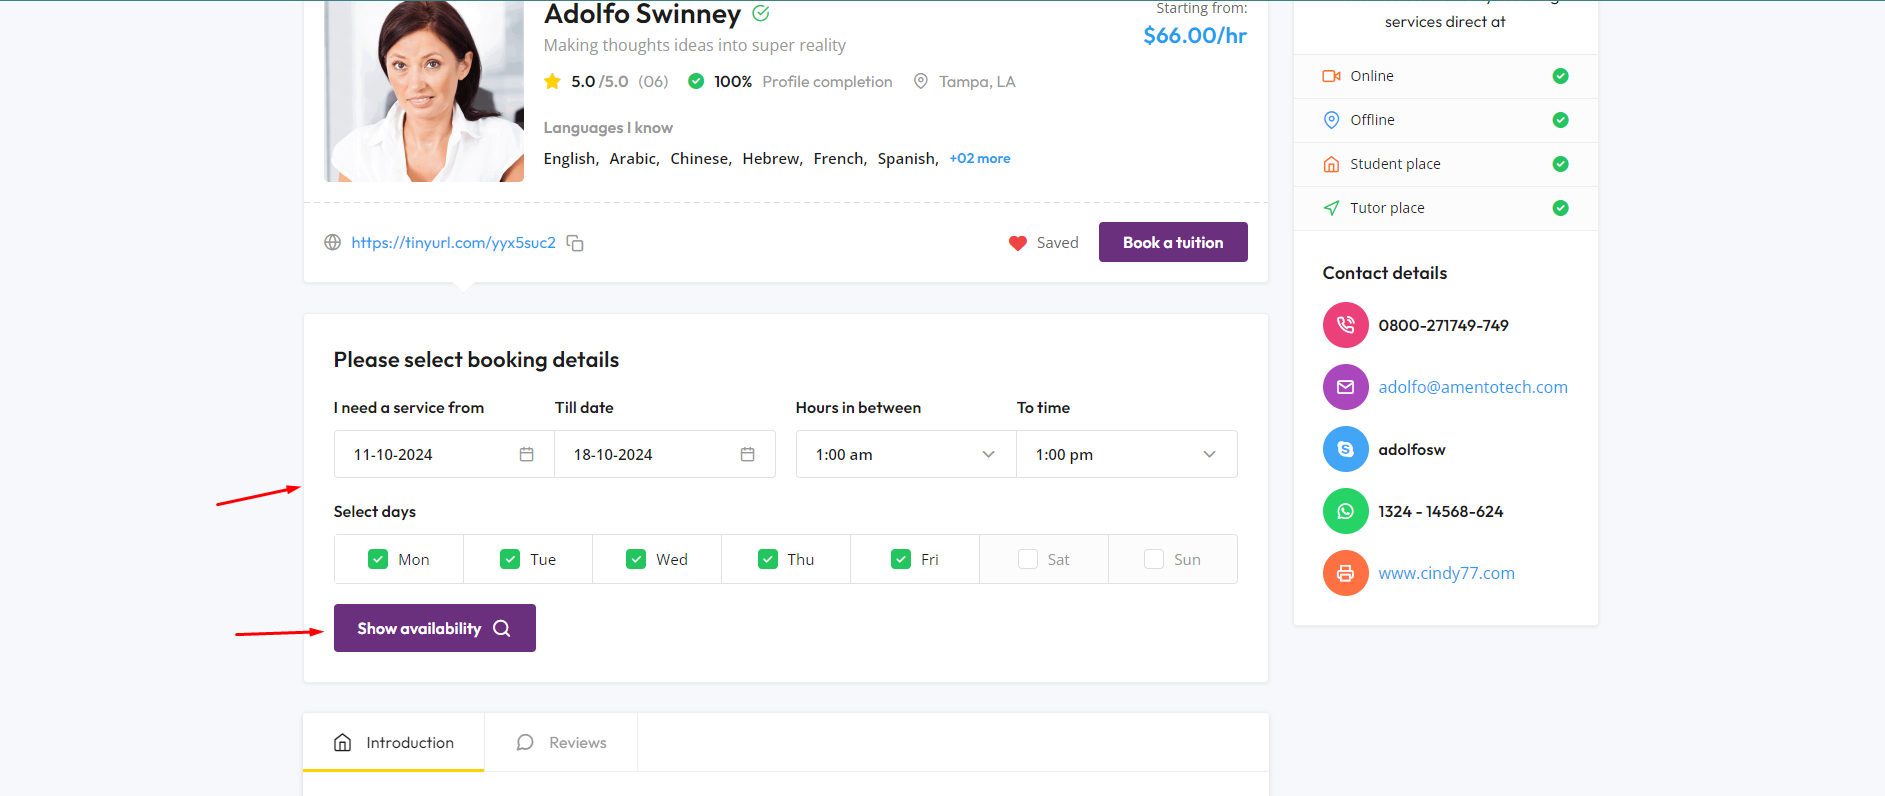
Step 2: On that screen, the student choose the required calendar dates according to their preferred time slots for booking and clicks Show availability.
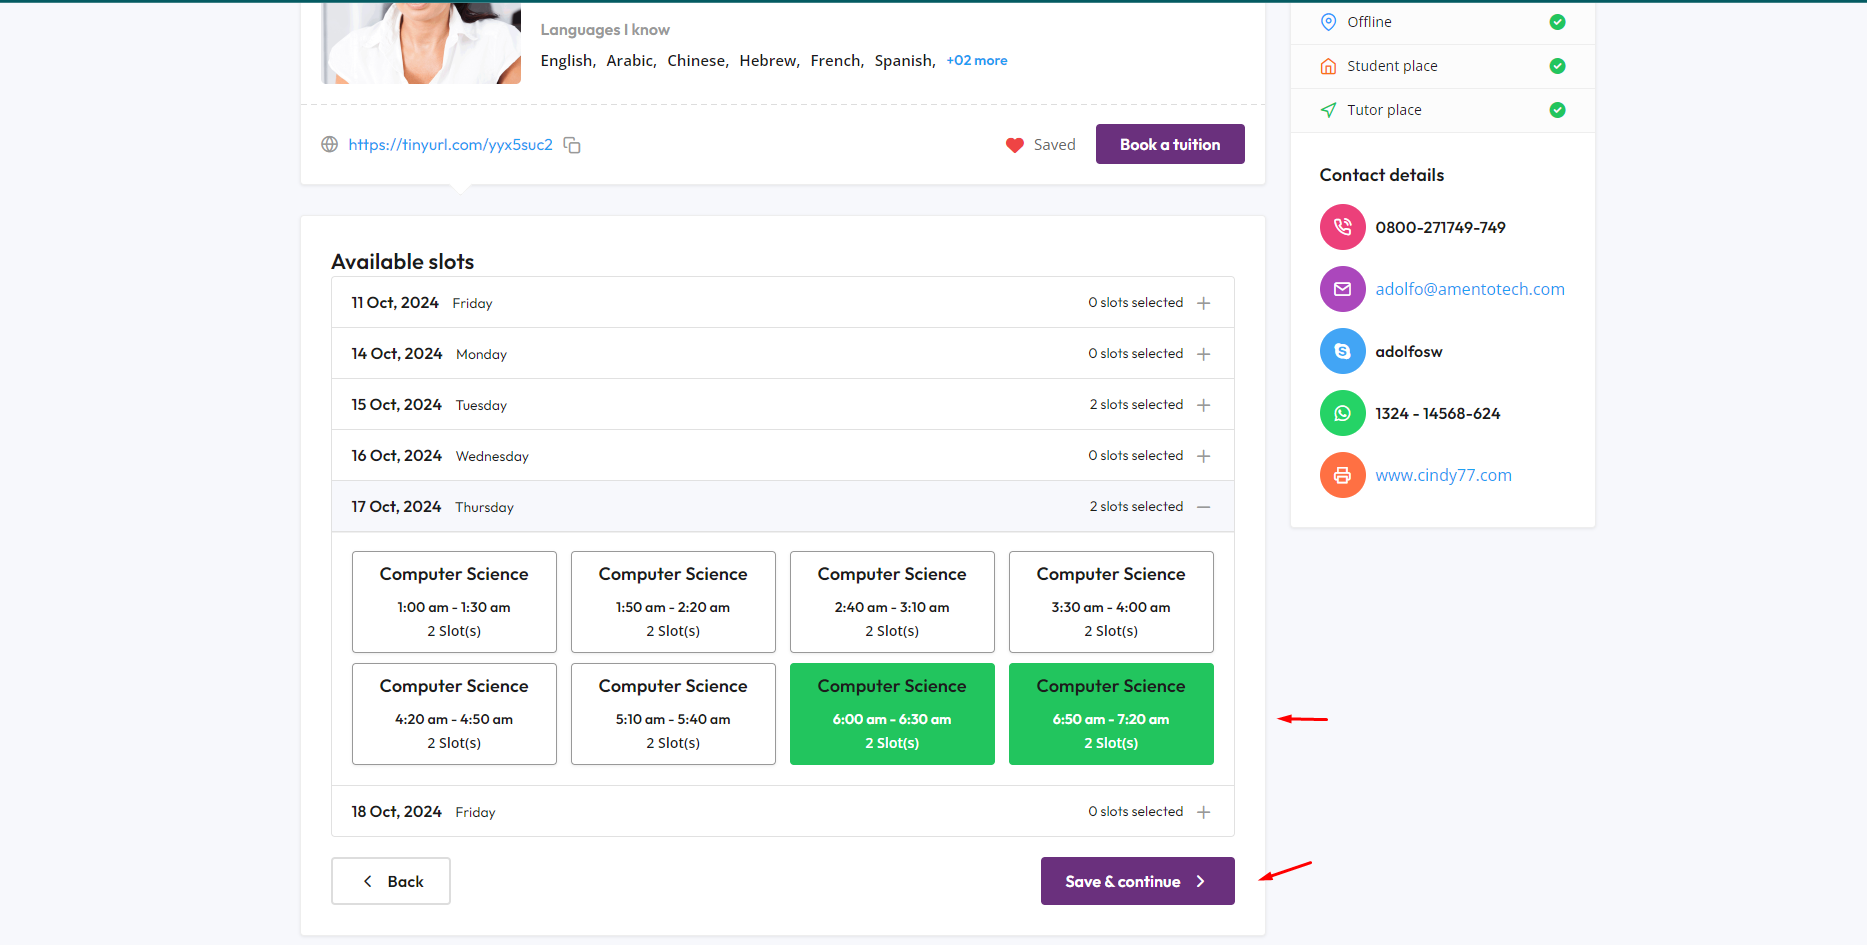
Step 3: On that screen, the student selects the desired slots based on their preference and clicks on Save & Continue.
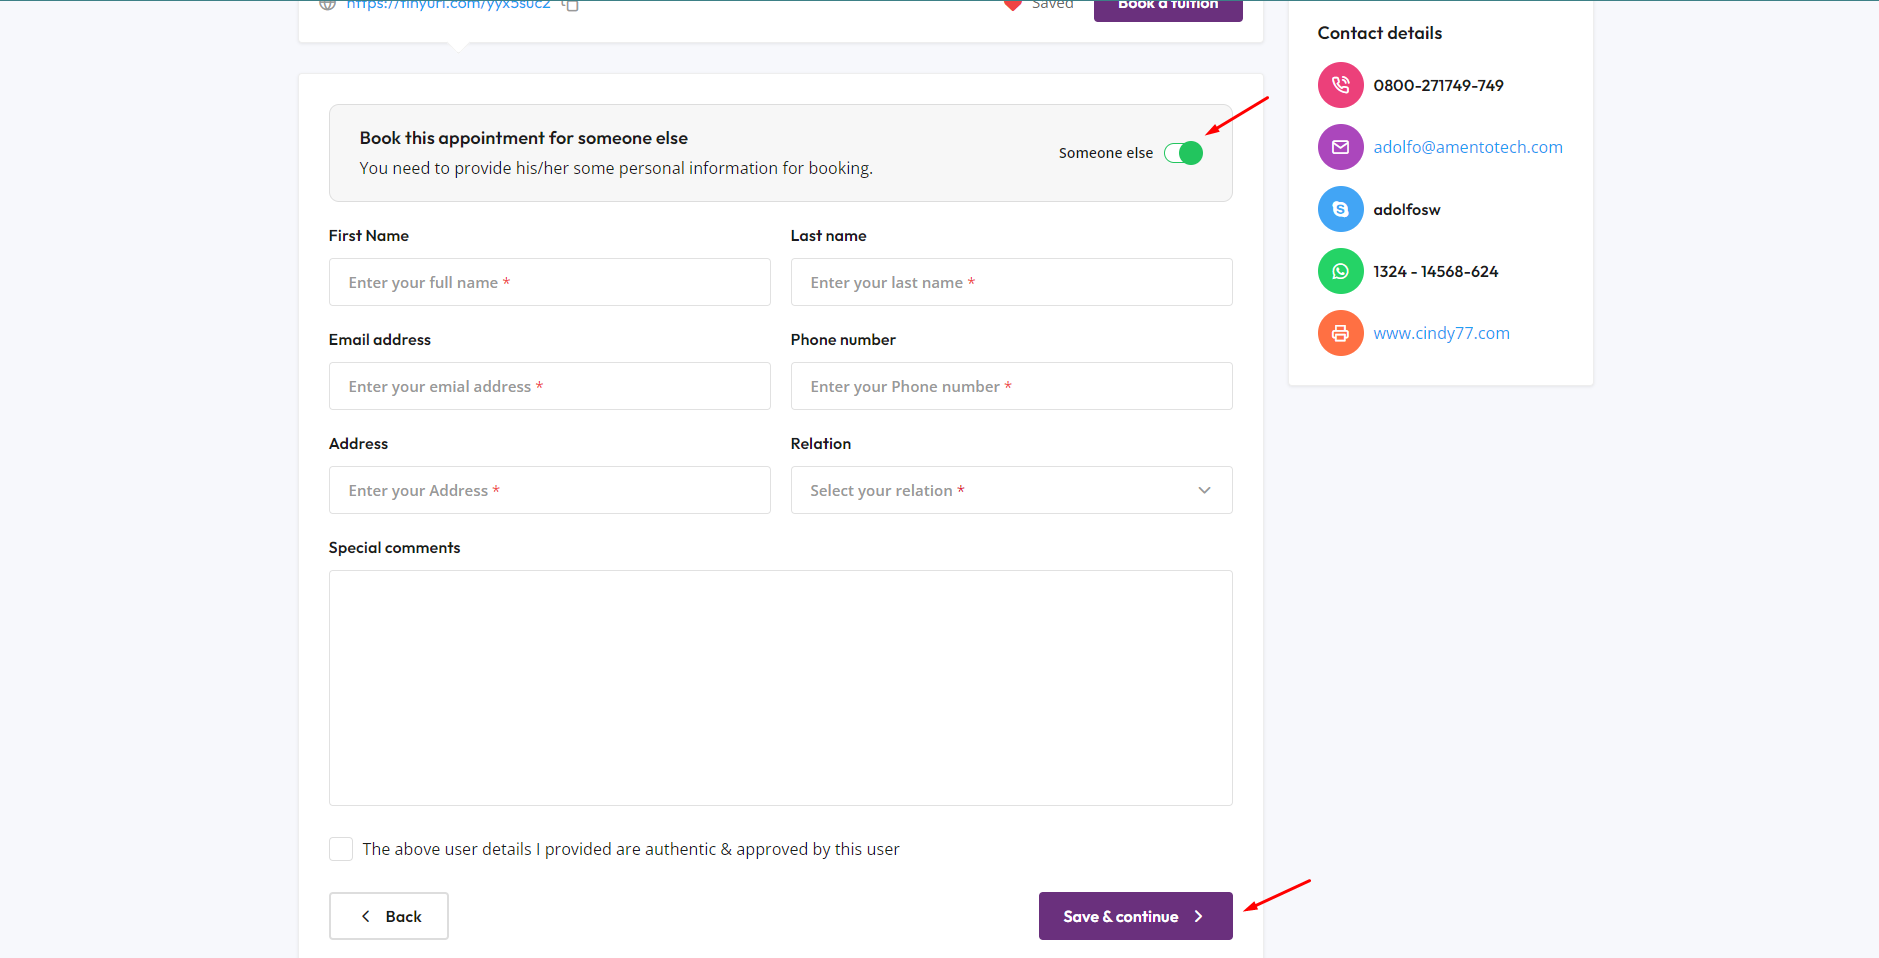
Step 4: On that screen, the student can select the someone else radio button when book an interval for another person, or leave it disabled when booking for themselves and click on Save & Continue.
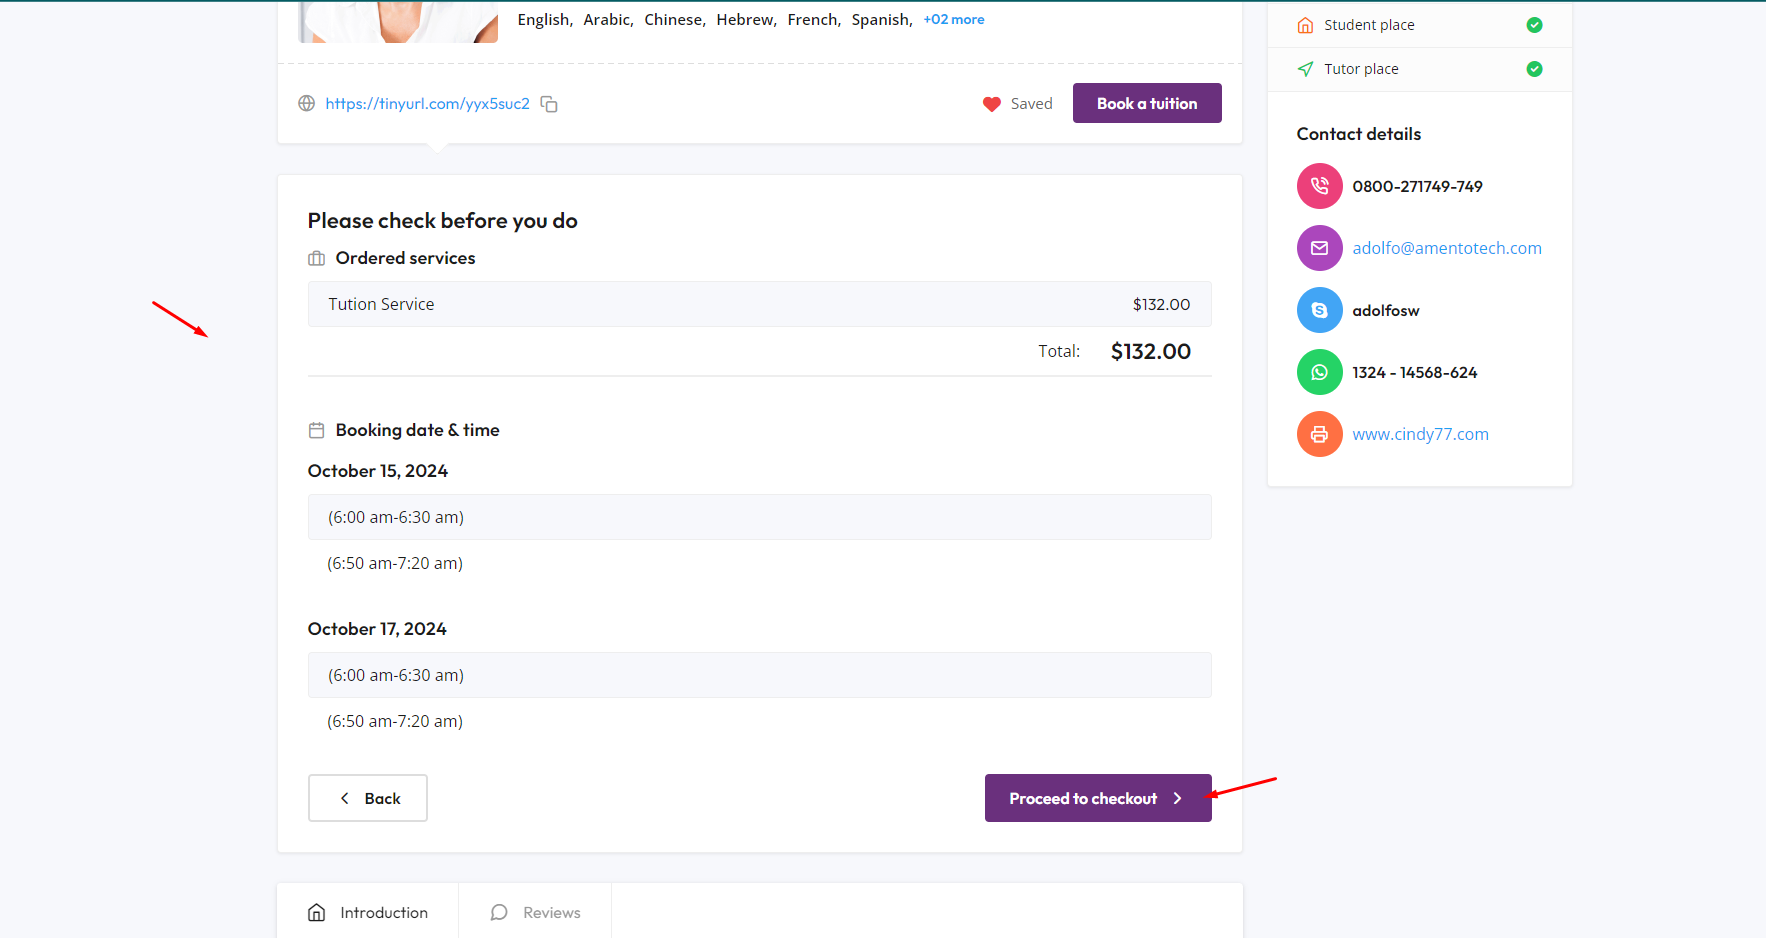
Step 5: On that screen, the student review their booking intervals and click Proceed to Checkout. After clicking, the student will be redirected to the checkout page.
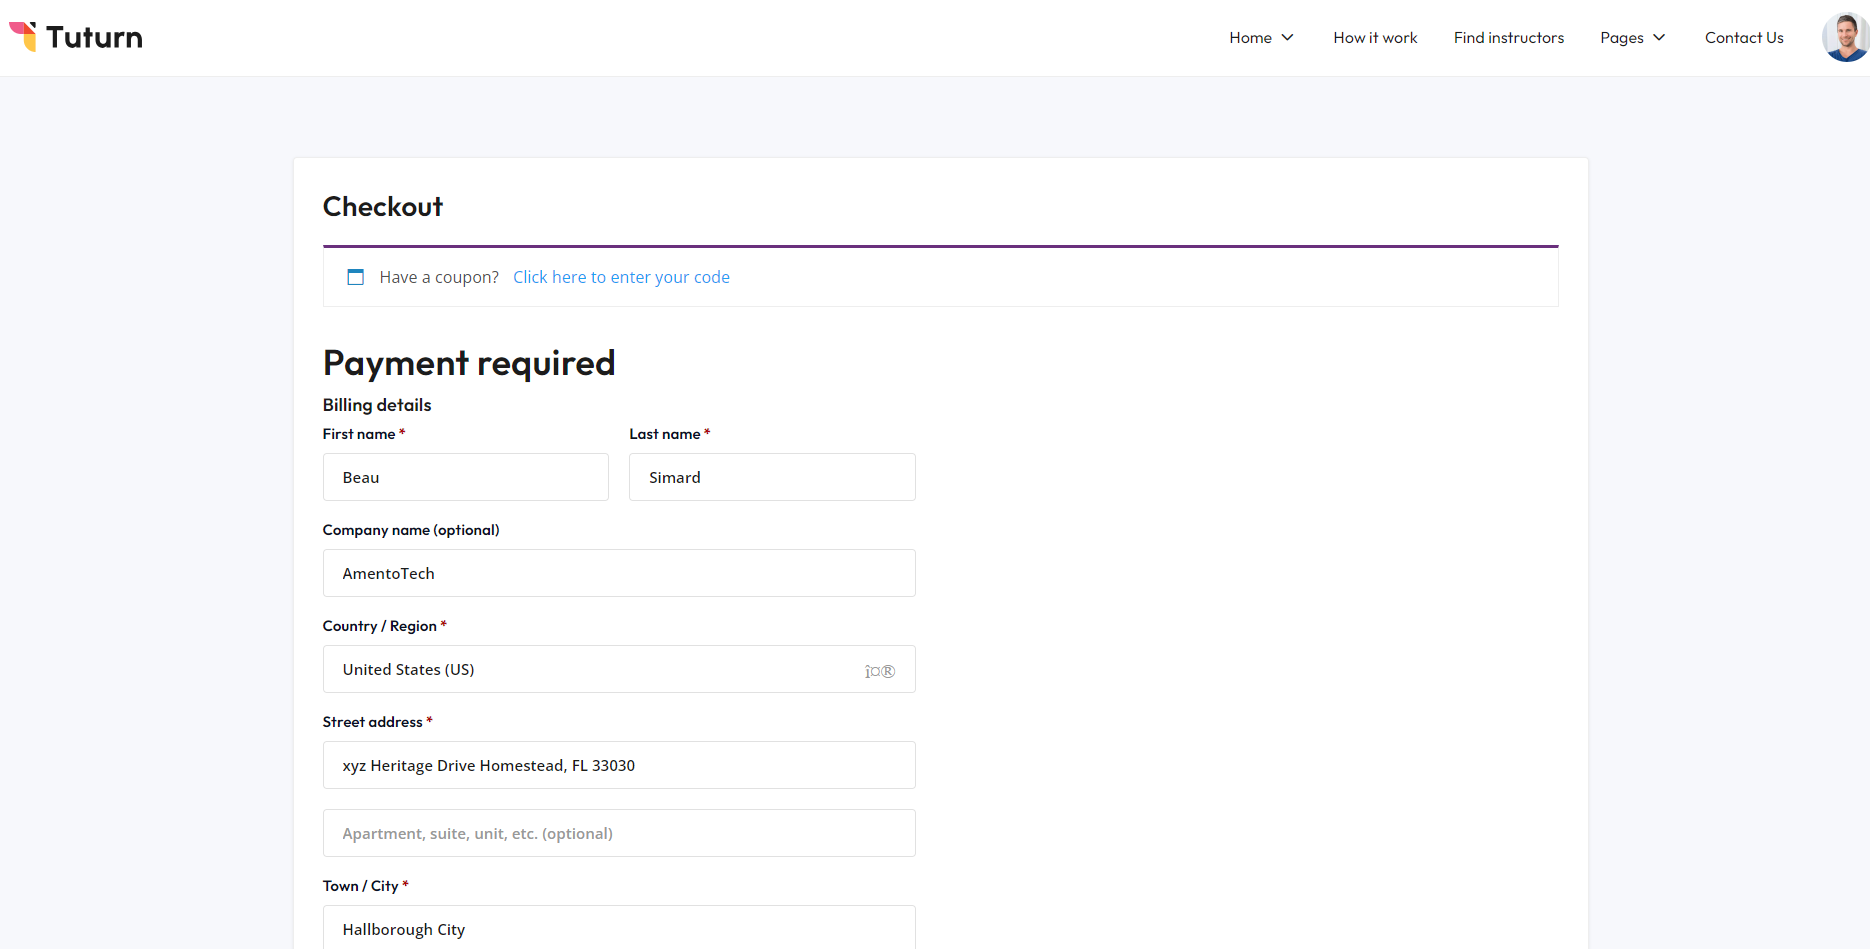
Step 6: On that screen, the student completes the booking checkout process.
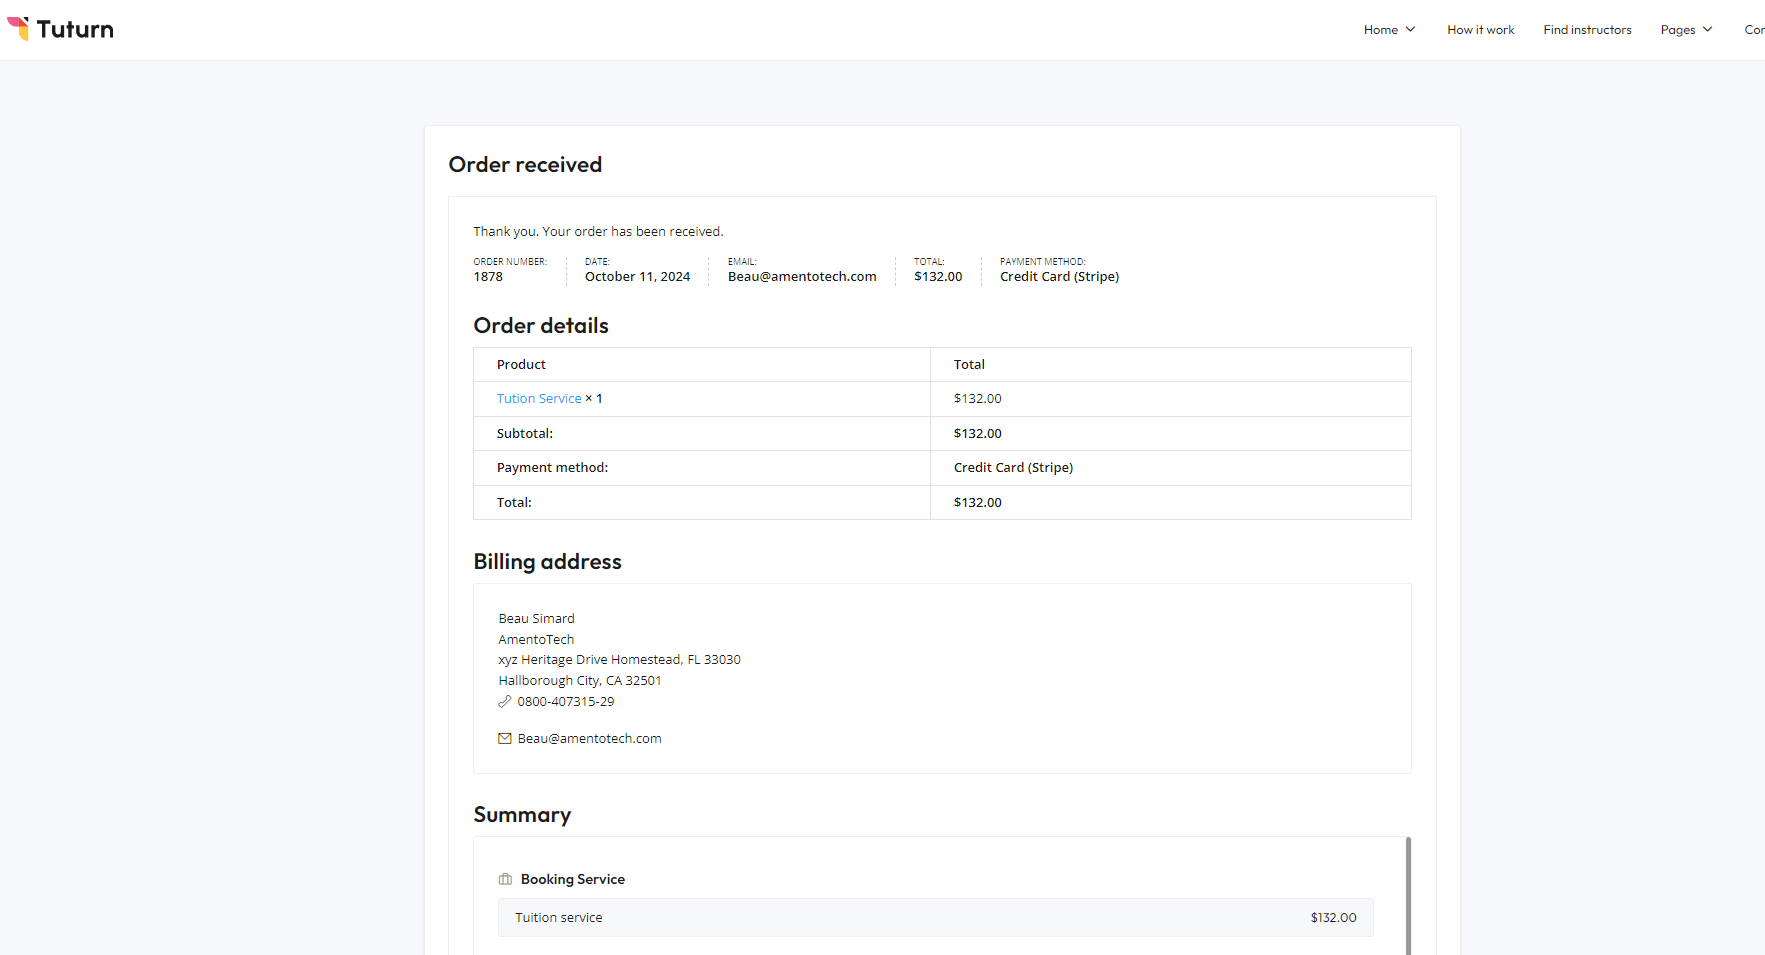
Step 7: On that screen, the student review their order summary.
Booking Lists
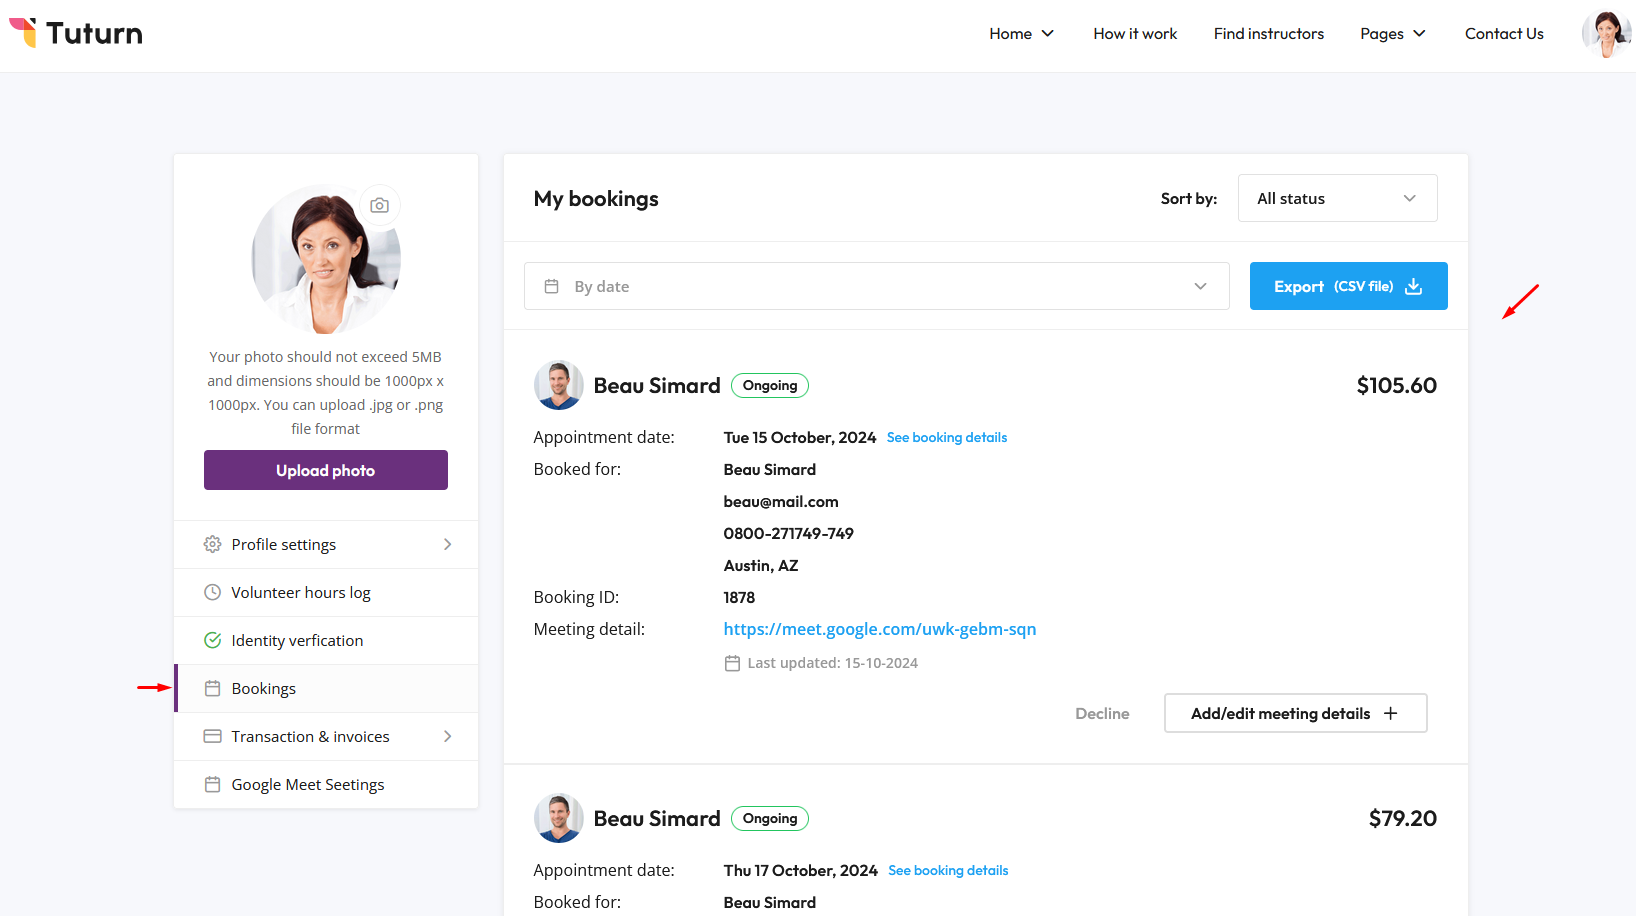
The instructors can view all their booking lists under Dashboard > Bookings.
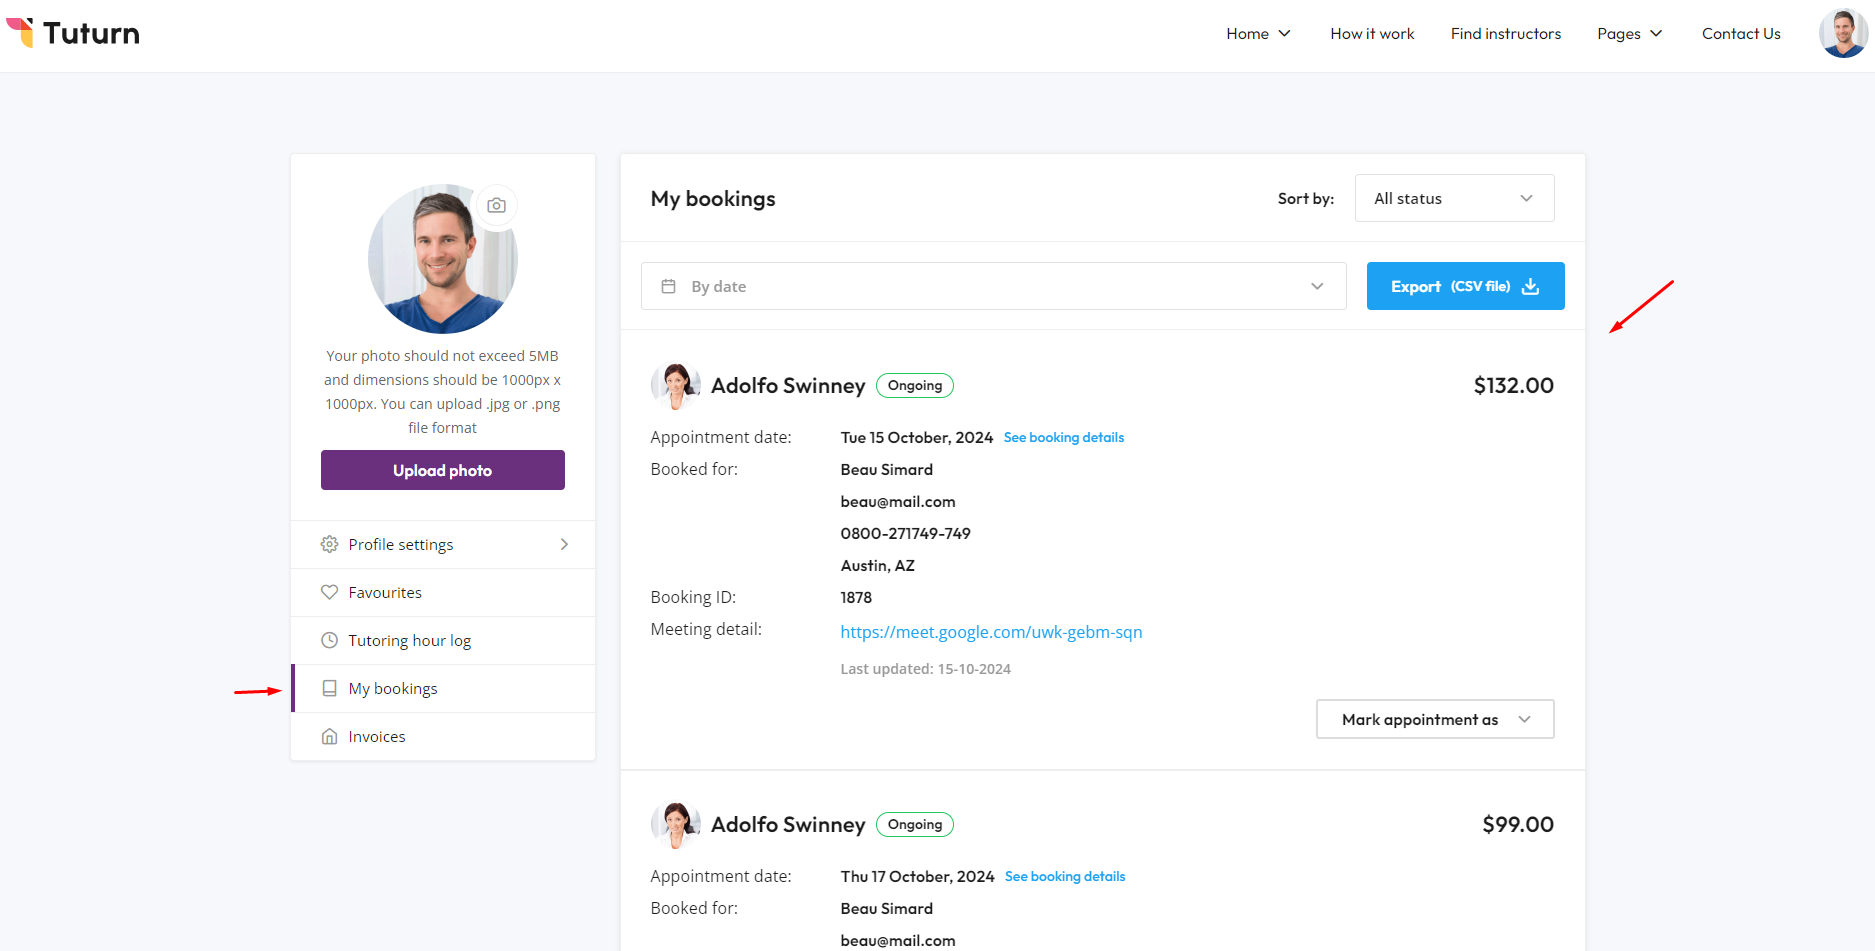
The students can view all their booking lists under Dashboard > My bookings.
Booking completion
Only the Student can complete the booking after the scheduled time.

If the Student is unable to complete the booking after the scheduled time, the booking will automatically complete after a specific time interval set by the admin in the Tuturn settings > Booking settings.
Booking cancel
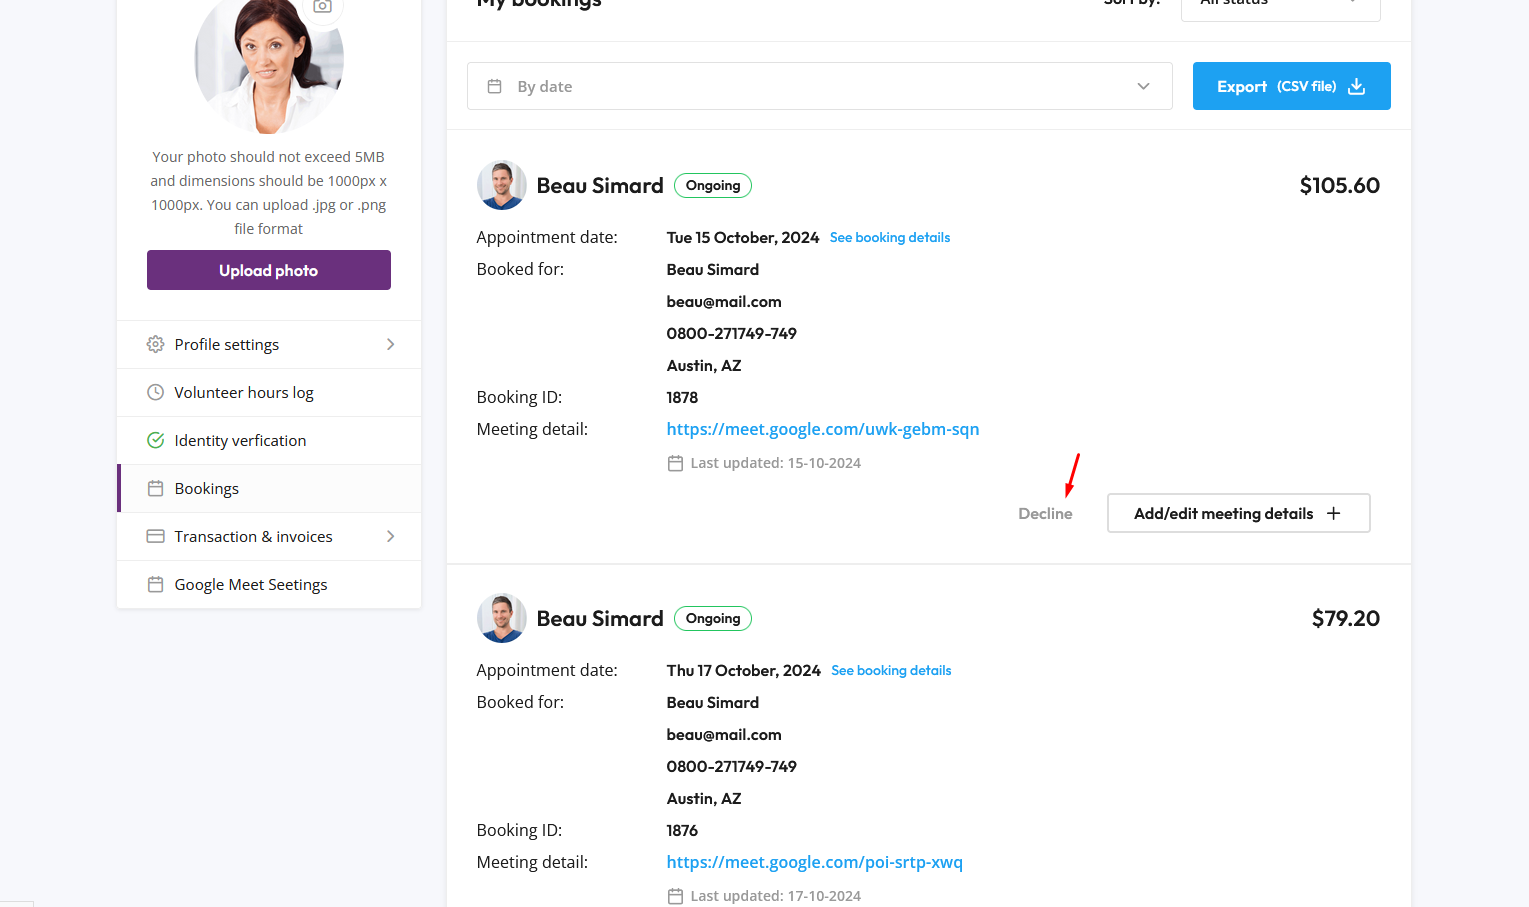
The Instructor can decline the booking before the scheduled time.
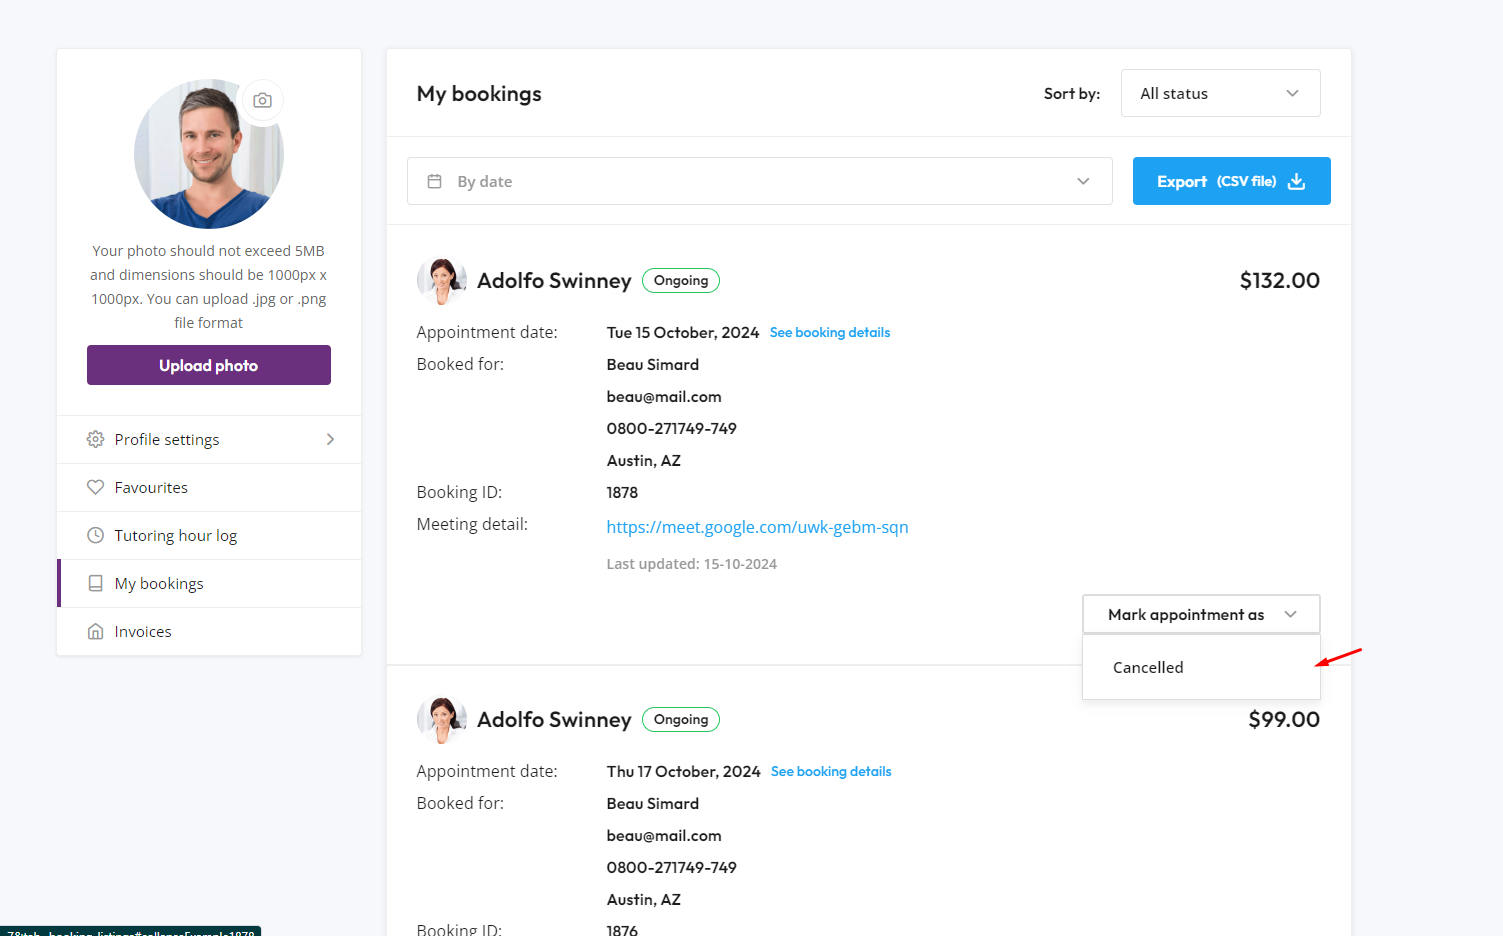
The Student can cancel the booking before the scheduled time.
Template Override
In the Tuturn theme, you have the option to override templates to customize them according to your specific requirements. To override template, follow these instructions:
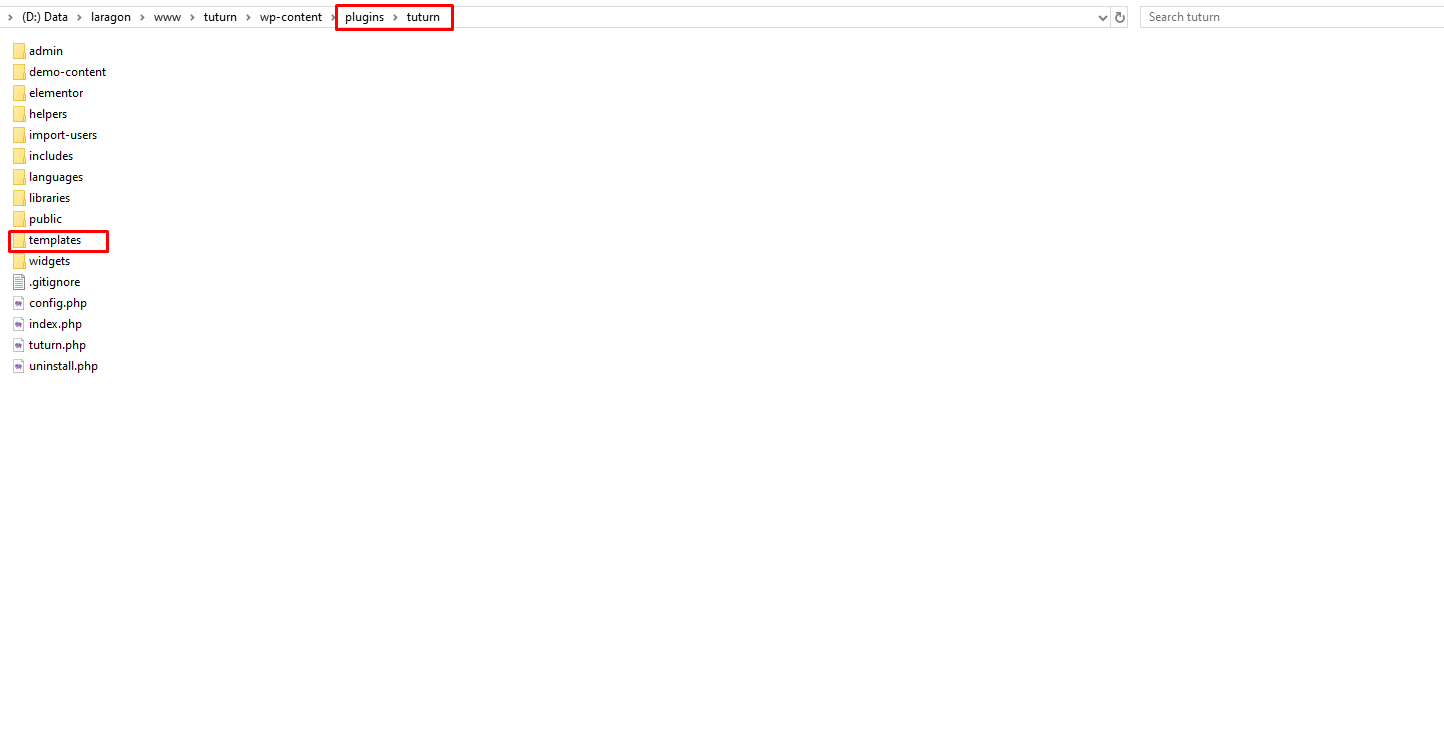
Step 1: Go to the Tuturn plugin directory, locate the templates folder, and copy the template you wish to customize.
Step 2: After copying the template, go to the active Child Theme, create a folder named extend and paste the template inside.
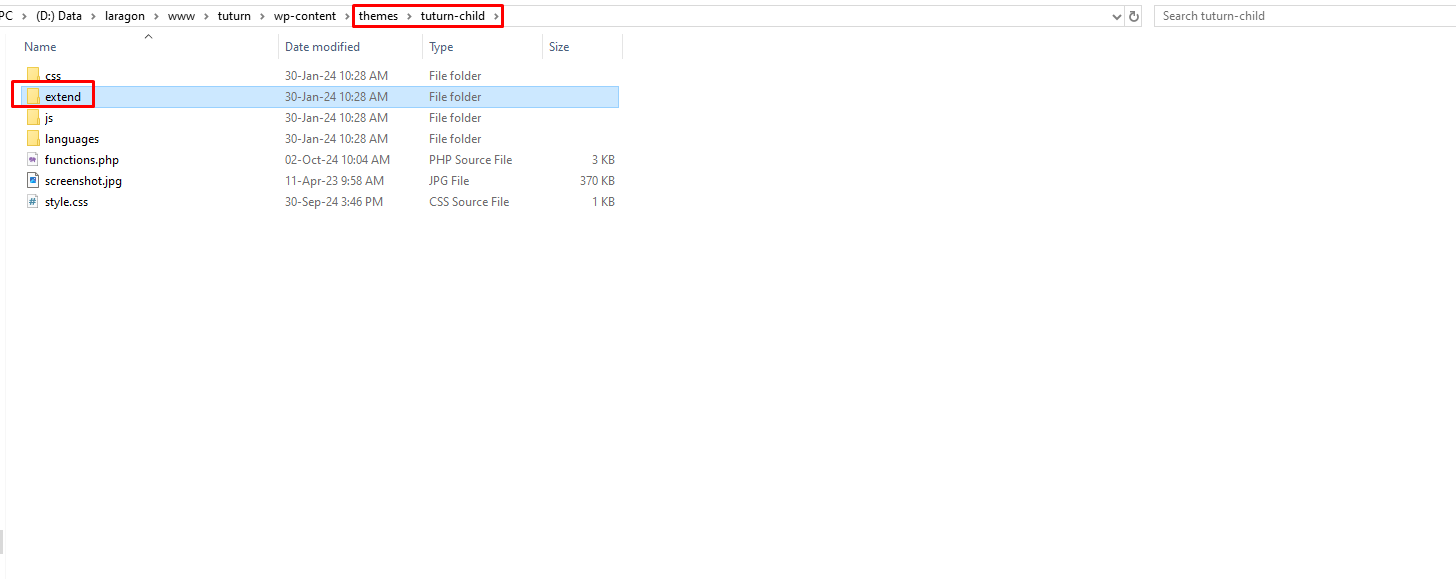
If the template file is part of a specific folder structure, ensure you follow the same structure.
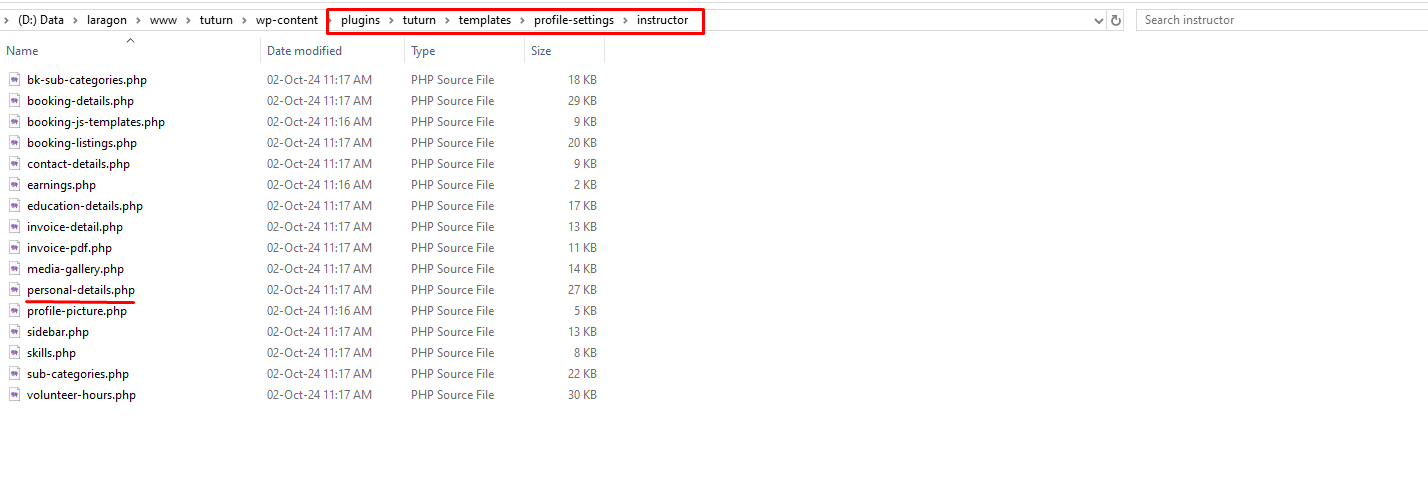
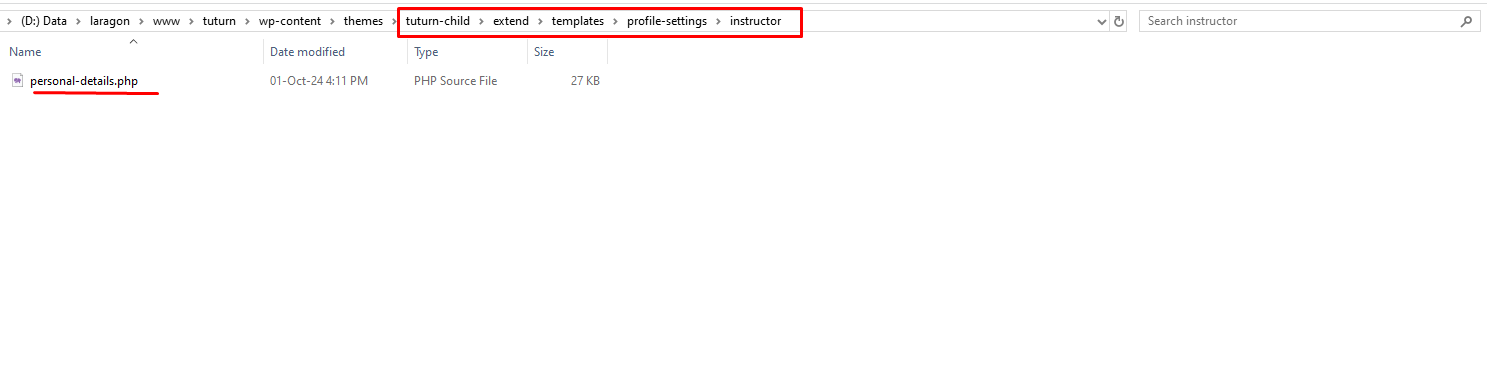
Step 3: After override the files you must have to include this code in the child theme function.php file.
Override profile & detail pages
                                    // Overwrite templates in child theme
                                    add_filter('tuturn_locate_template', 'tuturn_child_overwrite_child_files', 10, 3);
                                    function tuturn_child_overwrite_child_files($template, $template_name = '', $template_path = '')
                                    {

                                    if (!empty($template_name) && $template_name === 'profile-settings/instructor/personal-details.php') {

                                    //file path in the child theme
                                    $template = get_stylesheet_directory() . '/extend/templates/profile-settings/instructor/personal-details.php';

                                    }

                                    // for detail pages
                                    if (!empty($template_name) && $template_name === 'single-tuturn-instructor.php') {
                                    $template = get_stylesheet_directory() . '/extend/templates/single-tuturn-instructor.php';
                                    }

                                    return $template;
                                    }
Override Search pages
                                    // Overwrite search pages
                                    add_filter( 'template_include', 'pluginname_load_template', 99 );
                                    function pluginname_load_template( $template ) {

                                        global $post;
                                        $custom_template_slug   = 'templates/search-instructors.php';
                                        $page_template_slug     = get_page_template_slug( $post->ID );

                                        if( $page_template_slug == $custom_template_slug ){
                                            $template = get_stylesheet_directory() . '/extend/templates/search-instructors.php';;
                                        }

                                        return $template;
                                    }
Support
If you have any questions that are beyond the scope of this help file, Please feel free contact us at Item Support Page.
We answer all questions within 12-24 hours in weekdays. In some rare cases the waiting time can be to 48 hours. (except holiday seasons which might take longer).
Don’t forget to Rate us
Go to your Themeforest Profile > Downloads Tab > & then You can Rate & Review for our template.
Thank You.
Change Logs
Explore the latest updates, new features, fixes, and enhancements. For a detailed overview, visit the changelog by clicking here.